

Spotlights can operate on 220 V or 12 V voltage. Regardless of the voltage, they are connected in parallel (in a loop or individual wires) or in series (garland). The difference is that the power supply for 12 V spots is supplied through a step-down transformer. It converts the mains 220 volts into the necessary 12. Let’s talk more about how to connect spotlights to one- and two-key switches in detail.
文章内容
Connection schemes for 220 V
Some spotlights operate from 12 V. To supply them with power it is necessary to install a converter (they also say transformer or driver). With the development of technology appeared spots that can work from 220 V. This scheme is at least a little, but easier, because recently it is more common to connect spotlights to the network directly, without converters.
Serial connection
This scheme is easy to implement, it requires few wires, but it is possible to connect spotlights in series only in a relatively small number – five or six pieces. The main disadvantage of this method – the lamps will not shine in full force. Another disadvantage: if one lamp fails (burns out), all the lamps stop working, because the circuit is broken. In order to restore functionality, each lamp has to be checked.
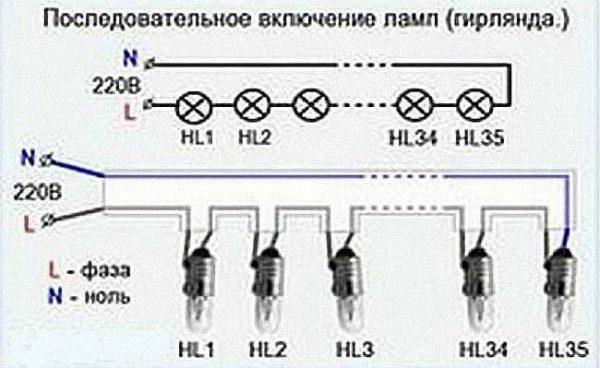
The scheme is very simple – the phase sequentially bypasses all the lamps, and to the output of the last zero is fed. The scheme with a junction box and a switch is located below.
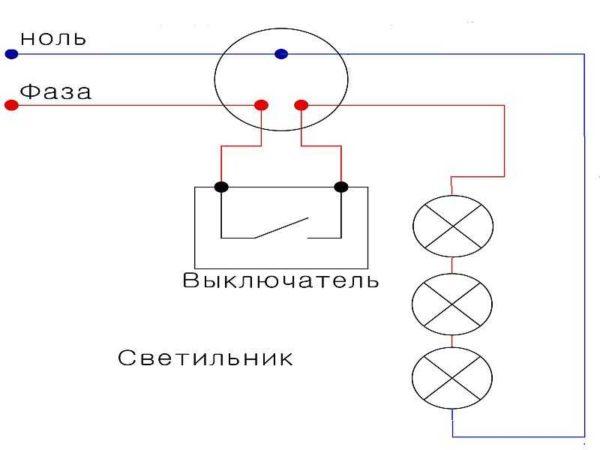
When working, be careful: the phase must go to the switch, which then goes to the lamps. Zero (neutral) – directly fed to the last lamp in the chain. This is important for proper operation of the circuit and for safety.
If you have a three-core wiring – in addition to zero and phase there is also a protective wire “ground”, it is taken directly from the “ground” pad and fed to each of the lights to the appropriate terminal. You can take the “ground” in a nearby socket or on the switch.

Practical implementation of this scheme is more convenient not with a cable and wires – because one wire is constantly broken bypassing all the lights, and zero goes a whole piece from the distribution box to the last lighting fixture. But once again we repeat – this type of connection is almost not used.
Schemes of parallel connection
With a parallel connection, all lamps will shine with normal intensity, because this scheme is more popular even though it requires more conductors. To connect any number of built-in lamps (even with LED lamps) use non-combustible cable VVG ng 2*1,5 or 3*1,5 (three-core wire is used if the wiring with grounding). It is possible to use cable VVG ng ls (non-combustible with reduced smoke emission during combustion) but this is already at will. It can be round or flat = it does not matter, but non-combustible – necessarily, especially if you have a wooden ceiling.
Methods
Parallel connection can be realized in two ways:
Daisy-chain connection
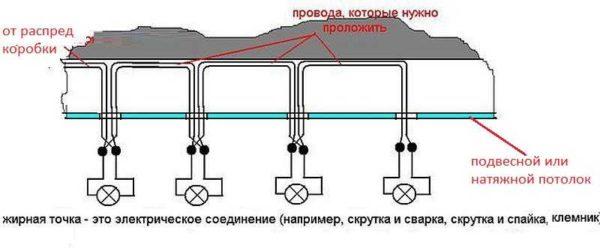
Let’s look at the diagrams. The figure below shows how to lead the wire in the daisy-chain method of wiring. The cable comes out of the distribution box, it goes to the first lamp, to the output of this lamp is connected to another piece of cable, which stretches to the next lamp. This is how all the lights are connected.
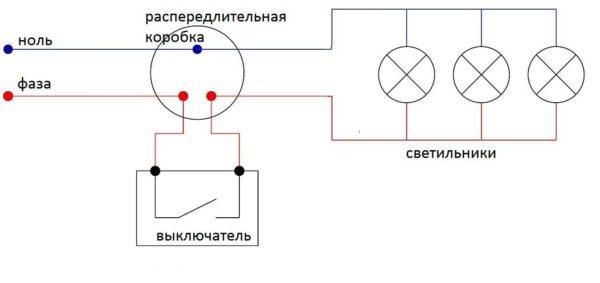
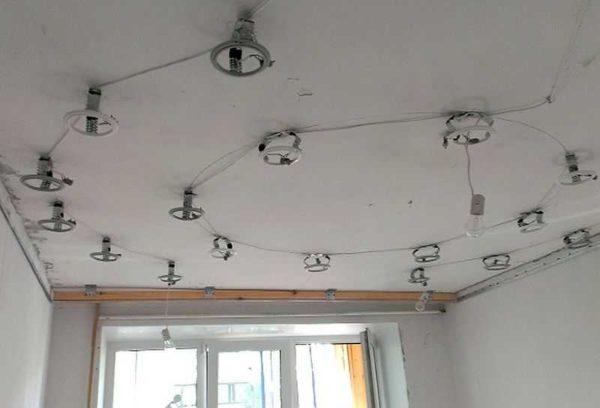
Physically, it looks like in the photo below. Several pieces of cable connect the luminaires one after the other.
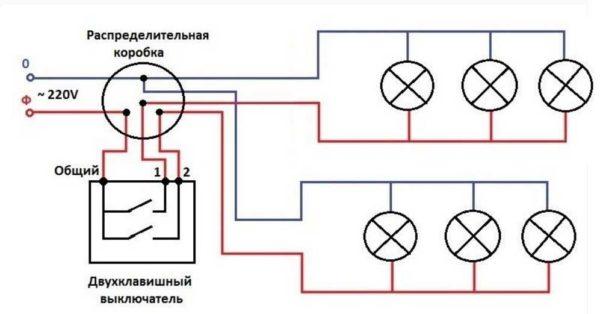
If you want to divide the lighting fixtures into two groups, they are connected to a two-key switch. The scheme becomes somewhat more complicated, but only because the number of wires increases.
An example of realization can be seen in the video. You can use other terminals, but the method itself is shown quite well.
Radial
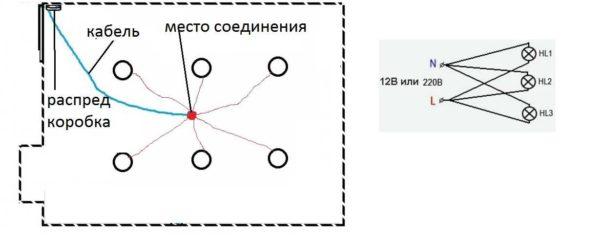
With a radial connection for each lighting fixture goes its own piece of cable. The method is costly in terms of cable consumption, but more reliable in terms of operation: in the event of a breakdown, only one point of lighting is not lit. In this case, it makes sense to pull the cable from the junction box on the ceiling to the middle of the room, there to fix it. From this point, start pulling cables to each recessed lighting fixture.
Pay attention to the picture on the right. It shows that from the phase wire diverge wires to the lamps and separately from the neutral. Since there are many wires converging in one place, it is necessary to choose a reliable method. If the wires are single-core and the lamps are not very many, you can make a twist, but then it will have to be well crimped with pliers, and then welded. It is not the easiest way and the connection turns out to be unbreakable. But reliable. The second method is simpler: on each conductor of the cable to install a connector with the required number of inputs and connect the wires to them. You can use Wago terminal blocks for the appropriate number of connected wires. They are reliable, easy to install, but they cost a decent price (fakes are better not to take).
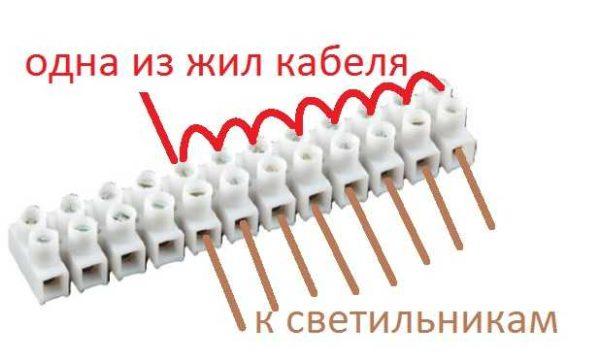
Another option – ordinary terminal blocks with a screw connection. They are cheap and quite reliable, but you will have to put jumpers on all involved terminals on the side where you need to connect the cable. In this way, all wires will be energized.
Despite the high reliability of the method is rarely used – the costs are high, and it is problematic to qualitatively connect a large number of wires in one point.
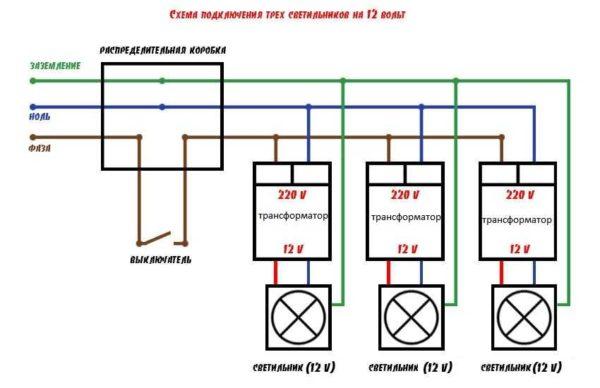
Connection of spotlights on 12 V
Schemes are exactly the same, but the cable from the switch is led to the converter, and from the output of the converter goes already to the lamps.
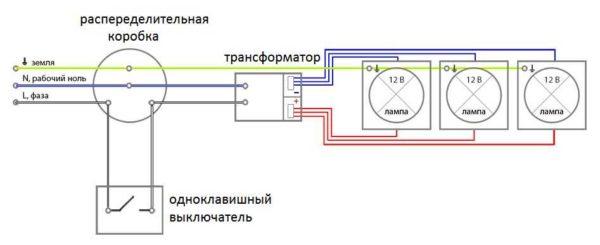
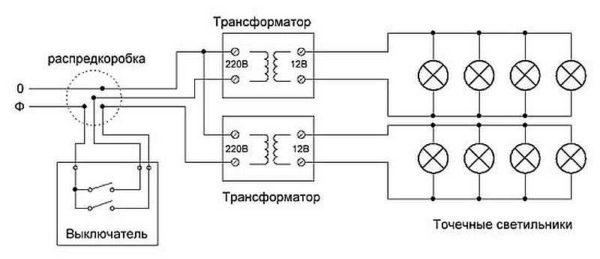
If there are a lot of spotlights, they prefer to connect them to two keys. In this case, two transformers (power supply, adapter) will be required. The scheme does not look much more complicated – there are two branches. If desired, you can find switches and on three keys, and you can put several next to each other. But if you need to change the illumination within wide limits, it is better to put a dimmer.
As you realized, the schemes differ only by the presence or absence of a transformer. So the other schemes will not be difficult to realize.
Choosing the power of the converter / transformer
To make the lighting work normally, it is necessary that the power of the driver was 15-20% more than all the consumers connected to it. For example, you need to select a step-down transformer to connect 8 spotlights, which will be installed incandescent lamps of 40W. The total power of all lamps will be 320 W. The transformer will be required for 380-400 W.
It is clear that the more light sources you will connect, the more powerful converter will be required. But with increasing power increases the price and size of the device. In addition, powerful transformers can be difficult to find. And another thing: a large and heavy box can be difficult to hide. Therefore, in this case, a large group of lamps are divided, and to each put its own converter, but of lower power (how to connect spotlights in this case, you can see in the diagram above).
安装的特殊性
In order to correctly connect spotlights, you need not only competently choose a scheme. It is necessary to observe a certain sequence of actions, which depends on the type of ceiling.

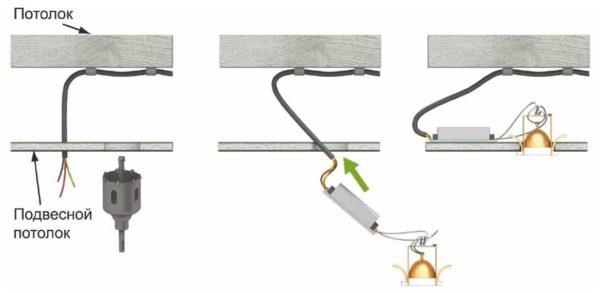
In stretch ceilings
Spotlights are usually installed with suspended or stretch ceilings. If the ceilings are stretched, all the wires are laid in advance. They are attached to the ceiling without connecting to the power supply, place and fix the lights on the hangers, then connect the wires to them and check the work.
Before installing the stretch ceilings, the power is turned off, the lamps are removed, and parts that may be affected by temperature are removed. After the stretch ceilings are installed, holes are cut in the material (the lights are visible or can be felt), o-rings are installed, and then the lights are assembled.
Plasterboard ceilings
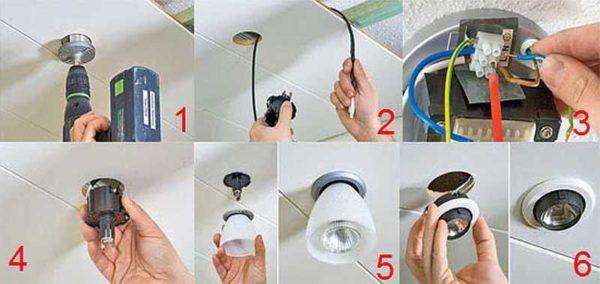
If the ceiling is made of gypsokatron, you can proceed according to the same scheme, but mount the lights after the ceiling is putty. That is, divide the wiring, leave the free hanging ends of the wiring. To avoid problems with determining the location of lighting fixtures, it is necessary to draw a detailed plan indicating the exact distances from the walls and from each other. According to this plan make a marking and drill with a crown of the appropriate size cut out the holes. Since small movements – a few centimeters – can be, cutting the cable leave a reserve of 15-20 cm. This will be quite enough (but do not forget that the wires are attached to the main ceiling and they should be 7-10 cm beyond the level of drywall. If the ends turn out to be too long, they can always be shortened, but to increase – a big problem.
There is a second way to connect spotlights on the drywall ceiling. It is used if there are few light sources – four to six pieces. The entire installation of spotlights along with wiring is done after the ceiling has been completed. Before the start of the installation, the cable/cables from the junction box are installed behind the ceiling level. After finishing the work on puttying and sanding make markings, drill holes. Through them run the cable, bringing the ends outside. After mounting the lights themselves.
Everything is not difficult, but this method can not be called correct: the cables simply lie on the drywall, which does not exactly meet fire regulations. This can still be turned a blind eye, if the ceiling is concrete, the cable is taken incombustible, the cross-section of the wire is not small, the connection of the wires is done correctly.
If the floor is wooden, the PUE requires laying in non-combustible all-metal trays (cable channels) or metal pipes. Install such wiring can only before the start of work with the ceiling. It is very undesirable to violate the rules of installation – wood, electricity, heat generation during work… not the safest combination.

")


Connecting spotlights can be a bit tricky! I remember trying to set up some for a backyard party. I mixed up the wires and ended up with a flashing disco instead of nice, steady light. Lesson learned: always double-check your connections before the big night!