
")
Improvement of a cottage and garden, your own backyard – a never-ending process. All the time something is being remodeled, changed, decorated. In this article collected crafts for the garden and cottage, which will make your possessions unique. That’s what is good made by their urkami things that they are unique and inimitable.
Зміст статті
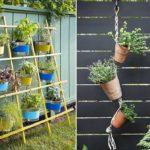
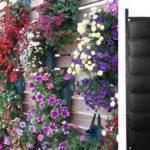
Vertical flower bed or vegetable garden
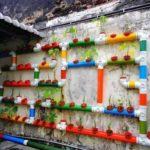
To decorate a fence, a wall of a dacha or garden house, a farm block is not an easy task. One of the options from the category of “cheap and surly” – to make a vertical flower bed. On any vertical or inclined surface hanging bags or small in size and volume of containers filled with soil. Such crafts for the garden and dacha are good that you can attach any junk – bottles, crates, pipe trimmings. From all this you can make original cachepots.

Most often on such flowering walls plant ampel flowering or green plants. Unpretentious ordinary petunias and pelargoniums are best suited. Plant Surfinia (very similar to petunia) and nasturtium. They and bloom for a long time, and do not require special care. Suitable any herbaceous plants with long hanging wattles.
So what else can you make the basis for a vertical flower bed? Yes from anything. Everything that can be poured into with at least a little bit of earth. See for yourself.
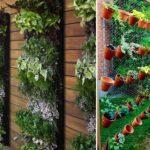
Flower pots
Plastic or clay pots left – it does not matter. Even if they are old and unsightly, they can be painted with some fun colors. And if they are also different sizes, you will get a very original panel.
-

- It is not difficult to make a lattice of slats. It is even easier to hang pots with flowers on it
-
- It takes a couple of minutes to hang a pot on the stretched grid-frames. You only need a piece of wire.
-
- Even an old dry tree can be the basis for a vertical flower bed.
-
- Pots of the same color, but different shapes and sizes also look great
Plastic vessels can be nailed through, although this is not the best idea. For clay or ceramic ones, you will have to make a wire “holder” – a circle, which can be attached to the wall/fence, or you can hang on ropes from the bar. In general, only here are a lot of options. Such crafts for the garden and dacha do not take a lot of time and the result is pleasing to the eye.
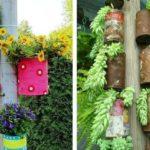
Tin cans
Tin cans of different formats and sizes are not a problem to find. Small and medium can be used in the form of cylinders, and large or long – cut lengthwise in half or remove a third of the radius from one of the sides. It’s up to you how you like it.
-
- Pillars, too, can become a support for a hanging flowerbed
-
- Paint the cans in cheerful colors – it turns out very well
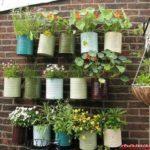
Methods of attachment are the same as for pots: the smaller ones can be fixed on stands, the larger ones can be hung. Use throwaway material – tin cans – and make from them attractive and useful crafts for the garden and dacha … Is it not the top of pleasure.
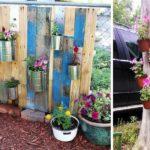
Plastic bottles
How can you do without them? Screw on the lid, cut off about a third of the long side. The method of attachment is described above. There is also another option with minimal damage to the wall. Knock down a grid of wooden slats. This lattice is fixed on the wall, and to it with self-tapping screws or nails to attach the bottles.
If the bottles are from milk or kefir – no problem, the plastic is opaque, in it the root system will be comfortable. To drain excess moisture, it will be necessary to make several holes in the bottom part. They can be made with a nail heated on the fire. Quickly and without problems. If the bottles are transparent, it is desirable to paint them. Roots do not like an abundance of light. You can use ordinary paint (better – acrylic, it is easy even on the bottles), but it is faster to work with cans. It is better to paint from the outside. Inside the paint will quickly decompose.
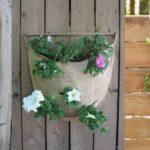
From fabric
From sacking, any more or less dense fabric sew a bag with pockets under the primer. You can use an old organizer (for shoes, toys, etc.). With these candidates for vertical flowerbeds in general, everything is simple: fasten with nails / self-cutters through the bar (otherwise the fabric will tear). After pouring soil into the pockets and planting flowers.
-
- Handicrafts for garden and cottage: sew such a bag even a novice seamstress can do it
-
- If you have a large number of canvas or canvas bags, you can hang them on hooks and fill them with soil.
-
- This is an option for planting border flowers.

You can sew or use canvas bags. Hang them on hooks. You can plant plants in them from the top and/or make holes in the side. If sewing is not your thing, enterprising Chinese sew such bags for hanging flowerbeds. Such crafts for the garden and dacha require more effort – bags/sacks are usually sewn. But the flowering wall looks unforgettable.
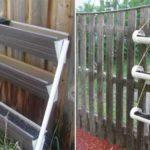
Cuttings of sewer or drain pipes
Take plastic pipes. We cut them lengthwise in half and get two long containers for planting plants. If you don’t have your own leftovers, you can buy cuttings at the market or from construction crews. You need small pieces, so this beauty will not cost much.
-
- Plastic pipes can be used as a popra under the pots – drill holes in them for the pot
-
- These are the designs – you can put or hang
-
- You can plant flowers directly into the pipes – they can be cut lengthwise or cut holes in them.
-
- Multi-storey vertical flower bed with daffodils

You just need to think of something to cover the edges. The easiest way – the bottoms of plastic bottles. Find the right size, cut so that there are 2-3 cm of walls, put on the edges and fasten. Attach can be attached to small self-tapping screws. They pierce the plastic well.
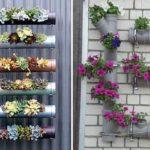
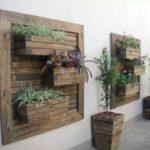
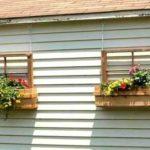
Small wooden crates
Wooden boxes can be hung in two ways. The first is to fix as a normal box one of the sides. The second is to hang not as a box, but as a frame – sideways. The second option gives more options: you can pour earth directly into the boxes, and you can use them as stands for any other containers with flowers.
-
- Panorama of boards and boxes with flowers – stylishly
-
- Crafts for cottage and garden – such hanging boxes will decorate and the wall of the house, and the shed
-
- Different size and format boxes and the decoration itself, and a support for pots with flowers
If you have a beautiful wall and do not want to dirty it, you can make a kind of panel out of boards, on which to fix the boxes. This option is not quite dacha. It will be suitable for a solid yard. Very attractive looks wood and greenery. And so that the boards do not darken, treat them with wood oil with a dye. Such a coating should be updated infrequently, and the old impregnation does not need to be removed.
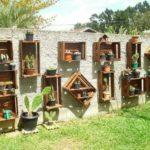
Ideas for flowerbeds from old things (photo)
As it turns out, you can make a flowerbed out of everything. Even old pants, a bicycle, a boat, an old chandelier, a chest of drawers, a chair, a kitchen table … And this is not a standard standard flowerbed, but an art object that few people will forget. There are very interesting ideas. These crafts for the garden and dacha will definitely be remembered by everyone.
What is characteristic, such crafts for the garden and dacha help to get rid of junk. Maybe it is worth considering everything available for use in this way?
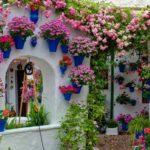
Column-bed
Flowering columns look very beautiful. They are usually planted with petunia and pelargoniums. These two types of flowers bloom abundantly almost throughout the entire vegetative period. Against a background of lush greenery, the abundance of colors of different shades attracts the eye. At first glance, you won’t guess how such a column was created. In fact, everything is simple.
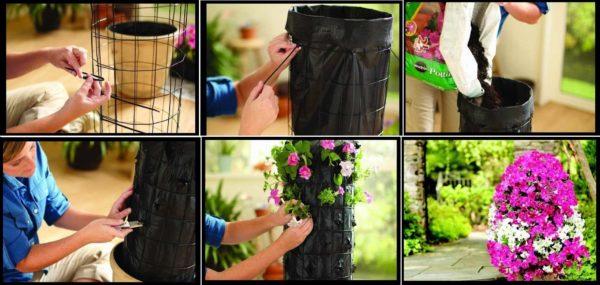
You need a metal mesh of wire 2-3 mm in diameter. From it, the column is formed – the mesh is twisted into a cylinder, fastened. Inside the bag is inserted (you can dense plastic, but better cloth), in which the earth is poured.
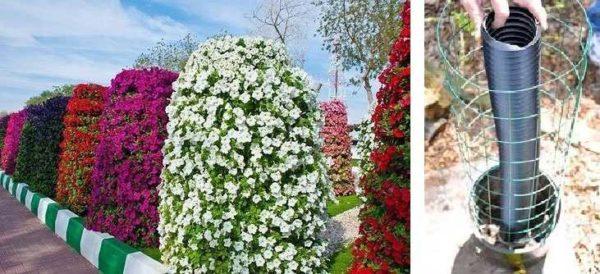
For more even moistening of the soil in high columns, a piece of drainage pipe is inserted in the middle. It differs in that its surface is perforated and through it perfectly will pass water. So, a piece of pipe is inserted in the center, filled on all sides with soil. In this version, watering the flowering column is not a problem. It is necessary for a couple of minutes to throw the hose inside, in this pipe, and the water is distributed itself through the holes.
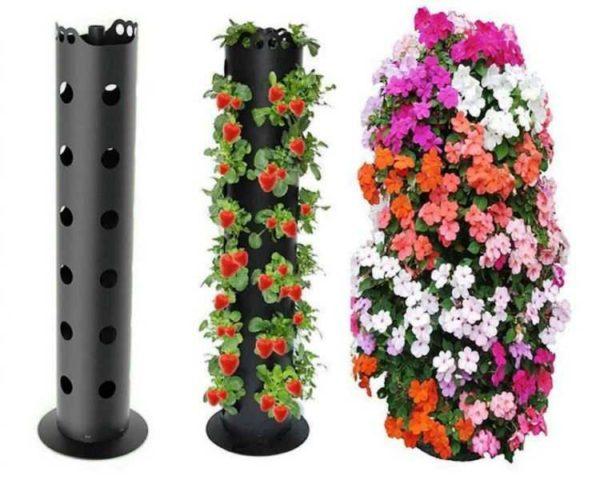
Plant plants from the top and into the holes cut in the sides. The distances between the plants are not too large – so that the column will quickly take the desired form.
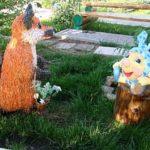
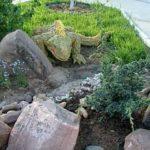
Garden figures
What besides flowers decorates our yard, garden? Aha, all sorts of figures. In this section, consider new crafts for the garden and dacha in this area.
From plastic bottles
Decorative figures for the garden and dacha are made from a variety of materials, but most of all crafts from plastic bottles. There are a lot of them, and different formats and very plastic material this thin plastic. In addition, it can be painted, which further expands the possibilities.
In addition to plastic bottles, garden figures can be made of wood, old pots, flower pots, bowls, buckets, cones, painted stones. In general, from what ordinary people throw into the landfill. You should. From all this turns out very interesting crafts for the garden and dacha.
Figurines from plaster and cement mortar
On sale there is plaster for sculptures. It is ideal for making garden figurines. But it is expensive, but it hardens quickly and has a smooth surface. Instead of special gypsum, you can use construction gypsum or even a mixture of cement and sand. Cement figures will be dark gray, so you will have to use dark or saturated paints. Under light colored paints, you will have to apply several coats of light colored primer. But cement is more durable.
Working with plaster and cement
Dilute gypsum should be in the proportions indicated on the package. Just be aware, it sets very quickly. Immediately after mixing it should be poured into molds, so first prepare all the forms, then only dilute the gypsum mixture. After about 40 minutes, the plaster will harden so much that it can be removed from the mold. So making garden figurines from plaster is a quick process.
With cement it is different. For 1 part of cement brand M400 or M500 you need to take 4-5 parts of fine dry sifted sand. In dry form, mix the mixture until the sand is not colored evenly in gray (there is white cement and even pink). Only after that you can add water. It is taken 0,5-0,8 parts. The proportions of water are not exact, since the sand is of different moisture content, and the composition itself can be of different degrees of fluidity. After pouring the mold will have to wait a few days. At least 3-4 (at a temperature of about +20 ° C), and better 5-7 days. So to make garden figures from cement, have patience.
Decoration
In the solidified form of the figures can be painted with acrylic paints. Apply two layers of paint, and then cover with yacht varnish. In this form, garden figures keep the brightness of colors for several years.
To work with plaster you need to know one secret. To make the figure easily come out of the mold, the inner walls before pouring lubricate with a mixture of soap, water and vegetable oil. Soap is rubbed on a grater, pour water. When the shavings soften, stir to a homogeneous mass and add a little vegetable oil. This mixture lubricates the form from the inside before pouring the diluted gypsum into it.
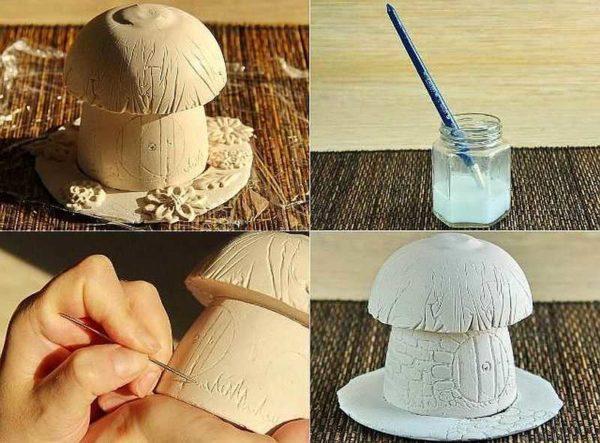
Plastic bottles are often used as molds. With them you can not be very ceremonious – cut with a knife or scissors. If a metal container is used, it is necessary to lubricate the walls thoroughly. If the surface does not necessarily have to be flat, it is easier to cover the container with food film or a plastic bag. In this form, the workpiece is removed without any problems at all. While the plaster is still not completely dry, on its surface you can use something sharp (needle, awl, etc.) to form the desired relief.
If the surface should be flat, but in fact it has imperfections, take sandpaper and get rid of the irregularities. The process is long and dusty, so have patience.
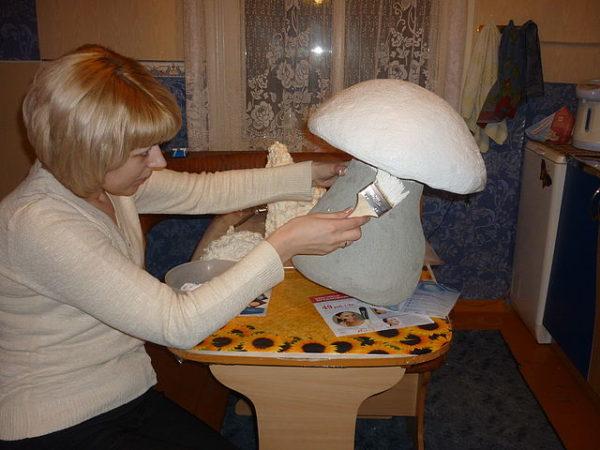
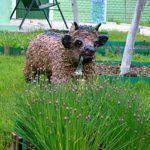
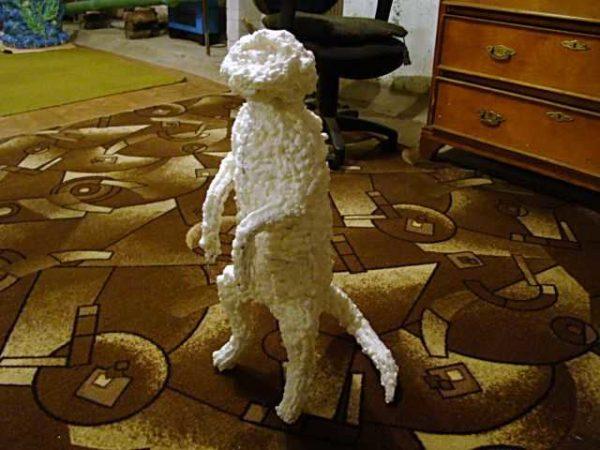
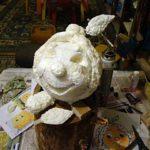
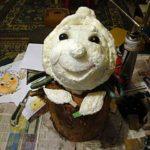
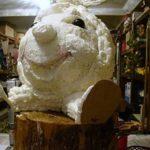
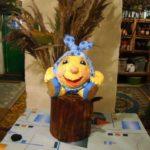
Figurines from assembly foam
Handicrafts for the garden and dacha from mounting foam appeared not so long ago. Foam with low expansion is used. It barks a denser surface without large bubbles. Work with foam with gloves, as it adheres well to any material. With skin too.
-
- Figurines for the garden made of mounting foam are very realistic
-
- Heroes from familiar fairy tales
-
- An iguana on a stone slide…
-
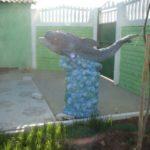
- A dolphin made of foam
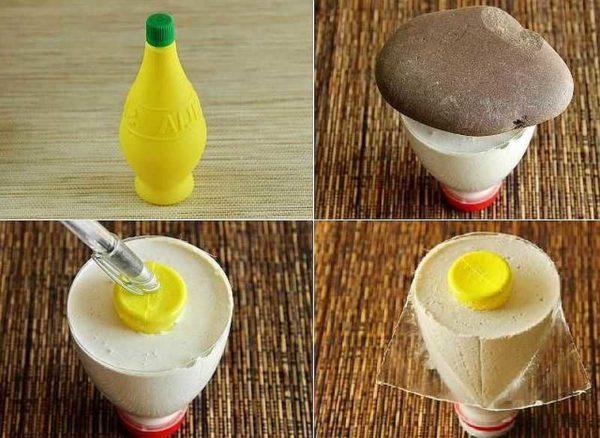
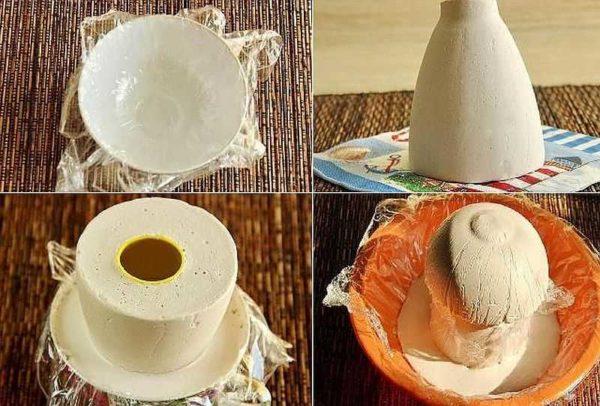
How and from what to make the base
To create the conceived figure, find the base that most resembles the object. It can be a plastic bottle, a piece of wood, even a skein of wire or a ball of paper. For handles/legs/sticks or thick wire are suitable if you need to give a curved shape. For tails, a hose is more suitable. To give it a stable shape, a fairly stiff wire is threaded inside.
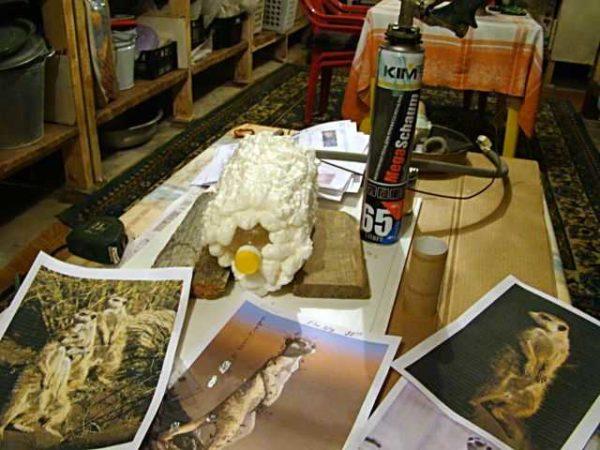
Small details – ears, horns, etc.. – can be cut out of cardboard, plastic, foam rubber. They can be simply inserted into the uncured foam, and then, after its polymerization, foam. Before you start working with foam, all the parts of the frame should be connected together. The aesthetics of the connection is absolutely unimportant – everything will be covered with foam. Strength is important – so that some parts do not fall off.
Features of assembly and work with foam
If the base is a plastic bottle, pour sand into it – so that the figure is not blown away by the wind. For the rest will have to come up with some weighting stands.
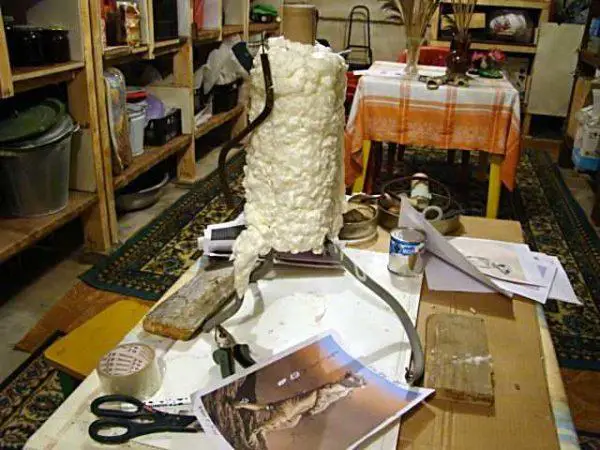
Foam is applied to the assembled frame. Vertical or horizontal strips, one not far from the other, but leaving room for expansion. The foam is laid in layers. The second layer is placed after the first layer has polymerized. The time of initial polymerization is indicated on the package. You applied the first layer, adjusted, waited 20-50 minutes until the foam hardens, applied the second layer. And so on until you get the desired shape.
When working, the shape of the foam can be corrected. For this purpose you can use a piece of plastic soaked in water, a plastic or silicone brush, whatever you like. For some figures, a smooth surface is important. If smoothing doesn’t work, you can cut off the imperfections with a sharp office knife. “Wool” of hairy animals is also made of foam – it is applied in short strokes. In general, the process is creative…
How to paint
It is most convenient to paint garden figures from mounting foam with oil paint. It is necessary to cover in two layers. After it dries, it is desirable to cover in two layers with yacht varnish.
-
- Cover the ball with foam, attach characteristic details – the colobok is almost ready
-
- Eyes – small rubber balls covered with paint.
-
- Cut out the missing parts
-
- After painting, this is what we get.
Just look, it gives all the colors a yellowish tint. If you are not satisfied with this, look for another compound for outdoor use, but colorless.
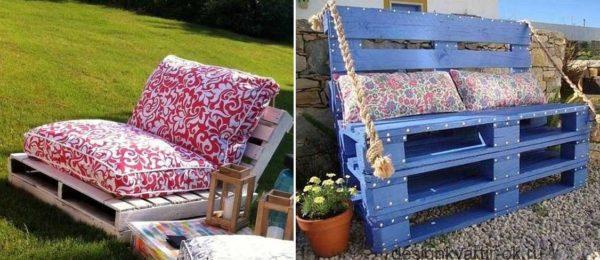
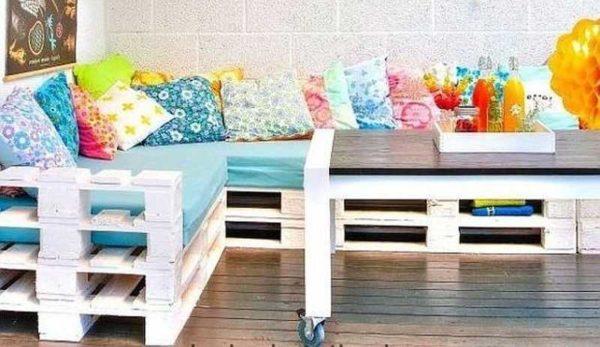
Functional crafts for dacha and garden – garden furniture from pallets
Buying furniture for the dacha in stores is not the best option. You will not take expensive, cheap made of fiberboard, which from moisture in an unheated room swells and furniture becomes unusable. So it turns out that the best way out is to make it with your own hands. There are many ideas that allow you to get a very comfortable environment with minimal time and money.
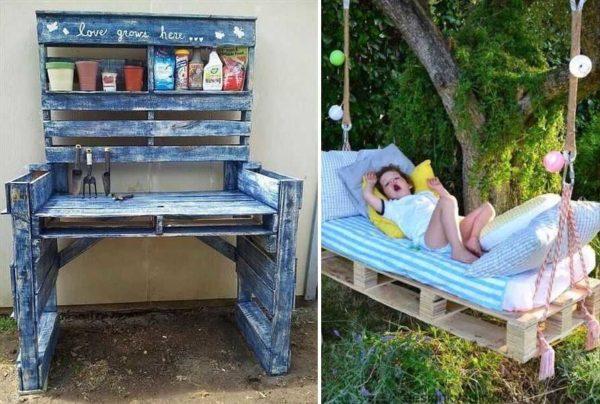
In our country there are a lot of oddities. One of them is the use of wood for the manufacture of cargo pallets. Buy used pallets can be quite inexpensive – they are written off after a certain period of time. Here from these pallets and you can make a table, sofa, chair and many other different useful furniture. For sofas / chairs will need to additionally sew pillows or mats of foam, but this is not a problem for most. Such crafts for the garden and cottage to do doubly pleasant – get every time a charge of positive emotions when you see them, and even when you use…
Processing of pallets
Wood used is not the best quality, but it is many times better than fiberboard. Especially for dacha. So, we take the pallet, sand the wood. It is possible, of course, and manually with the help of sandpaper with different grains, but the case will go faster if you use devices. Suitable sandpaper circles of red color on a Bulgarian, but more qualitative processing will be with the use of grinders.
After grinding, we proceed to the initial stage of assembly, and then, before the final assembly can be painted. Why not paint right away? Because during fabrication, ideas come up that require removing or adding one or two or more slats. If the pallets are already painted, there are still light/dark places that are difficult to make the same color later. In general, it is better to first try on what and how it will be, and before assembling all painted.
You can paint with any wood paint, but do not score and about wood oils. They do not create a film of colorant on the surface, but penetrate the interior, protecting the wood and tinting it at the same time. Using oils does not stain the grain of the wood, but brings out the brighter color. On the plus side, you don’t have to renew the coating by scrubbing off the old one, but only by coating/impregnating the top layer. All in all, a good option if you want to preserve the wood grain.
Connection methods
The pallets are joined together using nails or wood screws. In particularly stressed places, you can use metal mounting plates – so that they do not move relative to each other 100%.
The slope of the backrest in the manufacture of armchairs / sofas can be set with strips of metal or angles welded at the desired angle. It may not be very aesthetic, but it is reliable and fits perfectly into the overall style of “pallet” furniture. In general, everything is really easy, even if you have not done anything like this before.
Other ideas worthy of attention
The theme of homemade dacha furniture is inexhaustible. Skillful people from throwaway material make very interesting things. For example, a table from a bundle of birch logs. Glass table top is, maybe, and overkill for the dacha, but it is very beautiful.
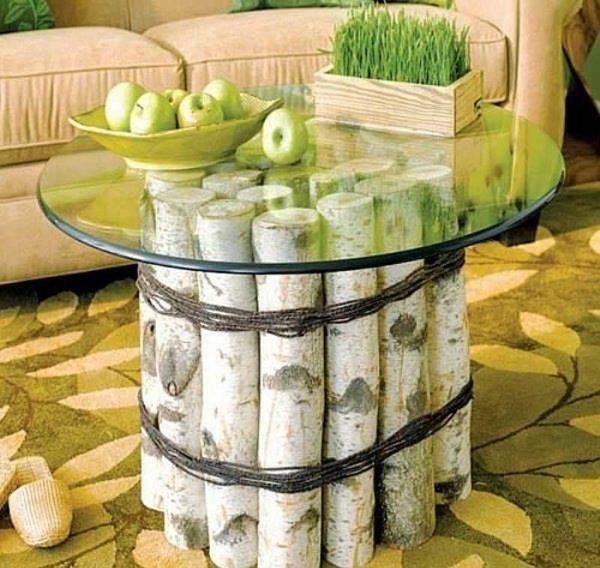
Developing this idea, you can use an interesting trunk, a few snags, etc. as a “leg”. Just do not forget to pre-soak the wood, and especially the bark, in antiseptic additives (not containing chlorine and dyes). Otherwise, the bugs living in it can quickly turn the wooden walls into dust.
Another deserves attention is the table for washing the harvest. All dacha growers are aware of how much effort goes into “washing root vegetables from the ground”. An elegant solution to the problem – a special table, where instead of a table top is fixed stainless steel mesh.
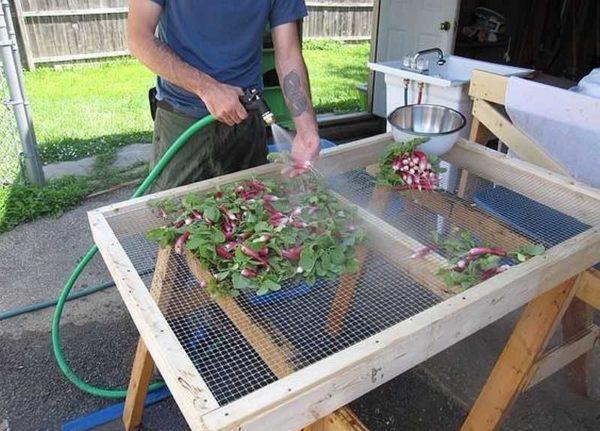
The smaller the mesh, the more small root vegetables can be washed. And in order not to spread dirt on the site, the site under the table can be concreted and make a drain in the direction of the beds, for example.
-
- It’s no longer a dull path or ground…..
-
- From old windows/doors and glass bottles, too, you can make useful crafts for the garden and cottage
-
- A durable broom can be made from plastic bottles.

-
- Painted stones – an interesting decoration
And not exactly furniture (or rather not furniture at all), but also interesting ideas that you can’t pass by – a tool shed made of old doors, painted concrete tiles/asphalt, a chandelier made of glass bottles, a broom made of plastic bottles….


