It is convenient to have your own well on the plot, but drilling and maintenance services cost a lot. At least there are ways to drill and, if necessary, clean the well yourself. One of such devices is a chute. Usually it is made of a piece of pipe, and in the lower part of the valve is attached. And it is not difficult to make a chute with your own hands, as well as to use it. The work is long and physically tiring, but there are no other difficulties.
Contents of the article
The design of the trough
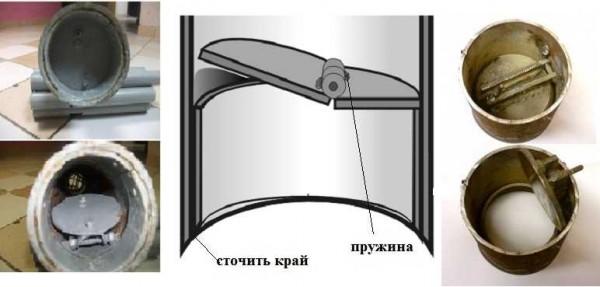
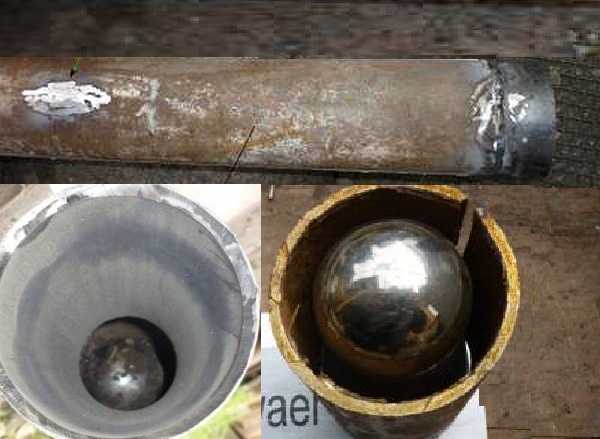
The trough is a section of pipe up to 4 meters long. In the lower part of it, a shoe with a valve is installed. In large-sized shells put flat valves cut from a steel sheet with a seal of rubber, strips of leather, sometimes without a seal. In those that are smaller in size and diameter, ball valves are used. These devices are also called mechanical troughs – the work is due to gravity.
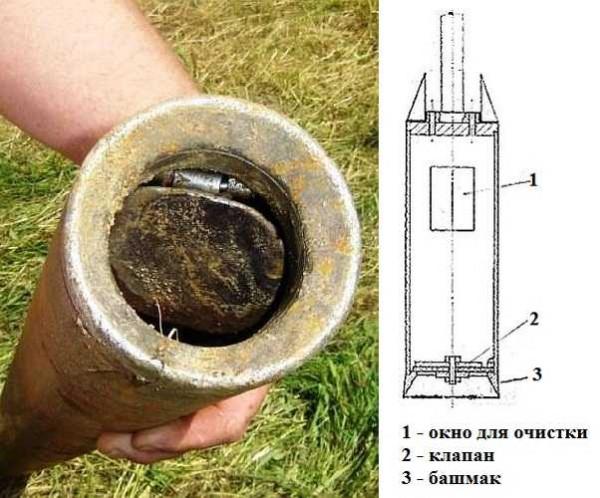
Through the window in the upper part of the body, the rocks are taken out, which are stuffed there during drilling or cleaning the well. When drilling viscous rocks – clay or loam, it is necessary to make the window long and narrow – almost the entire length: it is very difficult to remove such a load through a small hole.
The ball valve is easier to make. The diameter of the ball should be equal to about half the diameter of the pipe (you can slightly more). At the bottom, a washer is installed, the inner diameter of which is smaller than the diameter of the existing ball. At some height inside the trough (three or four radii of the ball) weld a limiter – it does not allow it to rise too high. If this is not done, most of the soil that has fallen inside may spill out (pour out). This happens because of too much time, which is required for the load to descend and close the hole in the bottom.
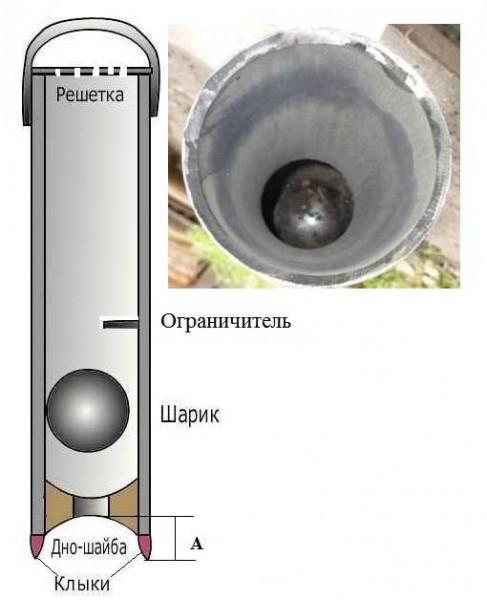
At the bottom of the pipe in both versions, sometimes tusks are welded or cut or the edge of the pipe is sharpened to make it sharp. This way the soil or silt is better broken up. But because the fangs are too high, too little soil gets in. When using a ball valve, the length of the fangs should be such that the ball does not protrude. The same picture – small amount of soil taken in at one time – can be observed in troughs with a flat valve. In this case the depth of the shoe is reduced.
The same result can be caused by too small inner hole in the washer installed on the bottom with a ball valve. The way out is to bore it.
In the upper part of the trough make a loop or a bracket, for which it will be possible to fasten a rope or rope. For this rope the projectile is taken out of the well, on it it is lowered back.
Perhaps you will be interested to read “How to make an antenna for the dacha with your own hands”.
How it works
The tourniquet is used when drilling loose, sedimentary and friable prod (pebble, sand, gravel, etc.). It is also used when cleaning wells from silt or sand plugs to increase the flow rate. In any case, the principle is the same: the projectile is dropped into the well. Under the impact force, the valve opens, some amount of soil falls inside. Usually there is not much of it. Therefore, it is lifted a little up, and again it is thrown down. This is repeated until the entire inside of the pipe is filled.
The full trough is taken out, turned upside down and the soil is poured out. This is where the hole in the side comes in handy: it is easier to clean through it and you can reach the valve with your hand.
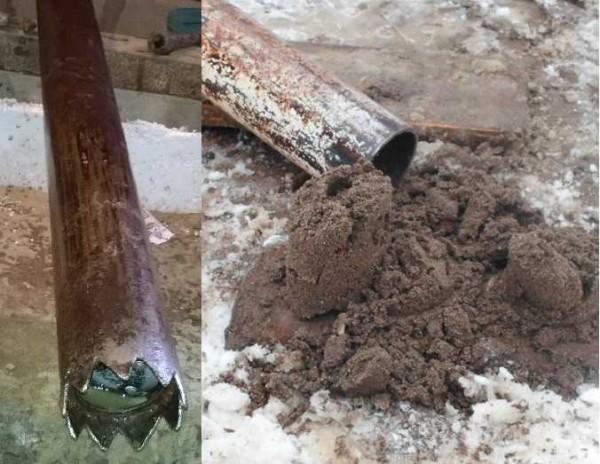
This technique is called percussive channeling (you can see why). Both drilling and cleaning require repeated repetition of this operation. Only for cleaning the well it may take several days of work – from two-three to seven-eight days, and for punching even more.
The work is heavy: if for cleaning the well it is enough to have a pipe section of one meter long, then for drilling with percussion-channel method the chute is 2-4 meters long. And the heavier the projectile is, the better: more effectively loosened and extracted soil, the faster the well is drilled.
To make the work a little easier, put a tripod, the rope is passed through a system of blocks. Such an installation, even without a drive, makes the work much easier.
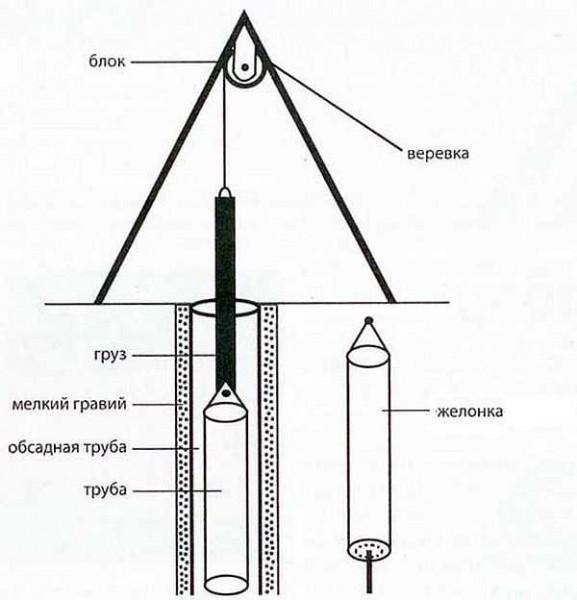
Sometimes a homemade chisel is not heavy enough: the force of impact is insignificant and the work is slow. In this case, weighting is required. There are several ways of weighting:
- Fill the top of the pipe with concrete.
- Attach a weight in front of the trough (as in the photo above). Only learn that the connection must be strong, but movable.
- Making a chute with your own hands, use a thick-walled pipe. If you find one with a wall thickness of 1 cm, no other ways of weighting will not be needed: the shell will be heavy.
Trough with your own hands
If you have a welding machine and some skills in working with iron, a trough with your own hands is made in a few hours.
Trough with a ball valve with your own hands (without lathe work)
This version of the ball valve is assembled from spare parts that can be bought in stores. For manufacturing, a water pipe with a diameter of 89 mm is used. Also bought a concentric adapter 89*57 mm, and a ball from a bearing with a diameter of 60 mm.
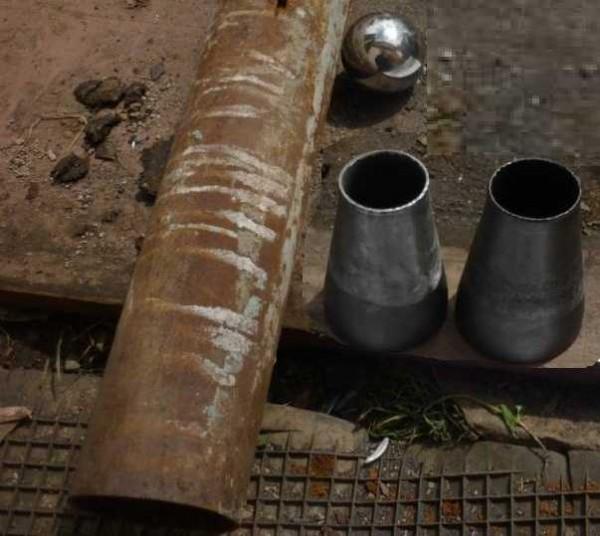
The ball perfectly enters inside the adapter and gets stuck there. But the fit is loose. To fit everything better, the inner surface of the adapter is treated with sandpaper – it fits almost perfectly.
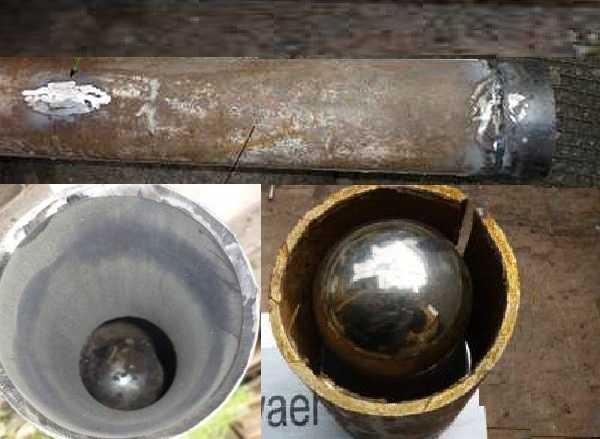
The narrow part of the transition is inserted into the pipe and welded. The ball is thrown inside and the stop is welded on. And the last touch – to make a fastener for a cable or twine. All, the trough with your own hands is ready.
Perhaps you will be interested to read about how to purify water from the well.
How to make a chute yourself at home
If you need to clean the well, and there is no sheet metal and welding for serious work under the hands, there is a way out: a chute with a valve from a plastic bottle.
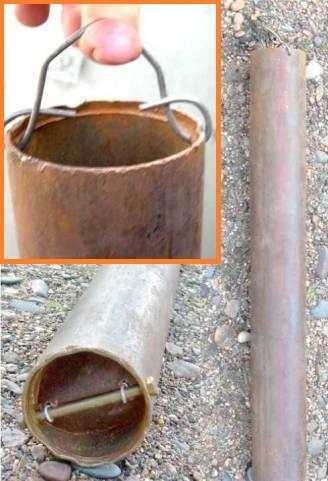
This option is suitable for cleaning the well, but not for drilling. Need a bolt, the length of which is slightly longer than the diameter of the pipe for the chute and a nut. Two or three centimeters from the edge of the pipe, one opposite the other, two holes are drilled. Their diameter coincides with the diameter of the bolt.
The valve is cut out of plastic. It represents an ellipse. The smaller diameter of the ellipse is equal to the diameter of the pipe. It must be cut out very precisely, so that inserted inside it tightly adheres to the walls. The cut valve in the middle will be attached to the bolt, for this purpose, four holes are made in the plastic, through which the wire is threaded. How all this is assembled is shown in the photo below left.
Only such fastening, as on the photo above, is very unreliable. After a few strokes, your shell can break off, and you will have to decide how to get the chisel out of the well. The best variant of fastening – one-piece, without seams and twists. How to do this will become clear if you watch the video. There, by the way, there is an important thing – how to make hooks, so that, if necessary, you can pull the chute out of the well.
On the organization of autonomous water supply from a well or well read here.
Features of use on soils of different types
When drilling sandy soils with a chute, it is necessary to use casing pipes – without them,the well will fall over. When drilling in such soils it is necessary to make sure that the projectile is not buried in the sand without casing for more than half of its length. This can lead to collapse, the borehole will be filled up and you will not be able to pull it out.
To pass the sand was easier, water is poured into the well, it prevents collapses and makes the work easier. If during work the sand is trammed and not captured, a chisel is used.
With floating sands work only constantly deepening the casing. And only if the aquifer is below the layer of floating sand, otherwise the well may not work.
For the passage of driftwood chute use a length of at least 2 meters. It should have a flat, well-fitted valve with a leather sealing gasket. At least two people should work together: when pulling the bailer out of the driftwood, the casing pipe should be rotated, lowering it downwards. The faster the casing pipe is lowered at this moment, the faster the layer will be penetrated. At first the casing is easy to lower, then it becomes more and more difficult. Sometimes there comes a point when they stop moving altogether. In this case, almost the entire pipe is filled with sand. In this case, the pipes are lowered under pressure. To do this, a platform is placed on the pipe, on which a weight (sandbags) is placed. And all this together is rotated. Usually this method is quite effective.
https://youtu.be/0N_KOvdK2xU
When penetrating gravel and gravel beds, a chisel is used together with a chisel. First, the bit is lowered into the shaft, crushing the rock, and then the chisel is used to pull it out. The chisel on such soils rises only 5-10 cm, the blows are small and frequent.
For faster passage, a platform is made on the casing pipe, and a worker stands on it. He is positioned above the borehole, gradually raising and lowering the chute. As the ground builds up, the casing is lowered under the weight of the worker.
In viscous clay soils, you can work without casing. If the clay is too dense, a chisel is also used first, loosening the soil by about 50-70 cm. Then it is removed with a chisel. A flat valve with a rubber or leather seal is also used.
If the clay is dry and dense, each time pulling out the chute, several buckets of water are poured into the well. After the water from the water-bearing soybean appears, it is not necessary to refill it from above.
If the rocks are very soft, sometimes the valve is removed. And drill only with the pipe itself, raising it 2-3 meters above the bottom and dropping it.



Building my own trough was such a cool project! I grabbed some wood, followed the plans, and ended up with a sturdy piece. It was messy work, but seeing it all come together was super satisfying. Now I’m all set for my garden! Would love to see others’ creations too!