

Özel bir eve veya yazlığa su tedarikini sürekli ve kesintisiz hale getirmek kolay bir iş değildir. En zoru da kışın su teminini sağlamaktır. Boruların donmasını önlemek için donma derinliğinin altına döşenebilirler, ancak yine de zayıf noktalar vardır. Birincisi, periyodik olarak tüm rekorları kıran anormal soğuk kışlar. İkincisi ise evin içine giriş noktalarıdır. Hala sık sık donuyorlar. Çıkış yolu, su temini için bir ısıtma kablosu kurmaktır. Bu durumda, kanalizasyon arzu edilir, ancak gömmek sığ olabilir. Ve eve giriş yerlerine daha güçlü ve daha iyi yalıtılmış bir ısıtıcı yerleştirebilirsiniz.
Makalenin içeriği
Sıhhi tesisat için ısıtma kablosu çeşitleri
İki tip ısıtma kablosu vardır - rezistif ve kendi kendini düzenleyen. Rezistifte metallerin elektrik akımı geçişinde ısınma özelliği kullanılır. Bu tip ısıtma kablolarında metal iletken ısıtılır. Karakteristik özellikleri her zaman aynı miktarda ısı yaymalarıdır. Dışarısı +3°C veya -20°C olsa da aynı şekilde ısıtılırlar - tam güçte, dolayısıyla aynı miktarda elektrik tüketirler. Nispeten sıcak zamanlarda maliyetleri azaltmak için sistem sıcaklık sensörleri ve termostatla donatılmıştır (elektrikli yerden ısıtma için kullanılanla aynı).
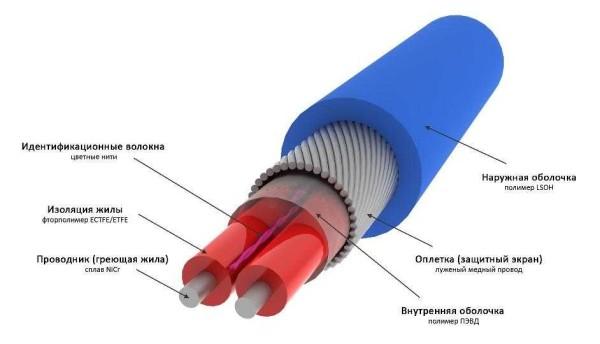
Dirençli ısıtma kabloları döşenirken kesişmemeli veya birbirlerine yakın (yakın) yerleştirilmemelidir. Bunu yaparlarsa, aşırı ısınır ve hızlı bir şekilde arızalanırlar. Kurulum işlemi sırasında bu noktayı dikkatlice gözlemleyin.
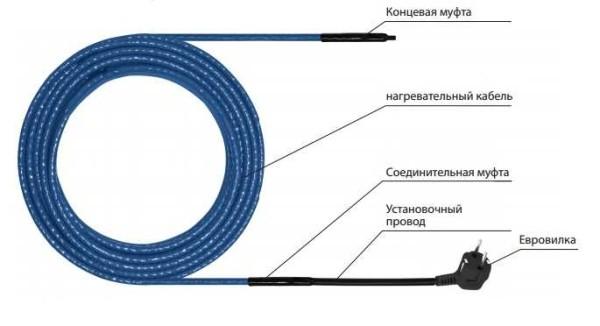
Sıhhi tesisat için dirençli ısıtma kablosunun (sadece değil) tek ve çift damarlı olduğunu da söylemeye değer. Daha pahalı olmalarına rağmen daha sık iki çekirdekli kullanılır. Bağlantıdaki fark: tek çekirdekli, her iki ucu da güç şebekesine bağlanmalıdır, bu her zaman uygun değildir. Bir ucunda iki çekirdekli bir fiş var, ikincisinde - 220 V ağına dahil olan bir fişli sabit sıradan elektrik kablosu Başka ne bilmeliyim? Dirençli iletkenler kesilemez - çalışmazlar. Gerekenden daha uzun bir bölüme sahip bir bobin satın aldıysanız - bütün olarak yerleştirin.
Kendinden regüleli kablolar bir metal-polimer matrisidir. Bu sistemde teller yalnızca akım iletir, ancak iki iletken arasındaki polimer ısıtılır. Bu polimerin ilginç bir özelliği vardır - sıcaklığı ne kadar yüksekse o kadar az ısı açığa çıkarır ve tam tersi, soğudukça daha fazla ısı açığa çıkarmaya başlar. Bu değişiklikler, kablonun komşu bölümlerinin durumundan bağımsız olarak gerçekleşir. Böylece kendi sıcaklığını düzenlediği ortaya çıkıyor, bu yüzden kendi kendini düzenleyen olarak adlandırılıyor.
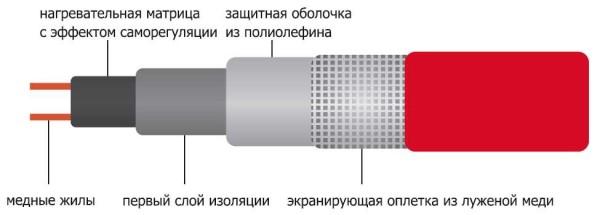
Kendi kendini düzenleyen (kendi kendini ısıtan) kabloların birçok avantajı vardır:
- çaprazlanabilirler ve yanmazlar;
- kesilebilirler (kesme çizgileri ile işaretler vardır), ancak daha sonra bir sonlandırma kaplini yapmak gerekir.
Eksi bir tane var - yüksek bir fiyat, ancak hizmet ömrü (çalışma kurallarına uyulursa) yaklaşık 10 yıldır. Dolayısıyla bu masraflar makuldür.
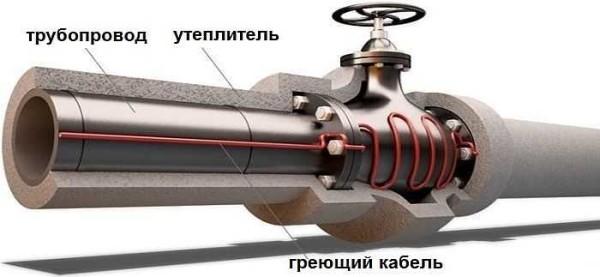
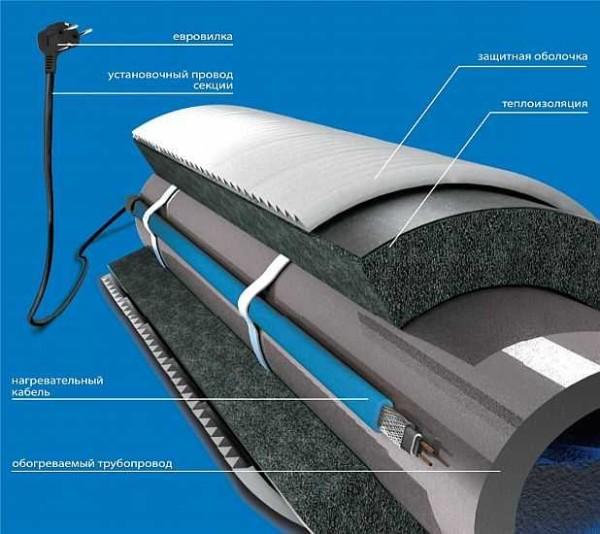
Her türden su borusu için ısıtma kablosu kullanıldığında, boru hattının yalıtılması arzu edilir. Aksi takdirde, ısıtma çok fazla güç ve dolayısıyla yüksek maliyet gerektirecek ve ısıtmanın özellikle şiddetli donlarla başa çıkacağı gerçeği olmayacaktır.
Kurulum yöntemleri
Su boruları için ısıtma kablosu borunun dışına veya içine döşenir. Her yöntem için özel kablo türleri vardır - bazıları sadece harici kurulum için, diğerleri - dahili için. Kurulum yöntemi mutlaka teknik şartnamede belirtilir.
Borunun içinde
Isıtma elemanını su borusunun içine monte etmek için birkaç gereksinimi karşılaması gerekir:
- kabuk zararlı maddeler yaymamalıdır;
- elektriksel koruma derecesi en az IP68 olmalıdır;
- hava geçirmez şekilde kapatılmış bir sonlandırma manşonu.
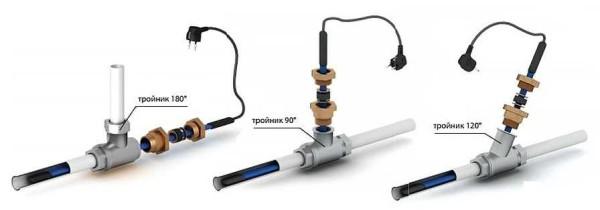
Teli içeri sokabilmek için, boru hattının sonuna bir tişört yerleştirin, dallarından birine rakor (bir set halinde gelir) içinden tel sarılır.
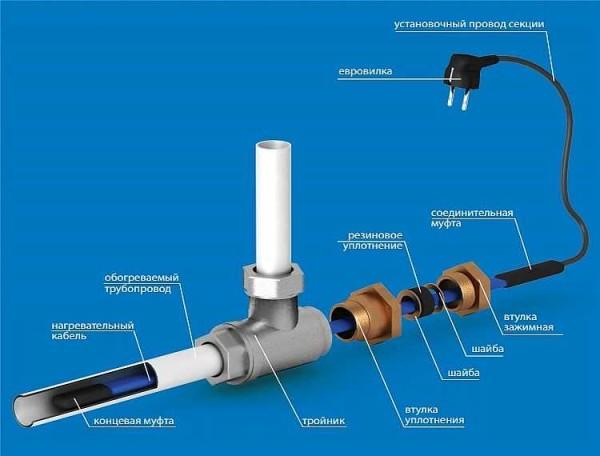
Lütfen kaplinin - ısıtma kablosu ile elektrik kablosu arasındaki geçiş noktası - borunun ve rakorun dışında olması gerektiğini unutmayın. Islak ortamlar için tasarlanmamıştır.
Isıtma kablosunu borunun içine monte etmek için kullanılan tee farklı dallanma açılarına sahip olabilir - 180°, 90°, 120°. Bu montaj yönteminde kablo hiçbir şekilde sabitlenmez. Basitçe içeri sokulur.
Harici kurulum
Su boruları için ısıtma kablosunu borunun dış yüzeyine sabitleyin, böylece tüm alana sıkıca yapışmalıdır. Metal borulara montajdan önce, toz, kir, pas, kaynak izleri vb. temizlenir. Yüzeyde iletkene zarar verebilecek herhangi bir unsur kalmamalıdır. İletken temiz metal üzerine serilir, her 30 cm'de bir metalize yapışkan bant veya plastik kelepçelerle sabitlenir (daha sık yapabilirsiniz, daha az sıklıkta - değil).
Bir veya iki tel çekilirse, bunlar alttan monte edilir - en soğuk bölgede, paralel olarak, birbirlerinden biraz uzakta döşenir. Üç veya daha fazla tel döşenirken, çoğu altta olacak şekilde düzenlenirler, ancak ısıtma kabloları arasındaki mesafe korunur (özellikle dirençli modifikasyonlar için önemlidir).
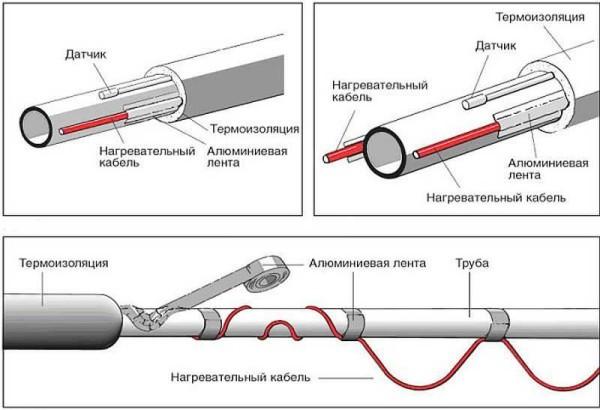
İkinci bir kurulum yöntemi vardır - spiral. Telin döşenmesi dikkatli olmalıdır - keskin veya tekrarlanan kıvrımları sevmezler. İki yolu vardır. Birincisi, serbest bırakılan kabloyu boru üzerine kademeli olarak sararak kaplini gevşetmektir. İkincisi - daha sonra sarın ve metalize yapışkan bant ile tutturmak sarkmalar (fotoğrafta alt resim) ile düzeltmek için.
Plastikten yapılmış su borusu ısıtılacaksa, telin altına ilk metalize bant yapıştırılır. Bu ısıtma verimliliğini artırarak, ısı iletkenliğini artırır. Su borusuna ısıtma kablosu takmanın bir başka nüansı: tees, vanalar ve diğer benzer cihazlar daha fazla ısı gerektirir. Döşerken, her bağlantı parçasında birkaç döngü yapın. Sadece minimum bükülme yarıçapına dikkat edin.
Ne ile izole edilmeli
Isıtılmış boru hattını yalıtmak için herhangi bir kaynaktan mineral yün kullanılması kesinlikle istenmez. Islanmaktan korkar - ıslak durumda ısı yalıtım özelliklerini kaybeder. Islak bir durumda donduğunda, sıcaklık artışından sonra, sadece toz haline gelir. Boru hattının etrafında nem olmamasını sağlamak çok zordur, bu yalıtımın alınmaması daha iyidir.
Yerçekimi etkisi altında sıkıştırılan çok iyi yalıtkanlar değildir. Sıkıştırıldıklarında yalıtım özelliklerini de kaybederler. Özel olarak inşa edilmiş bir kanalizasyona döşediğiniz boru hattı hiçbir şeye bastırılamazsa, köpük kauçuk kullanabilirsiniz. Ancak boruyu sadece gömerseniz, sert bir ısı yalıtımına ihtiyacınız vardır. Başka bir seçenek daha var - buruşuk yalıtımın üzerine (örneğin, kapalı hücreli polietilen köpük) sert bir boru koymak, örneğin - plastik kanalizasyon.
Başka bir malzeme - polistiren köpük, farklı çaplarda boru parçaları şeklinde kalıplanmıştır. Bu tip yalıtkanlara genellikle kabuk denir. İyi ısı yalıtım özelliklerine sahiptir, sudan korkmaz, bazı yüklere dayanır (yoğunluğa bağlı olarak).
Su boruları için hangi güçte ısıtma kablosu gereklidir
Gerekli güç, yaşadığınız bölgeye, boru hattının nasıl döşendiğine, boruların çapına, yalıtılmış olup olmadığına ve ayrıca ısıtmayı tam olarak nasıl döşediğinize bağlıdır - borunun içine veya üstüne. Prensip olarak, her üreticinin metre boru başına kablo tüketimini belirleyen tabloları vardır. Bu tablolar her bir güç için hazırlanmıştır, bu nedenle burada herhangi birini ortaya koymanın bir anlamı yoktur.
Deneyimlerimize dayanarak, Rusya'nın Orta şeridinde ortalama bir boru hattı yalıtımı (30 mm kalınlığında polistiren köpük kabuk) ile bir metre boruyu içeriden ısıtmak için 10 W/m'lik yeterli güç olduğunu ve dışarıdan en az 17 W/m almanız gerektiğini söyleyebiliriz. Ne kadar kuzeyde yaşarsanız, o kadar fazla güce (veya daha kalın yalıtıma) ihtiyacınız olur.
Termostatlı mı termostatsız mı?
Su kaynağını ısıtmak için az bir miktar ödemek istiyorsanız, bir termostat koymak daha iyidir. Kendi kendini düzenleyen bir ısıtma kablosu monte edecek olsanız bile. Temel olarak özellikleri şöyledir: +3°C'de açılır, +13°C'de kapanır.
Suyunuz bir kuyudan temin ediliyorsa, hiçbir zaman +13°C sıcaklığa sahip olmayacaktır. İlkbahar ve yaz aylarında bile ısıtmanın her zaman çalışacağı ortaya çıkıyor. Yaz aylarında elbette kablo kapatılabilir, ancak ilkbahar ve sonbaharda ani don olasılığı nedeniyle bunu yapamazsınız. Kuyularla biraz daha kolaydır, ancak çok değil - yaz aylarında, su kesme eşiğinin biraz üzerinde bir sıcaklığa sahip olabilir. Ancak bu - yaz aylarında ve en sıcak dönemde. Ve genel olarak, örneğin sarnıca giden suyu neden ısıtmanız gerekiyor? Mutfağa ya da duşa giden suyu ise yine kazanlar ya da su ısıtıcıları ile ısıtacaksınız.
Her durumda, bir termostata ihtiyacınız vardır. Üzerinde kesme sıcaklığını +5°C civarında ayarlarsınız. Boru hattını ısıtma maliyetleri zaman içinde düşer. Aynı zamanda, ısıtma kablolarının hizmet ömrü önemli ölçüde artar - belirli bir çalışma saati kaynağına sahiptirler. Ne kadar az çalışırlarsa, size o kadar uzun süre hizmet edeceklerdir.
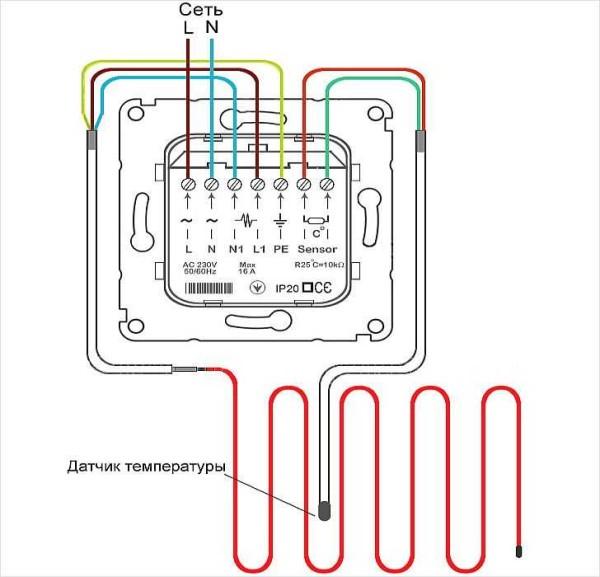
Termoregülatörlü su boruları için bir ısıtma sistemi kurarken, bir sıcaklık sensörü takmanız gerekecektir. Burada bir zorluk var. Isıtıcılardan gelen sıcaklıktan etkilenmemesi için borunun üzerine yerleştirilmelidir. Yani borudan yalıtılmamalı, ancak kablolardan yalıtılmalıdır.
Termoregülatörün kendisinin odaya monte edilmesi arzu edilir. Evin elektrik panosuna bir devre kesici ve tercihen bir RCD aracılığıyla bağlanır. Isıtma kablosunun güç tüketimi azdır, bu nedenle otomatik devre kesicinin nominal değeri yaklaşık 6A alınabilir, RCD'nin nominal değeri en yakın daha büyük olanı ve ardından sızıntı, tercihen 30 mA seçilebilir.
Tesisat için ısıtma kablosunu termoregülatörün gövdesindeki uygun konektörlere bağlayın. Birkaç dal varsa, bunlar paraleldir. Komşu kontaklara bir sıcaklık sensörü bağlanır. Her termoregülatörün üzerinde neyin nereye bağlanacağının açık olduğu bir işaret vardır. İşaret yoksa, başka bir tane satın almak daha iyidir: bu kopyanın çalışabilirliği çok şüphelidir.


So, I recently installed a heating cable on my water pipes after hearing about those freeze risks in winter. It was pretty straightforward! Now I don’t have to worry about getting stuck with frozen pipes. Definitely worth it for peace of mind during the cold months!
I recently installed a heating cable for my water pipes, and it’s a game changer! No more worrying about frozen pipes during winter. Super easy to set up and reliable. Totally worth it to keep things running smoothly. Highly recommend it to anyone living in cold areas!