

Many families have several devices connected to the Internet: we can’t imagine life without the World Wide Web, so each one needs its own line. They work mainly on wireless protocol – Wi-Fi, but there is still a wire, because while the wired Internet is more stable than wireless. During renovation, all wires are hidden in the walls and “internet” is no exception. They, like electrical, wind up on the sockets, but a different standard: called computer or information. They can be with different connectors, but the most common is RJ 45. Installation and connection can be done independently, but since the appearance of the connector looks unusual, the wires in it are more than two or three, and the connection is not provided by soldering and not twisting, you need to know how to connect the Internet socket as well as the connector, which should be inserted into it.
Contents of the article
Crimp connector RJ-45
Coming into an apartment or house Internet cable, which is most often called twisted pair, often ends with a small plastic connector. This plastic device is a connector, and usually RJ45. In professional jargon, they are also called “Jacks”.
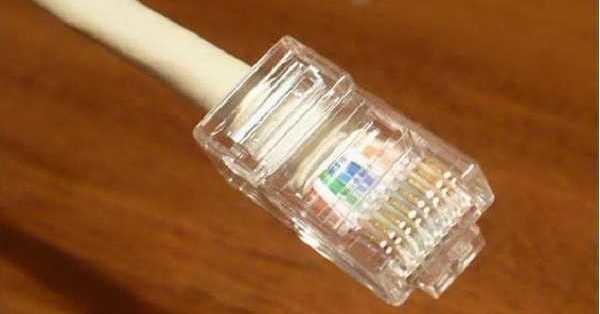
Its body is transparent, so you can see the wires of different colors. The same devices are used on connecting wires that connect computers to each other or to a modem. Only the order of arrangement (or as computer specialists say, pinout) of wires may differ. The same connector is plugged into a computer socket. If you understand how the wires are distributed in the connector, with the connection of the Internet socket will not be a problem.
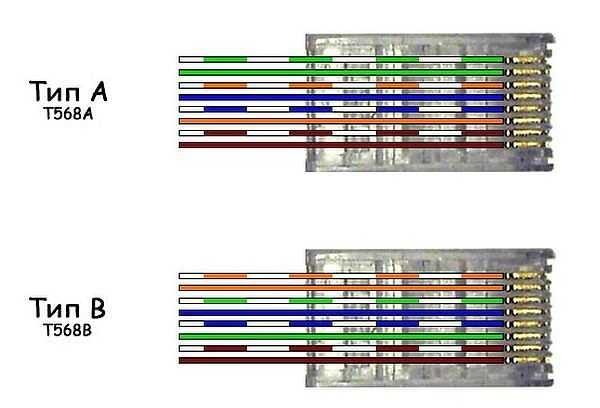
Connection scheme of the Internet cable by color
There are two connection schemes: T568A and T568B. The first option – “A” in our country is practically not used, and everywhere the wires are arranged according to the scheme “B”. It is necessary to memorize it, as it is required in most cases.
To finally clarify all the questions, let’s talk more about the number of wires in the twisted pair. This internet cable comes in 2-pair and 4-pair. For data transmission at speeds up to 1 Gb / s use 2-pair cables, from 1 to 10 Gb / s – 4-pair. In apartments and private houses today, mostly wind up streams up to 100 Mb/s. But with the current pace of development of Internet technology is quite possible that in a couple of years speeds will be counted in Megabits. For this reason, it is better to immediately expand the network of eight, not 4 conductors. Then when the speed changes, you will not have to redesign anything. Just the equipment will use a greater number of conductors. The difference in the price of cable is small, and sockets and connectors for the Internet still use eight-pin.
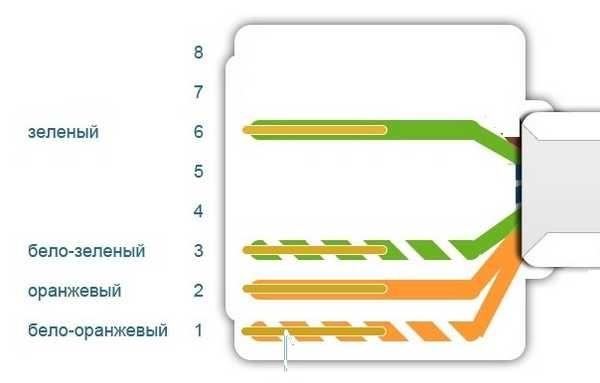
If the network is already divorced two-pair, use the same connectors, only after the first three conductors, laid in scheme B, skip two contacts and the green conductor laid in place of the sixth (see photo).
Crimping the twisted pair in the connector
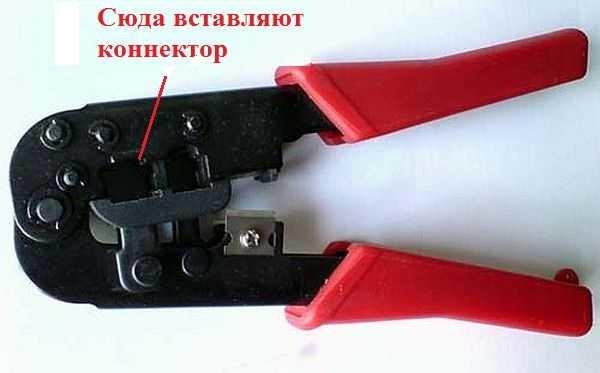
For crimping wires in the connector there are special pliers. They cost about 6-10$ depending on the manufacturer. It is more convenient to work with them, although you can do with an ordinary screwdriver and wire cutters.
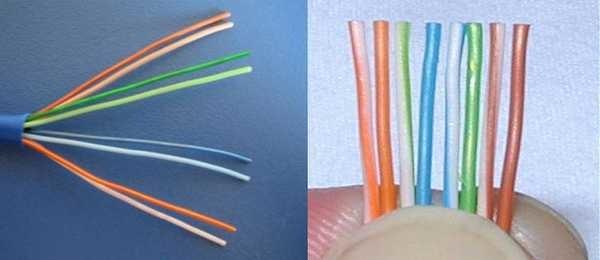
First, the insulation is removed from the twisted pair. It is removed at a distance of 7-8 cm from the end of the cable. Under it there are four pairs of conductors of different colors, twisted in two. Sometimes there is also a thin shielding wire, it is simply bent aside – we do not need it. We untwist the pairs, align the wires, separating them in different directions. Then put them together according to the scheme “B”.
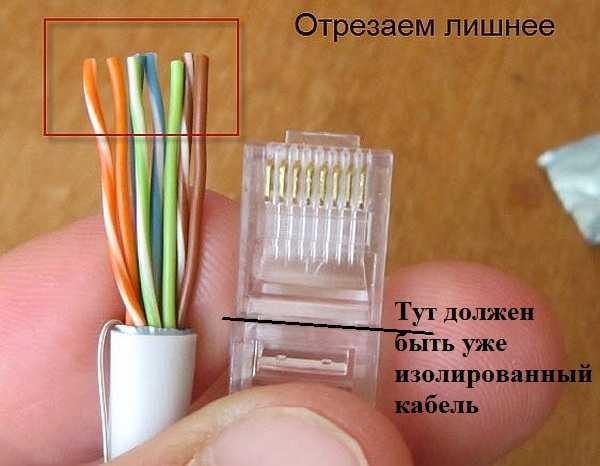
Clamp the wires in the desired order between the thumb and index finger, Lay the wires evenly, tightly to each other. Having aligned everything, take wire cutters and cut off the excess length of the wires laid out in order: 10-12 mm should remain. If you attach the connector as in the photo, the insulation of the twisted pair should start above the latch.
Twisted pair with cut wires lead into the connector. Note that you need to take it with the latch (tab on the lid) downwards.
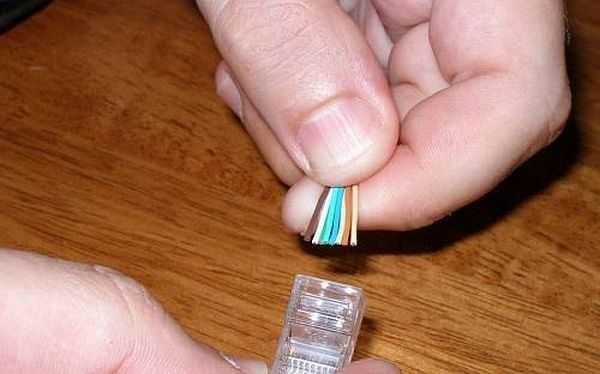
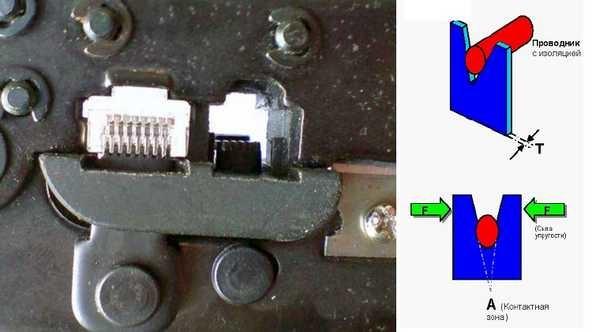
Each conductor should get into a special track. Insert the wires as far as they will go – they must reach the edge of the connector. Hold the cable at the edge of the connector and insert it into the pliers. The handles of the pliers are brought together smoothly. If the case has become normal, no special effort is required. If you feel that “it does not go” recheck whether RJ45 stands correctly in the socket. If everything is fine, try again.
When pressure is applied, the protrusions in the pliers will move the conductors to the micro knives, which will cut through the protective sheath and make contact.
This kind of connection is reliable and problems with it are rare. And if something does happen, it’s easy to redo the cable: cut it off and repeat the process with another “jack”.
You can read about connecting a chandelier here.
Video lesson: crimping an RJ-45 connector with pliers and a screwdriver
The procedure is simple and easy to repeat. Perhaps you will find it easier to do everything after the video. It shows how to work with pliers, as well as how to do without them, and do everything with an ordinary straight screwdriver.
How to connect the Internet cable to the socket
Now we have reached directly to how to connect the Internet outlet. Let’s start with the varieties. Like ordinary electrical outlets, information outlets come in two modifications:
- For internal installation. A mounting plastic box is embedded in the wall. In it, then inserted and fixed contact part of the socket, and the top is closed all plastic decorative panel.

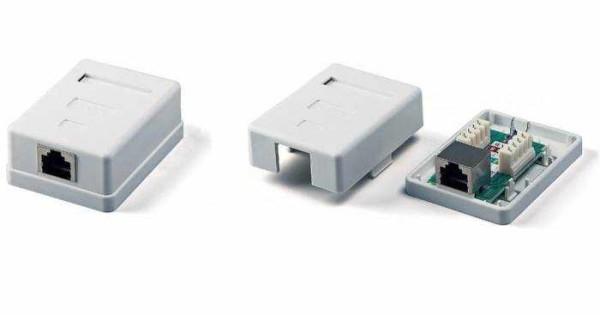
- For outdoor installation. This type of socket is very similar in appearance to the usual telephone sockets: a small plastic case that is mounted on the wall. It also consists of several parts. First, the housing with a contact plate is mounted, then the wires are connected, and then everything is closed with a protective cap.

According to the number of connection points there are single and double computer sockets.
Although outwardly computer sockets are different, the principle of connecting the conductors they have the same. There are special contacts equipped with microknives. At the inserted conductor is cut through the protective sheath. As a result, the metal of the contacts-microknives tightly adheres to the metal of the conductor.
How to connect a wall-mounted computer outlet
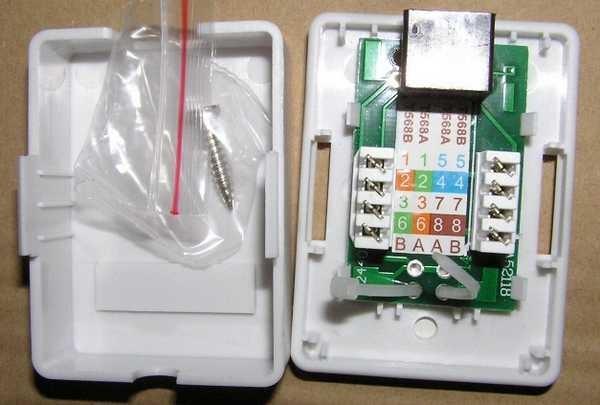
Inside each socket there is a hint about how to place the wires when connecting an Internet cable. Manufacturers stick a color scheme, which we saw when crimping the connector. There are also two options – “A” and “B”, and we also use option “B”.
The case is mounted on the wall, usually with the cable inlet upwards and the computer connector downwards. The next steps are simple:
Connecting twisted pair to the outlet is really not a complicated procedure. Even the first time it takes a few minutes. Once again, you can see what and how to do in the video. It first shows the connection of an internet cable with 4 wires, then – with 8.
Sometimes you have to get up in bed to turn off the lights. But you can make control of lighting from several points. How – read in the article about connecting pass-through switches.
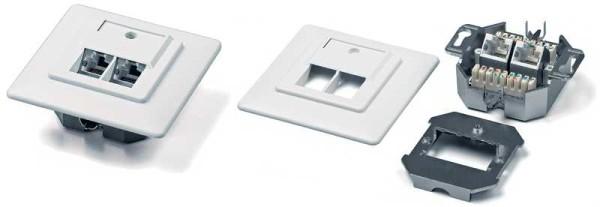
How to connect an internal Internet socket
We will not describe the installation of a plastic box – this is another topic. Let’s understand the peculiarities of connection and assembly. The main sticking point here is how to disassemble computer sockets. When connecting to them conductors must get to the contact part: a small ceramic or plastic housing with embedded contacts-micronozhami. This is where the conductors are connected to this mounting plate, and then the housing is reassembled. And the whole problem is that different manufacturers assemble/disassemble them differently.
For example, in the popular manufacturer of computer sockets Legrand (Legrand) in order to get to the connectors in the computer socket Legrand Valena RJ45, you need to remove the front cover. Under it you will find a white plastic impeller (as in the photo), on which there is an arrow.
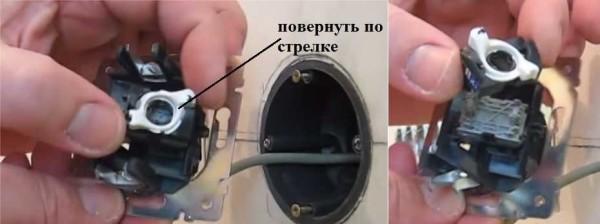
It is necessary to turn the impeller according to the arrow, after which you will be left with the body and the contact plate in your hands. It is marked with colored markings of conductors. Connection is no different, except that – first in the hole on the plate you need to thread the twisted pair, and then divide the wires.
For clarity, watch the video.
Another popular manufacturer of such equipment is Lezard (Lezard). His system is different. The front panel and metal frame are fixed on small bolts. It is easy to unscrew them, but the inner contact plate is held all on clamps. Assembling and disassembling computer sockets Lezard (Lezard) in the right places you need to press the contacts with a screwdriver.
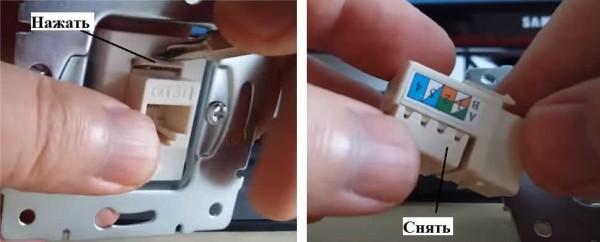
To remove the plastic contact group from the case, you need to press the latch located on top. After that, you will have a small box in your hands. But that’s not all. It is necessary to remove the plastic cover, which closes and presses the conductors. It is removed by prying off the side petals with a screwdriver. The plastic is elastic and the effort required is quite decent. Just do not overdo it: it is still plastic. After that, the wiring is standard: according to the markings on the sides (remember that we use the scheme “B”).
And again, to reinforce the material, we advise you to watch the video.
If you know how to connect the Internet socket, even with an unfamiliar model is not difficult to understand. And you can now modernize your network yourself (increase the length of the twisted pair, move the computer to another place, make another connection point, etc.), without involving specialists. One more question remains: how to connect double sockets. Two cables are brought to them and then goes on the expansion according to the color scheme. This is possible when your network is formed by a modem or two Internet lines come in. Is it possible to extend both inputs with one cable? Yes, but it is necessary not to get confused in the color designation of wires in the further network wiring (remember what color instead of what color you used).


")