Two components are necessary to ensure a normal air exchange in a house or apartment: the supply of fresh air through the living rooms and the outflow from the technical rooms. Ventilation in the bathroom and toilet is one of the components of the outflow. Therefore, it is necessary to make it correctly.
According to the principle of action ventilation can be natural or mechanical, they also say – forced. Natural air movement occurs due to the movement of wind, temperature differences and, arising from this, pressure differences. When using mechanical ventilation, air movement is caused by fans.
From the point of view of an urban person, forced movement is preferable: everyone has long been accustomed to the fact that life support depends on the availability of electricity. And it is rarely lost in cities. But in rural areas, power cuts in winter are more of a norm. That’s why, probably, they tend to make systems mostly energy-independent or, at least, redundant.
But natural ventilation in the bathroom and toilet should be too large. After all, the lower the velocity of air movement through the duct, the larger the cross-section of the duct is necessary to ensure the transfer of the required volumes. No one will argue that when the fan is on, the air moves faster. This is even reflected in SNiP: the norm of movement speed for ventilation systems with natural circulation – up to 1 m3/ h, for mechanical – from 3 to 5 m3/ h. Therefore, for the same room and conditions, the size of the ducts will be different. For example, to transmit a flow of 300 m3/h will be needed:
Therefore, few people today make do with natural ventilation. Unless in small houses (up to 100 square meters). Even in apartments, with channels taken out to the roof, ventilation of bathrooms and toilets are made with the use of fans.
Innehåll i artikeln
Rules of organization
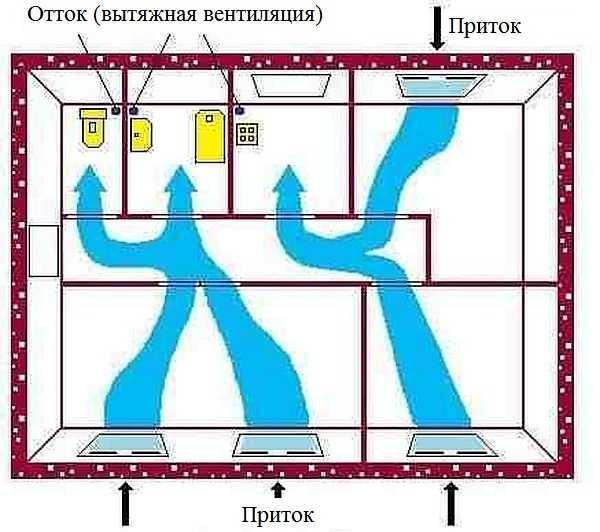
When organizing the air movement system, you need to remember the basic principle: in order for everything to work effectively, it is necessary to ensure the inflow of air through the living rooms and its flow into the technical rooms. From there it already leaves through the ventilation ducts.
Today the air supply has become a problem: reducing heating costs, we have cut off almost all sources of air supply. We put airtight windows, we insulate the walls, through which the air at least a little bit came, with airtight materials. The third source – entrance doors – today almost everyone has iron doors with rubber seals. In fact, the only way left is ventilation. But we do not abuse it at all: it blows out the heat. As a result, to the problems of lack of oxygen in the room is added the problem of dampness: there is no inflow, and the outflow is ineffective. Even forced.
If you want ventilation to be normal, and the walls in the rooms are not “wet”, make ventilation holes. There is such an option on metal-plastic windows, and there are separate devices that are mounted anywhere on the wall. They are with adjustable flaps, different shapes and sizes, outside are taken away by grilles. They are best installed under windows, above or behind radiators. Then they are not visible in the room, and in winter the air coming from the street is heated.
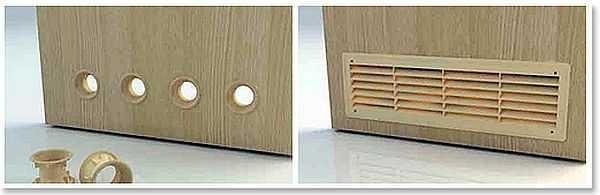
Having ensured the inflow, it is necessary to take care that through the doors it got into the technical rooms. Therefore, there should be slits under all doors: through them the air will flow to other rooms. It is advisable to install a ventilation grille in the bathroom door and/or make a gap of at least 2 cm from the floor. The same rules apply to other technical rooms: kitchen and toilet. Only if there is movement of air masses, ventilation will work.
Perhaps you will be interested to read about how to build a wooden toilet in the dacha.
Calculating the performance of the fan for the bathroom and toilet
To determine what kind of fan to put on the bath with a toilet, you need to calculate the necessary air exchange. Calculation is a whole system, but when installing a fan, the main focus is on its characteristics: it provides the required air velocity. In order not to get into the calculations, its performance can be taken from the average norms.

As you can see from the table (this is from SNiPa) for the bathroom for an hour should be “pumped” at least 25 m3/ h, for the toilet or combined bathroom the speed should be twice as much – 50 m3/ h. These are the minimum values. In reality, through three (or two) technical rooms – kitchen, toilet, bathroom – should leave as much air as comes through the supply ventilation.
The calculation of the supply is carried out on the volume of all living rooms and usually exceeds it by 1.5-2 times and to ensure the required air exchange minimum values specified in the table is not enough. Therefore, the performance of fans are taken, at least with a two-fold reserve, and for kitchens and more: so there will be no unpleasant odors in the apartment, as well as dampness and fungi. Therefore, going for a fan in the bathroom less capacity than 100 m3/ h is better not to take.
How to assemble and install a shower cabin is written here.
Choice
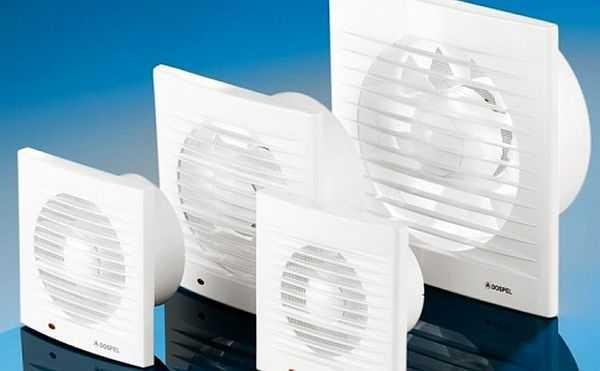
First of all, it is necessary to decide where you will put the fan: in the channel or on the wall. Accordingly, and the type: channel or wall-mounted. In the wall versions can also be two types: for installation at the entrance of the vent channel – they create more pressure, and for ductless installation – output directly through the wall to the street. For ductless installation usually use fans of axial type – they can not create a pressure of more than 50 Pa, in the channels for this reason are not put.
In addition to the performance that you have calculated, another important characteristic is such a characteristic as the noise level. The less it is, the better. It is good if the noise level will be no more than 35 dB.
Another thing to pay attention to is the level of electrical safety. For use in rooms with high humidity requires a level of protection not lower than IP 44 (indicated on the case of the fan).
Connecting the fan in the bathroom
For the operation of the fan requires power supply and the main question is how to connect it. There are several possibilities:
- Connect in parallel with turning on the lights. When you turn on the light in the bathroom or toilet, the fan automatically starts. But it also turns off automatically when the light is switched off. This situation is normal for the toilet, but not always for the bathroom. For example, after taking a hot shower, all the steam will not escape. Therefore, for bathrooms you can use another way to connect the fan or install a delayed shutdown (a special device on which you can set the time interval after which the power will turn off).
- Put it on a separate switch key or put a separate toggle switch/button.
- Install a timer that will automatically supply power on a schedule.
The electrical part is the hardest part. You will have to punch a grommet in the wall, in it “pack” the power cable, lead it to the place of installation of the switch and there connect depending on the chosen method.
How to make a shower cabin with a pallet of tiles can be read in this article.
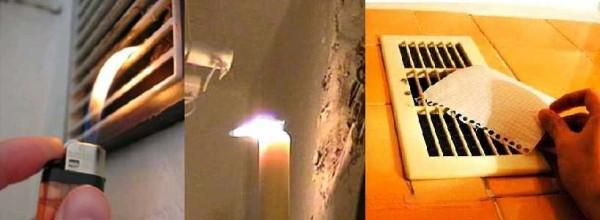
Checking the ventilation duct
Installing a fan in the bathroom with your own hands begins after checking the condition of the channel. To do this, remove the grille, if it has not yet been dismantled, and bring a flame (candle, lighter) or a piece of paper to the hole. If the flame or a piece of paper is steadily drawn towards the duct, the draft is normal. If it pulls out and then bends back – the draft is unstable. In this case, if you live in an apartment building, odors from the neighbors above or below can get to you. Then there may be a smell in the toilet from the ventilation. It is necessary to stabilize the draught.
If the flame or leaf is almost not deflected – the channel is clogged or blocked. In this case, mold and dampness, as well as unpleasant odors are guaranteed in the entire apartment, and in the bathroom, so necessarily.
In case of abnormal draught, residents of multi-storey buildings clean the ducts themselves or call the maintenance services. In private houses, in any case, everything falls on the shoulders of the owners. If the channel is unstable, perhaps you have not taken into account the winds and the draught is periodically overturned. You can solve the problem by moving the outlet, but it is not easy. To begin with, you can try to put a deflector (if there is none) or slightly increase/decrease the height.
Features of forced ventilation in the bathroom
When installing a fan during its operation, the amount of air output increases significantly. But because the housing blocks part of the cross-section of the channel, at other times, when the fan does not work, the flow is reduced by three times. As a result, the overall performance of the ventilation system drops.
To prevent this from happening, it is possible to install the fan with a lower air intake grille and thus raise the performance to the norm. The second option is to leave a gap of 1.5-2 cm between the housing and the wall during installation, i.e. to make legs. Air will enter the gap and ventilation will be normal in any case. For more information about this, see the video.
Having chosen the method of installation and the type of grille, you can proceed directly to installation. The size of fans can be different. Therefore, each case is different. But the basic steps are standard:
- It is necessary to make a hole on the tile under the case. The easiest way is to attach the fan and outline. Then a special nozzle on a drill or a Bulgarian cut out the appropriate size hole.
- Remove the front panel from the fan. It is fixed with one bolt in the lower part. The bolt is unscrewed, the grille is removed. Now you can see the holes for fasteners. Put the fan in this form in place (in the channel), mark on the tile with a pencil or marker the places where the bolts will be.
- With a drill of appropriate diameter make holes in the tile and wall for the size of the dowel.
- Make a cut in the tile, where we will pass the power supply wire.
- Insert the dowels.
- Pull the electric wires through the special hole on the fan housing (if there is no hole, it is drilled).
- Put it in place, tighten the screws.
- Connect the wires.
- Check the performance and install the grille.
- About the choice of fan and calculation of its performance read here.For wooden toilets all this is only partially true. Read about how to get rid of odors in a street toilet here.
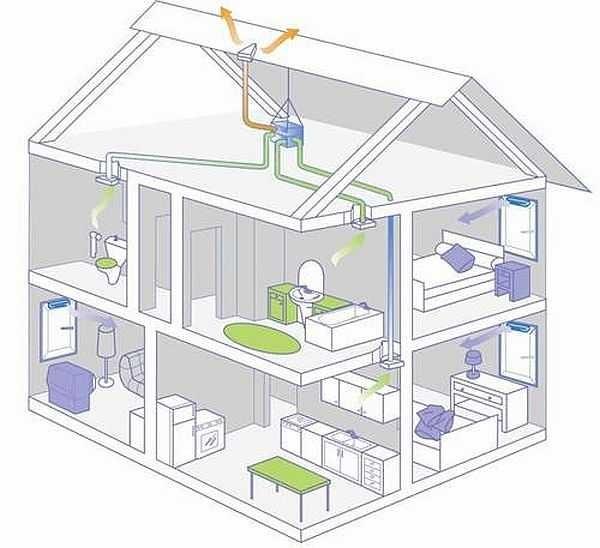
Ventilation in the bathroom in a private house
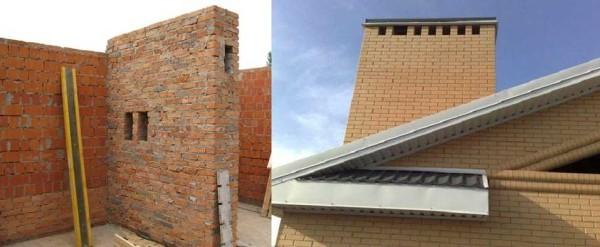
Here the main difficulties can arise in the arrangement of exhaust ducts. In the planning, they can be brought together in one place and then lead to the roof. This is more complicated in terms of internal wiring – you will have to pull the ducts to the right place, and also more costly in construction. But the appearance is solid.

Another way to arrange ventilation ducts: take it out through the wall, and then on the outer wall to go up . According to the rules, for normal draught in natural ventilation, they should rise above the ridge by 50 cm. But one common air duct will be led out by you or a separate one for each room – depends on your desire or on the layout. The picture will turn out roughly like this.

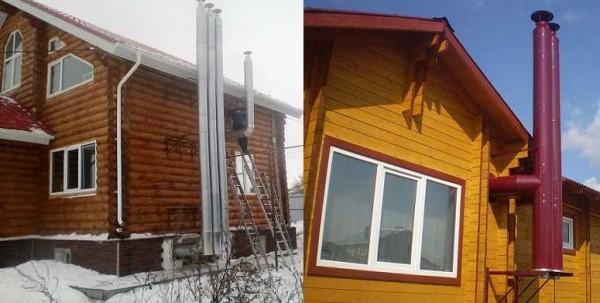
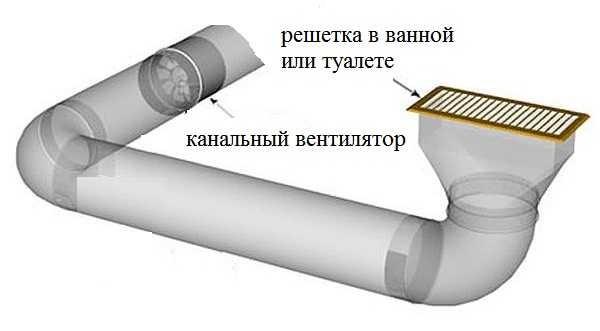
There is another option: to make a mechanical extractor, which will work exclusively from the fan. Then, depending on the layout, one of the two options presented in the photo is suitable.

In the first case (left), the exhaust hole is made directly in the upper part of the wall (in order for air exchange to be effective it should be located opposite the door, obliquely, at the top). In this arrangement, a normal wall fan is used. The same figure shows how you can reduce the number of necessary channels. If you have rooms of the bathroom and toilet are next to each other, through a thin partition, then in the partition you can make a hole and install a grille. In this case, the ventilation of the bathroom will go through the toilet.
In the second option (on the photo on the right), a duct with a duct fan is used. The solution is simple, only there is one nuance: if the duct will end under the roof overhang (on the photo it is short, but there are long ones), the wood will turn black after a while. If so make the output from the toilet, this may not happen, but in the case of the bathroom, increased humidity will make itself known after a couple of years. In such a case, the duct can be “pulled” to the roof cut or led upwards through an elbow (but raised 50 cm above the roof).