

Construction from wood will probably always be there. Very good atmosphere in such buildings, and the appearance of a well-cut house, according to the most modest estimates, attractive. Finishing a wooden house inside – this is a separate topic with many nuances: wood – a special material, the characteristics and properties of which should be taken into account. On the technical and technological features of finishing work in a house made of wood and we will talk.
Innehåll i artikeln
When to start
On a “fresh” log cabin you can start finishing work not earlier than the main shrinkage. If the log cabin is made of glued timber, it should take 3-4 weeks. For all other types of wooden houses the period is calculated in months, and sometimes – years. The exact time of shrinkage depends on the initial moisture content of raw materials, climatic zone and time of construction. That’s how complicated it is. In any case, earlier than a year, in the extreme case – in 10 months to start finishing is not worth it. During this period of time there is an active shrinkage of wood, logs and beams are reduced in size, the insulation laid between the wreaths is crumpled. If you attach the trim while the main processes have not passed, it will fall off or it will skew. You will have to remove everything and redo it all over again. So you should not hurry. Moreover, the work will be enough: you need to achieve tightness of joints, and this is not easy. You need a thorough competent caulking.
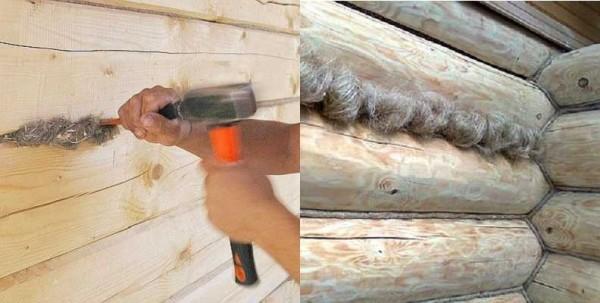
Usually the main caulking of the log cabin passes in two stages. Primary – a few weeks after the installation of the log cabin, and secondary – about six months – eight months. Each time the gaps are plugged with insulation – jute, soap, sometimes moss. Immediately it is made from the outside and inside, otherwise the house will skew. That’s why the building goes around the perimeter, plastering alternately, each wreath, then from the outside, then from the inside. The work starts from the bottom, from the lowest row of logs or beams.
At each caulking the log cabin is raised by 5-7 cm. Then, under the force of gravity, it gradually settles down. Sealed interwoven insulation reliably covers the gaps. The quality of this work is very important: it is not the least of all depends on how warm the house will be.
Start finishing work inside a wooden house after the log cabin sits down after the second caulking. To determine whether the process is complete or not, the height of the walls are periodically measured. If within two or three months there are no significant changes, you can consider that the main processes have passed. It’s time to start finishing the inside of the house and the outside.
How to build a house from a log read here.
Types of finishing the walls of a wooden house
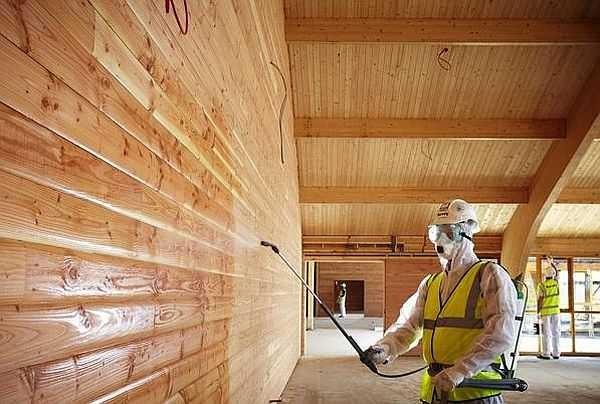
If the log cabin itself has an attractive appearance, it is rarely clad. In this case, it makes sense to reduce the cost of interior finishing: sand the log or log and zakolerovat. Only the floors should be varnished: the varnish will prevent the wood from abrasion. And the walls and ceiling are best covered with underpainting antiseptics or water-based paints. They do not paint over the texture of the wood, but only give it a shade, better showing the pattern. You will still need to use antiseptics to maintain the attractive appearance of the wood.
If the log or beam is normal, bad looking seam caulking, it is glued with twisted cord, and the walls are finished as well – sanded and tinted. Also everything looks good, and the cord in the groove serves as an additional guarantee against drafts.

What to cover the walls in a wooden house inside
If the log is so crooked or old that sanding will not help the case, you will have to do the interior finishing of a wooden house from wagon, wall panels, gypsum board or other material.
For any of these materials, it is better to make a crate: so you can level the surface of the walls. In addition, behind the battens there is room for free air circulation. This is important in a wooden house, because only dry wood does not rot or blacken. Free circulation of air between the finishing material and the wall will maintain their normal condition.

The distance behind the purlins are still used for laying communications – electrical wiring, for example. In a wooden house it should be made in non-combustible pipes, so that the space for it is necessary decent. In the same place, if necessary, you can put insulation – this is if you have a cold house. If you spend a little on heating and the house is warm, it is better not to use any additional materials: neither insulation nor vapor barrier. Wood itself perfectly copes with maintaining stable humidity in the house, and extra layers only upset the balance.
Fixing the trim on the battens is not to everyone’s liking: if an animal or insects settle behind the paneling, it is difficult to get rid of them. In this case, you can level the surface of the logs, removing protruding parts and to such a surface to nail the trim. Perfectly level surface is difficult to achieve, but possible. The gaps between the finishing material and the wall, which in this case are still present, once smeared with clay. It and heat insulation will be, and from draughts will protect. Technologically it is wrong, but it is also done.
Whatever materials for paneling the walls of a wooden house inside are not used, up to the ceiling should remain a gap of at least 2-4 cm. For a “young” log cabin it is insurance in case of shrinkage. For the old – a gap to compensate for changes in the geometry of wood. It breathes all its life: it gains moisture and swells, then shrinks. A gap under the ceiling will allow the wood to expand or shrivel without affecting the finish. If it is not done, either cracks will appear or the trim will bend/rip out. To the gap does not “cut the eye” it is closed ceiling skirting board. It is nailed only to the ceiling, to the wall only leaning. In this case, all the movements will be invisible.
About the interiors of a wooden house and ways of interior finishing read in the article “Design of a wooden house inside in photos and videos”
Finishing with wagon inside the house
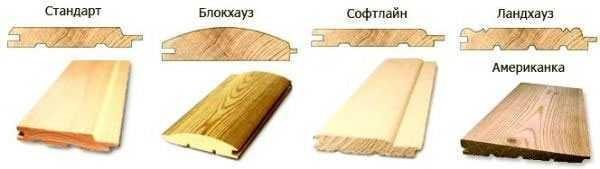
Carpentry is a leader among finishing materials. It is used both inside and outside the house, only with different processing (impregnations and paints are taken for exterior or interior work). It comes in different types. It is not only about different species of wood or different width of the board. There are also different profiles: flat, wavy, imitating a log or log cabin. Several options are in the photo below.
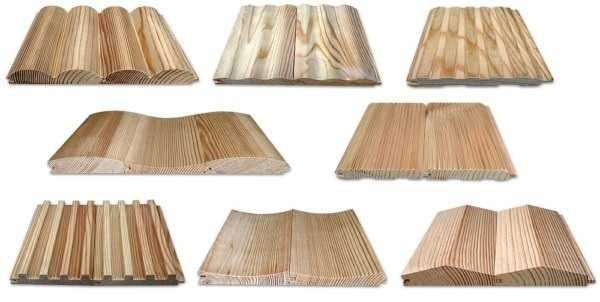
For finishing inside the house, the wagon is taken not thick: 1,5-2 cm is enough. It costs less, and it will fulfill its functions. Laths can be placed horizontally, vertically, at an angle. From combinations of all these directions you can get an amazingly beautiful panel, but it is labor-intensive.
Nailing the battens or laths you need to remember the shrinkage of the log cabin and the ability of wood to swell and shrivel. Near the floor and ceiling do not nail the trim and battens closely, leave 2-4 cm to compensate for these expansions.
Wagon trim and walls and ceiling. And there and there it looks more than decent, and costs such a finish is relatively inexpensive. Cheaper (and easier to perform) only to cover with plywood and paste wallpaper. This, by the way, is a popular option for finishing a summer house inside the economy class. With a sufficient level of performance, this method can be used to decorate rooms not only in the dacha version. The only objection is the glue used in the manufacture of plywood. But if it is taken I class of emission (authorized for use in children’s institutions), then probably nothing terrible will happen.
How and what to paint the wagon indoors read here.
Methods of fastening
In the past, especially did not worry and nailed the wagon in the plate (in the front surface) through. In the best case they used nails without caps or finish nails (their caps are very small). Sometimes the caps were covered with wood putty and sanded, sometimes the screw holes were covered with pins. This is for the most fastidious and demanding to the quality of finishing.
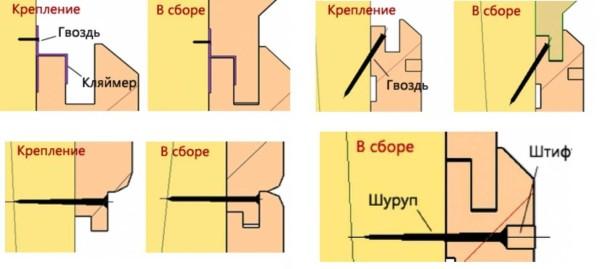
Today, even this method is considered not the most aesthetic: traces can still be seen. To make nothing visible, countersunk methods are used:
- nails or self-tapping screws are driven at an angle into the stud or groove;
- with the help of clampers.
Both of these methods require patience and care: thin nails of small size are used, they must be nailed so as not to damage the front surface. To make it easier, you can hit not with nails, but with staples from a construction stapler. Staples are taken with a narrow back and long legs, made of stainless steel with sharpening. Although there are models of staplers, “shooting” nails with a very small head. For fastening wagons – the very thing. Also use self-tapping screws. Comparison of the two methods is made in the video.
There is one nuance. If you bought wagon not chamber drying (its humidity is 7-8%), it will gradually dry up. Between the slats will appear gaps and you will either have to put up with them, or nail all the slats again. Sometimes two or three times. It is impossible to avoid this. You can only choose a profile in which the gaps will not be noticeable (profiles “Softline” and “Standard” in the picture in the previous section). In this regard, it is necessary to think carefully about what is better to fix the wagon for the first time: it will have to be removed. Therefore, it is desirable to make it so that it was not difficult and that it did not collapse. Here everyone decides for himself: someone is more convenient to work with self-tapping screws, someone with nails. Both methods are not ideal (nails are hard to pull out, and under the head of the screw you need to drill a hole), but both are acceptable.
Sometimes there is a need to dock the wagon with a wall of logs. The difficulty may arise because the wall has a non-linear shape. It can be outlined using a small piece of wagon, to which a simple pencil is attached. Putting the bar and leading on the wall with a piece of wagon with a pencil, transfer the shape of the log to the bar. Carefully sawing along the intended line, you can achieve an almost perfect match.
Perhaps you will be interested to read about how to lay laminate.
Wall panels for interior decoration
Finishing a wooden house inside with wall panels gives a completely different stylistic result. This finishing material is made of different materials with different textures:
- wood;
- bamboo;
- MDF (laminated and veneered);
- glass (smooth with photo printing, relief, colored, transparent, frosted);
- plastics and plastics;
- leather.
They can be set or paneled. Set – long thin elements, connected to each other on the principle of “spike and groove”. Wagon – this is in fact also wall panels. Just it has long been used as an independent category of finishing materials. Shield wall panels differ in geometry – have a comparable length and width.
Collected all usually on the battens (as well as wagon), the bars of which are nailed taking into account the size of the selected finish. This material is loved by designers: materials, texture and color solutions allow you to implement a variety of ideas. Such interior decoration of a wooden house can be very expensive – made of leather – or cheap – MDF panels. But the appearance has quite decent.
If the wall panels by technology should be laid on the glue (gypsum, for example), then on the crate (you remember that in a wooden house it must be made floating) are fastened plates substrate – plywood, GVL and so on. The boards are installed on this substrate on the glue. An example is shown in the video.
About the peculiarities of the design of a wooden house inside, read here.
How to cover a wooden house from the inside with plasterboard
The technology of work in a house made of wood or other material is no different: the frame is assembled, and to it the plasterboard is attached. Only, as in the case with the battens for wagons need to leave gaps near the floor and ceiling. The only condition: this type of interior decoration of a wooden house is possible only after full shrinkage (should pass at least a few years and the house should be heated). Gypsum – a fragile material and with significant changes it will simply tear. The only option that will allow you to ignore them to some extent – to make a floating frame, attaching profiles to the walls not rigidly, and leaving freedom of movement. Then the log cabin will settle by itself, and the drywall will stay in place.
With the help of what and how to make a floating batten for fastening rigid finishing materials (plasterboard, bases for ceramic tiles, etc.) see in the video.
Another feature of finishing a wooden house with drywall: all joints, seams and corners must be glued with a polymer reinforcing mesh. It will prevent the formation of cracks in the most problematic areas (or slow down their formation). If you need to make the cladding of the house from the beam inside the drywall, but you do not want to lose precious centimeters of space because of the installation of profiles, you can do as in the following video. There are some useful tips.
The layout of the interior of a country house is described here.
Features of the interior finishing of an old wooden house
If the house from a bar or log has stood for several decades, first of all you need to assess the condition of the wood. To do this, remove all the trim and “pick” all suspicious spots – darker or lighter color, differing in structure or texture. You can do this with a screwdriver, chisel, even a knife. If the wood is dense everywhere, there are no signs of destruction, everything is normal, you can start finishing. Perhaps you need to first impregnate the walls and other structures with a protective impregnation – to protect the wood for a few more decades. But not all owners of wooden houses agree to chemical treatment, so it’s up to you.
If the wood is crumbling from your efforts, you need to consult a specialist. It is necessary to determine what caused the damage – insects, fungi or microorganisms – and what measures should be taken. The damaged pieces or elements are then replaced, paying special attention to treating adjacent areas with antiseptics and protective impregnations.
Once the wood has been evaluated or “treated”, the exterior renovation can begin. Finishing an old wooden house inside does not differ from those described above. Except for the fact that shrinkage should not be taken into account: there is no significant movement. So from this side everything is somewhat easier.


I totally geeked out over the interior finishing of my cabin! We used reclaimed wood, and the vibe is just epic! The technical stuff, like insulation and moisture control, was tricky but worth it. Totally transformed the space—now it feels like a cozy retreat! Can’t get enough of it!
Wow, I totally get the challenges of finishing a wooden house! Last summer, I tackled some DIY shiplap walls, and it was a game-changer. The warmth of the wood really brings everything together. Love how you highlighted the tech details—super helpful for any newbie looking to dive in!
Thanks! Yeah, I remember when I put up shiplap in my living room. It was a mess at first, but once I figured out the right tools, it transformed the space. Totally agree—wood brings such a cozy vibe. Glad you found the tech tips useful!
Totally get that! I remember my first time with shiplap too—it was chaos! But once I got the hang of the nail gun, it all clicked. And you’re right, wood really adds that warmth. Love how projects like that can turn a room around!
Hey! Thanks for the kind words! I totally feel you on the shiplap walls; I did some in my living room last fall, and it was a blast. The cozy vibe it adds is awesome! Glad you found the tech tips useful—always here to share the DIY love!