

Shower cabins are often used in small bathrooms. They are popular in bathhouses and dachas, put them instead of baths in apartments and houses, make them in addition – who knows how. But plastic cabins are not liked by everyone: too flimsy. Shower cabin with their own hands, although it takes more time, but more reliable.
If you want to make yourself a shower cabin in order to save money, first calculate well. Many note that the cost of a homemade shower cabin is not cheaper. And this is still good. It often turns out to be even more expensive. But what is a plus is that you can make it exactly the way you like. Such sizes, as you want (or as it turns out). Just figure out the cost for each of the items and add up the total. Here’s what you’ll need.
- You’ll need good waterproofing, and most likely for pools.
- A good drain is simply essential.
- You’ll need to raise the floor to install the drain, and that’s a decent amount of mortar with plasticizers to increase water repellency.
- You’ll need a good non-slip floor tile or mosaic, and glue (water repellent) for the finish.
- It would also be a good idea to have underfloor heating – it is very unpleasant to stand on a concrete floor in winter.
- You will also need doors, although you can do with a curtain.
Already the amount is not insignificant. If you also need to build walls, even if they are made of plasterboard, then the savings will not be for sure.
Inexpensive cost of independent device shower cabin only if there is a ready-made cubicle, which is simply fenced off by a door or a curtain. But even in this case, the cost of the device drain and floor does not go anywhere.
Innehåll i artikeln
Ways of organizing the drain in the shower stall
Despite the outwardly almost identical appearance – walls and floor in tiles, some doors, homemade shower cabins have many variants of the internal device. There is really a lot to choose from.
Types of trays
The easiest and most reliable option to make a waterproof floor in the shower stall is to put a ready-made pallet. It can be installed on bricks or make a base of foam blocks. By “ready-made pallet” we mean two types: acrylic and enameled. Acrylic is lightweight and non-slip, but over time it turns yellow. Enameled – not bad in operation, but in the wet state is slippery: you have to put a rubber mat. The advantage of acrylic is that it is not so cold – by feel.
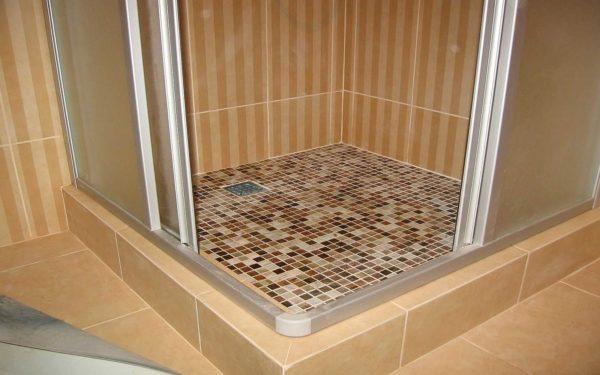
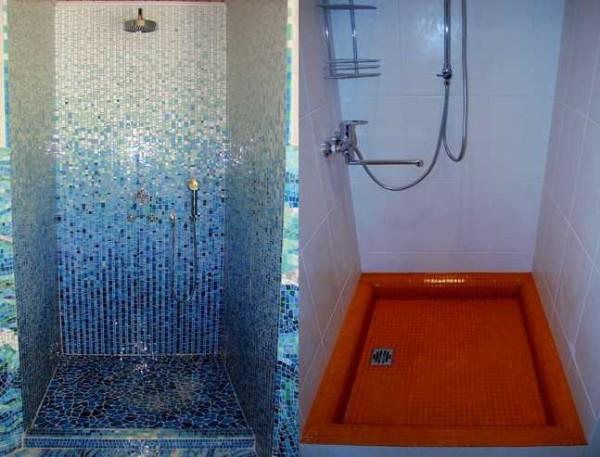
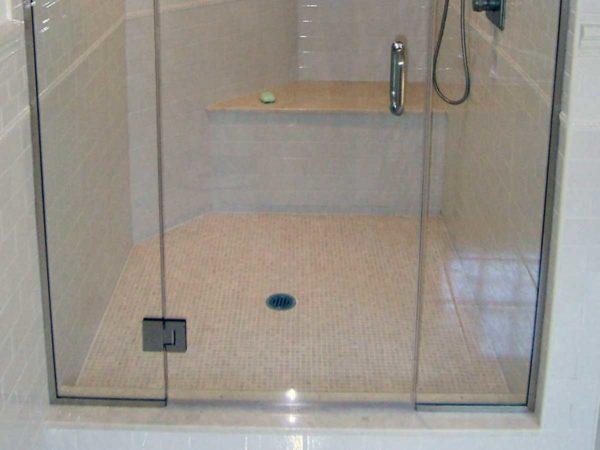
If both options do not fit, make a pallet of brick or solid concrete, which is then faced with tiles – the usual, for the floor, or mosaic. This is a capital solution, but difficult to implement. If you decide to make a pallet in the shower from tiles, and you live in an apartment building, you will need a very good multi-layer waterproofing: so that there are no problems with neighbors from below and from the side. This does not mean that in a private house shower cabin with their own hands is made without waterproofing. Just if you “make a mistake” will suffer themselves.
There is another option – intermediate. Welded from metal “trough” of suitable dimensions, it is well treated with anticorrosive materials. Installed on a podium made of brick or foam blocks (drain is also needed), if necessary, cover with brick on the outside, forming a curb or step. From the inside, glue mosaic.
These options are usually chosen. There is also a device without a visible tray, and the drain can be made into the wall, but then the entire bathroom must be raised to the floor level and form a slope towards the drain.
Dimensions and shape: choose
Now about the size of shower cabins and trays in particular:
If you want comfort – make at least a meter gap from wall to wall, if the size is severely limited, try to still leave at least 90 cm. One remark: a square is not the best shape for a shower. A rectangle is more practical in this respect. If the “depth” of the cabin is 80 cm and the width is 100 cm, you already feel free. And if the width is 110-120 cm – it is already full freedom.
Organization of the drain
Next, it is necessary to choose how the drain will be organized. There are two devices: a siphon and a drain. The trap is more expensive, but it is usually lower in height and more reliable. Its safety margin is enough for a decent period of time and it can be poured into concrete, which is usually done.
The siphon is cheaper, but when installing a sump, you will have to provide for the possibility of replacing it. It is not a good idea to just cast it in concrete, because if there is a repair issue, you will have to work with a perforator to get to it. You can imagine the results. Therefore, when using a siphon, leave a revision passage, which is closed with a hatch or a small door.
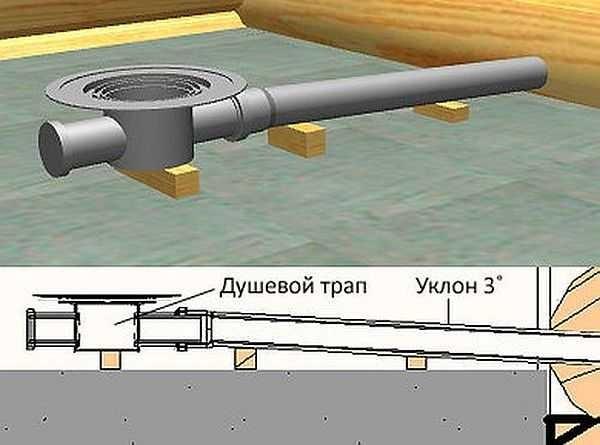
In any case, the drain should be serviceable. This means that the upper part – the grid can be removed and clean the pipe with a cable. And to make this possible, lay the drain pipe so that the maximum angle of rotation to the sewer was 45 °, but it is better not to do more than 30 °.
Now about slopes. To ensure that the water in the pipes does not stagnate, the pipe from the ladder to the sewer outlet laid with a slope of at least 4-5%. This means that for one meter of length the height difference is 4-5 cm. Approximately the same bevel should have a floor: water should flow to the place of drainage.
How to make a shower tray
It is about how to make a floor in the shower cabin on your own, with your own hands. The height of the floor inside the shower cabin is far from arbitrary. It depends on how the drain is made in the shower, how high the trap or siphon is exposed. And it, in turn, is put with such a condition to form the necessary slope. That is, the lower you have the entrance to the sewer, the less it will be necessary to scuff the drain and the floor.
That is, before you start work, you will have to put the trap. The cup – for sure. But wrap and close it well, plug the drain with a crumpled newspaper or rag, so that nothing gets inside when working. Keep a decorative grate at hand, so that you can try it on in time .
How to install one of the variants of the trap – linear – see in the video. Maybe the model will be different, but the general principles will remain the same.
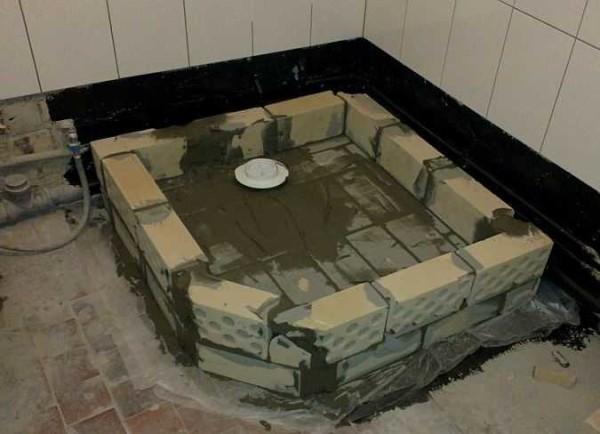
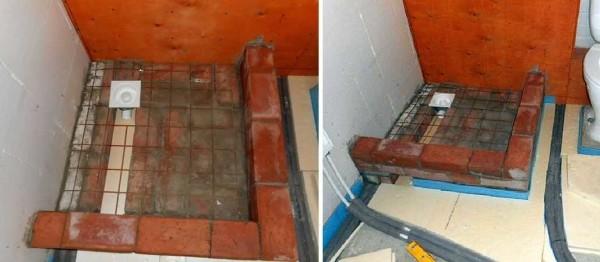
Homemade shower cabin with a brick shower tray (with step-by-step photos)
When arranging a brick shower tray, the floor should be at least relatively level. If there are very large drops, level them in advance (make a rough screed). Expose the drain device, connect it to the sewerage system, and then in steps like this:
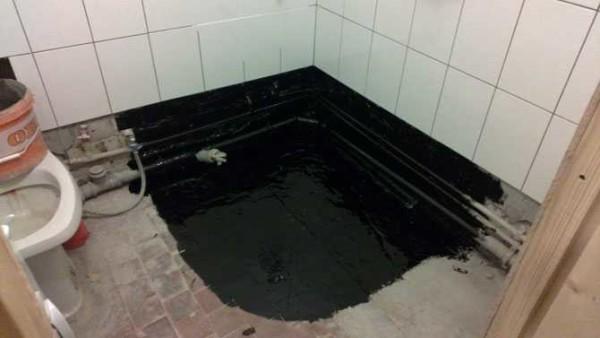
- Grease waterproofing of the base. In the simplest variant – bitumen, but many are frightened by the odor. You can lubricate with liquid glass, hydrophobic impregnation based on cement, waterproofing for swimming pools. The best option, of course, is the composition for swimming pools. These compositions are designed for high water pressure, so they are reliable. Slightly worse in such conditions – impregnations based on concrete, but they reduce moisture absorption many times. Often lubricated two or three times: to be sure that nothing missed.

- Gluing the joint with the wall waterproofing tape. The minimum height of the tape on the wall and floor – 10 cm. This is an additional protection of the most vulnerable place, where water usually seeps into the rooms below.
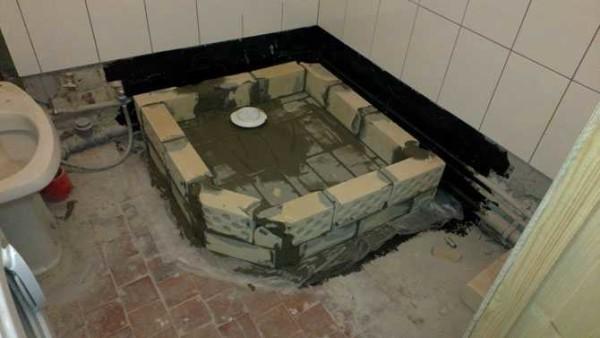
- Brick layer. Use only full-body ceramic bricks, as silicate bricks are quickly destroyed by moisture.
- Concrete screed on the beacons. At this stage, the slope is already formed in the direction of the drain, but the level should be slightly below the level of the drain: it will still have to put tiles on the glue. Usually in the solution add some substances (additives) that increase water repellent properties. The most common are PVA and liquid glass.
- After the setting of concrete, sometimes once again covered with waterproofing, but this time it is better to use the best on the basis of cement: on such a base well lay any tile.

- On the water-repellent glue put tiles.
- Grout the joints with hydrophobic paste.
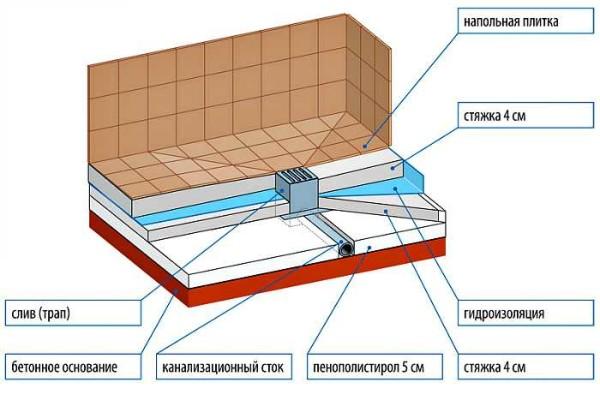
If you want to make a heated floor in the shower, two more layers are added. A layer of mortar is put on the brick, leveling the base. After the mortar has set, a heating cable or cable mats (cable on a grid) are placed on it. The top is filled with a special composition for a warm floor. The thickness of the layer above the cable – at least 3 cm. And do not forget to form a slope to the drain. After setting, you can put tiles (you can turn on the heating only after a month after pouring, otherwise cracks will appear).
To make the heating work more effectively, you can put insulation on the layer of mortar on the bricks, in particular extruded polystyrene foam. Its thickness is at least 3 cm, you can go up to 5 cm. On it put a metal mesh with a spacing of 10-15 cm, on top of the heating cable or cable mat, and then – the mortar.
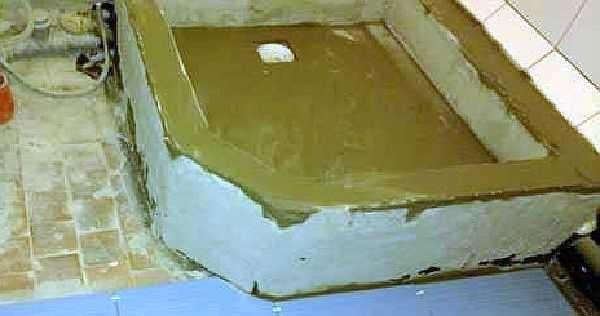
Monolithic concrete
When making with your own hands a shower tray from concrete, you need to assemble a formwork. It is best to use a thick board (at least 25 mm thick) or scraps of OSB, fiberboard (thickness from 16 mm).
If the shower cabin will have a concrete floor covered with tiles or mosaics, it is desirable to insulate it. Do heating or not – your choice, but on the insulation it should be 100%, otherwise you will have to pour hot water for a long time “in idle” to warm up the floor at least a little or throw knocked down from the wood grate. For a bath grates – an acceptable option, but for constant use in a house or apartment is unlikely.
So, the sequence of layers is as follows:
After 24 hours, the beacons are removed, grouted with mortar traces. A little later – after setting and gaining strength – cover with cladding waterproofing, and only then proceed to laying tiles.
If you are going to build such a shower cabin with your own hands in an apartment building, it is better to add another layer of waterproofing: break the screed layer into two parts. Schematically then everything looks like in the photo below.
Determining the height of the screed
Regardless of whether you make the pallet from brick or concrete, you need to know at what height to pour the screed. Its height should be slightly lower than the drainage grid – siphon or trap. It is more convenient to mark its position on the walls with a laser level. If you don’t have one, you will have to transfer the marks with a water level. To be a little clearer, watch the video. It shows how to set the screed levels on the walls and how to make a rough screed.
Doors for the shower cabin
If the cabin is rectangular, everything is solved more or less simply: the rectangle can also be cut out of glass in the workshop. Awnings for glass doors are many, you can choose a more convenient for your case. Only order the doors go with the canopies: you will have to drill holes for them, and it is best to try them on.
It is desirable to take tempered glass. If it breaks, it will break into small shards with blunt edges, which are difficult to hurt. But, most likely, the shards will remain hanging on the film. The minus of this glass – it is expensive. To save money, you can order the usual thick – 5-6 mm, and at home to glue it on both sides of the polymer translucent film. You will have to work hard, but the effect will be almost the same as with tempered glass: the shards will be on the film.
One moment: the glass before applying the film is washed, then degreased. The film is glued on the wet glass. So it is easier to expel air bubbles, and you can move the film for a while.
If you do not want glass doors, but need translucent, you can make them from polycarbonate, but not cellular, and sheet. You will have to find a suitable furniture profile, make a frame out of it and in the frame on the sealant to plant polycarbonate. For reliability it is possible and through the screws with washers to attach.
Another option is to buy ready-made doors. There are they and glass specially for cabins, and you can adapt plastic folding “accordion”, as in the video.
Video om ämnet
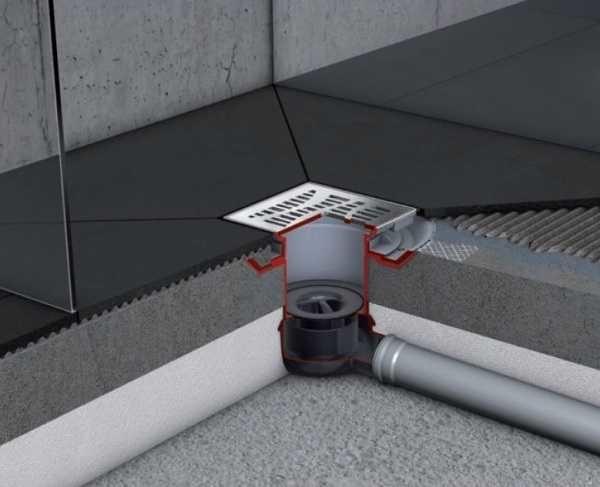
Traps for the shower there are different designs: ordinary, which look like a round or square grid in the floor, like a tray. There are more modern models – wall-mounted. Shower tray and wall trap are necessary if the cabin is made with a large flow of water. In this case, the usual design can not cope with the drainage and more productive models are required. And in the tray can stand and two drainage devices. Features of their installation in the video from one of the manufacturers.
One of the ways of waterproofing the shower cabin
And another type of waterproofing


Making a shower cubicle with a tiled shower tray is pretty cool! I did it last summer and it’s easier than you think. Just remember to use the right waterproofing. My buddy and I made a day of it, and now I’m loving my DIY shower!
I loved this guide! When I renovated my bathroom, I was so nervous about the tile shower tray, but following step-by-step tips made it way easier. The final look was amazing, and my friends can’t stop raving about it! Thanks for sharing such helpful advice!