

Electric welding uses an electric arc between the workpiece and an electrode to heat the metal. As the metal melts, it forms a weld. Welding techniques and electrode position can vary depending on the metal and type of joint. We will tell you how to weld seams so that the connection is reliable and beautiful.
Obsah článku
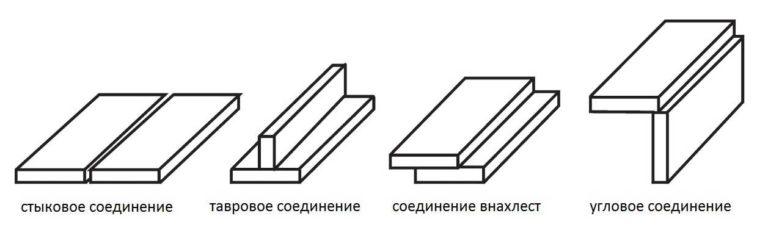
Types of welds and joints
Seams have a fairly extensive classification. First of all, they are divided by the type of connection of the cases. Depending on the requirements for reliability, the seam can be applied on one or two sides. With bilateral welding, the construction turns out to be more reliable and better holds its shape. If there is only one weld, the product is often skewed: the weld “pulls”. If there are two, these forces are compensated.
It is impassable to note that to obtain a quality weld, the metal should not be rusty. Therefore, welding places are pre-sanded or treated with a file – until the complete disappearance of rust. Then, depending on the requirements, the edge is ground or not.
butt joint (butt weld)
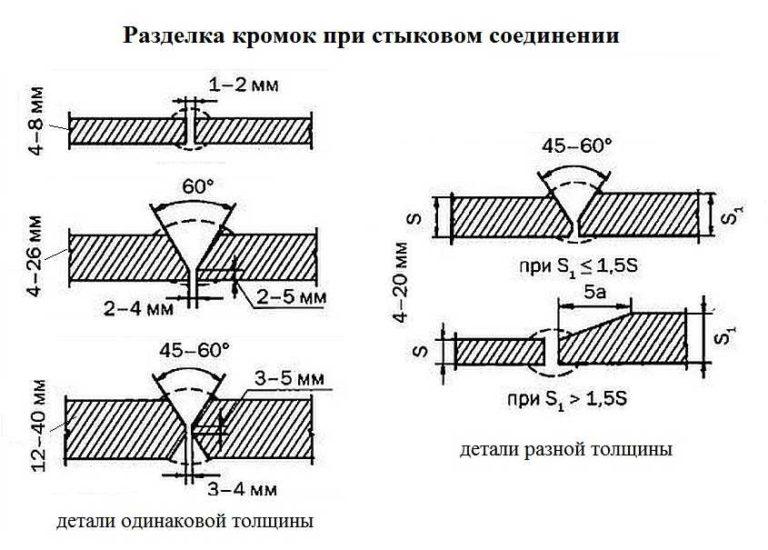
The butt joint in welding is used when joining sheet metal or pipe ends. The parts are laid so that there is a gap of 1-2 mm between them, if possible rigidly fixed with clamps. During welding the gap is filled with molten metal.
Thin sheet metal – up to 4 mm thick – is welded without preliminary preparation (rust stripping does not count, it is mandatory). In this case, only one side is welded. When the thickness of parts from 4 mm the seam can be single or double, but it is required to seal the edges with one of the methods shown in the photo.
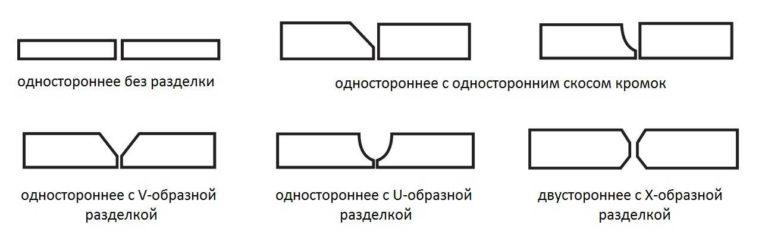
- When the thickness of the workpiece is between 4 mm and 12 mm, the seam can be single. Then the edges are cleaned by any of the methods. For thicknesses up to 10 mm, single-sided preparation is more convenient, while thicker parts are more often cleaned in a V-shape. U-shaped stripping is more difficult to perform, so it is used less often. If the requirements to the quality of welding are high, with a thickness of more than 6 mm, it is necessary to strip on both sides and double weld – on one and the other side.
- When welding metal with a thickness of 12 mm or more butt-to-butt, a double weld is definitely necessary, it is impossible to heat such a layer from one side. Edge trimming is double-sided, in the form of the letter X. It is not profitable to use V or U-shaped edge trims at such thicknesses: they require several times more metal to fill them. This increases the consumption of electrodes and significantly reduces the welding speed.
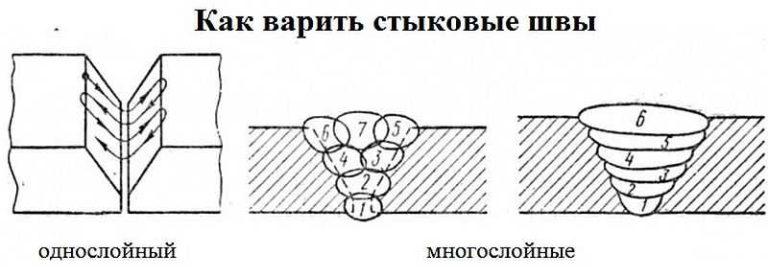
If it is still decided to weld a large thickness of metal with a one-sided partition, the weld will need to be filled in several passes. Such welds are called multilayer welds. How to weld the weld in this case is shown in the figure below (the numbers indicate the order of laying the layers of metal during welding).
About welding thin metal inverter welding machine read here.
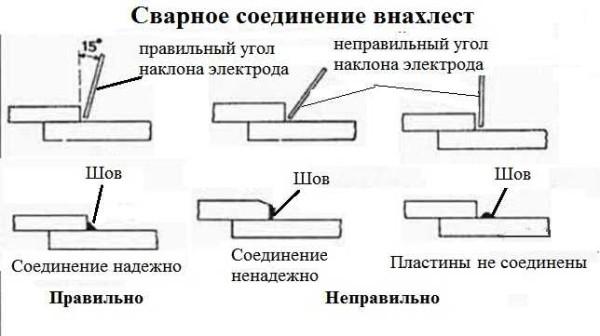
Overlap joint
This type of joint is used when welding sheet metal up to 8 mm thick. It is welded from both sides to prevent moisture and corrosion between the sheets.
When performing an overlap weld, it is necessary to correctly select the angle of inclination of the electrode. It should be about 15-45 °. Then a reliable connection is obtained. When deviating to one side or the other, the bulk of the molten metal is not at the joint, but to the side, the strength of the connection is significantly reduced or the parts remain not connected at all.
Lap and angle joints
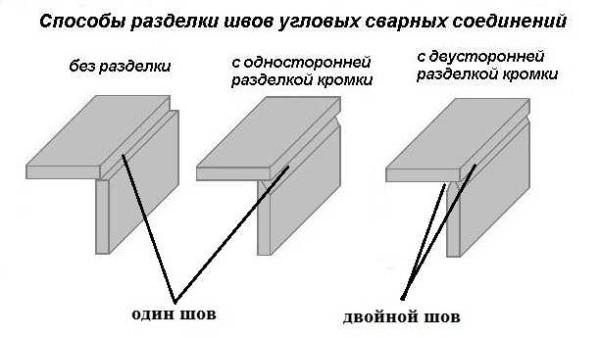
A T-shaped joint in welding is represented by the letter “T” and an angled joint is represented by the letter “G”. A T-joint can be a single seam or a double seam. Edges can also be cut or not. The need for edging depends on the thickness of the parts to be welded and the number of joints:
- metal thickness up to 4 mm, single seam – no edge trimming;
- thickness from 4 mm to 8 mm – double seam without edge treatment;
- from 4 mm to 12 mm – single seam with cutting on one side;
- from 12 mm the edge is cut on both sides, and the welds are also made two.
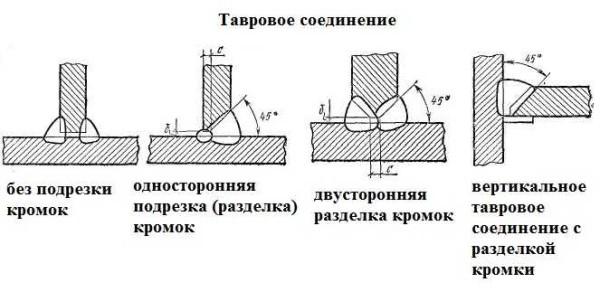
Corner weld can be considered as part of the T-joint. Recommendations here are exactly the same: thin metal can be welded without cutting edges, for greater thickness you have to remove part of one or both sides.
Angle and T-joints sometimes have to be welded from both sides (two welds). To properly weld such a joint, the parts are rotated so that the metal planes are at the same angle. In the photo, this method is signed “in a boat”. So it is easier to calculate the movements of the electrode, especially for a beginner with welding.
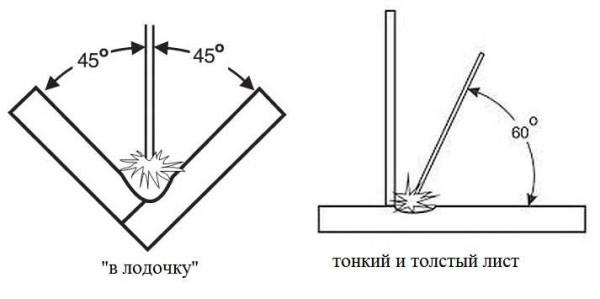
When joining thin and thick metal, the angle of inclination of the electrode should be different – about 60 ° to the thicker part. In this position, most of the heating will be on it, thin metal does not burn through, which can happen if the angle of inclination is 45 °.
Welding corner seams
When welding corner seams, you need to watch the position and movement of the electrode. You should get a seam with an even fill. It is easier to realize this if you put the parts to be welded “in a boat”, but this is not always possible.
If the bottom plane is located horizontally, it often turns out that on the vertical plane, as well as in the corner itself, there is little metal: it stacks down. This happens if the electrode is less time at the apex of the corner than near its sides. The motion of the electrode tip should be uniform. The second reason is that the diameter of the electrode is too large, which does not allow it to sink lower and heat the joint properly.
To avoid this defect, the arc is ignited on a horizontal surface (at point “A”), moving the electrode to the vertical surface, then circular movement returns it to its place. When the electrode is above the joint, it has an inclination of 45°, as it moves up, the angle slightly decreases (picture on the left), when moving to the horizontal surface, the angle increases. With this technique, the seam will be filled evenly.
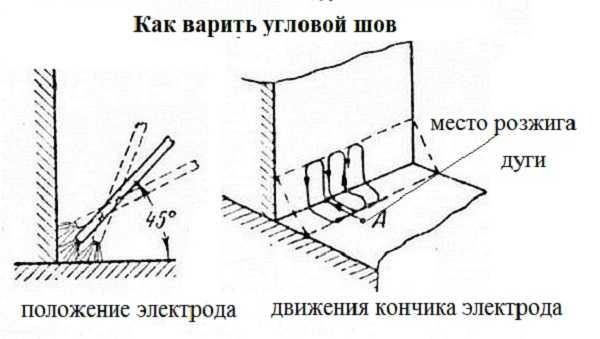
When welding corner joints, also make sure that the time of the electrode in all three points (on the sides and in the center) was the same.
Read about choosing electrodes for inverter welding machines here.
Position in space
In addition to different types of joints, welds can be positioned differently in space. They happen to be in the lower position. For the welder, this is the most comfortable. So it is easiest to control the weld pool. All other positions – horizontal, vertical and ceiling welds – require some knowledge of welding techniques (on how to weld such seams, read below).
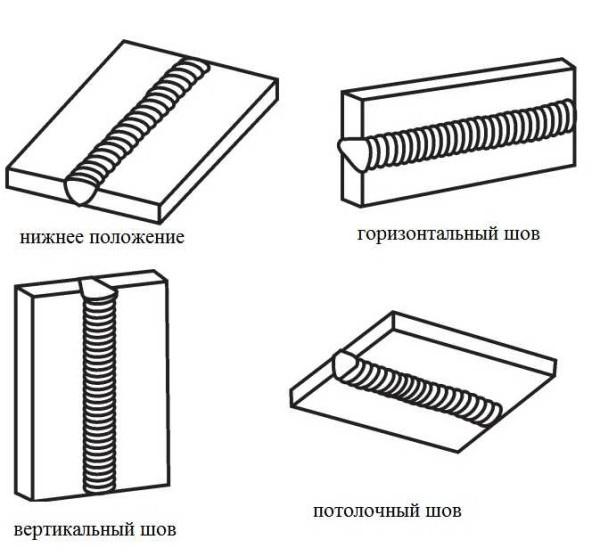
How to weld the weld
When welding in the lower position, no difficulties arise even for a novice welder. But all other positions require knowledge of technology. For each position there are different recommendations. The technique of making welds of each type is considered below.
Welding vertical seams
During the welding of parts that are in a vertical position, the molten metal under the influence of gravity slides down. To prevent the drops from breaking off, a shorter arc is used (the tip of the electrode is closer to the weld pool). Some masters, if the electrodes allow (do not stick), in general, they rest them on the part.
Metal preparation (edge cutting) is carried out in accordance with the type of connection and thickness of the parts to be welded. Then they are fixed in a given position, joined in increments of a few centimeters short transverse seams – “tacking”. These seams prevent the parts from shifting.
The vertical seam can be welded from top to bottom or from bottom to top. It is more convenient to work from bottom to top: the arc pushes the weld pool upward, preventing it from sinking downward. It is easier to make a high-quality weld.

This video shows how to correctly weld a vertical weld with electric welding with electrode movement from bottom to top without detachment. The technique of short roll is also demonstrated. In this case, the movements of the electrode occur only up and down, without horizontal displacement, the weld turns out to be almost flat.

It is possible to connect parts in a vertical position with a breakaway arc. For novice welders, this may be more convenient: during the breakaway time, the metal has time to cool down. With this method, you can even lean the electrode on the shelf of the weld crater. So it is easier. The scheme of movements is almost the same as without detachment: from side to side, loops or “short roll” – up and down.
How to weld a vertical seam with a tear off, see the following video. In the same video lesson shows the influence of current strength on the shape of the seam. In general, the current should be 5-10 A less than recommended for this type of electrode and metal thickness. But, as shown in the video, this is not always true and is determined experimentally.

Sometimes a vertical seam is welded from top to bottom. In this case, when igniting the arc, hold the electrode perpendicular to the surfaces to be welded. After ignition in this position, heat the metal, then lower the electrode and weld in this position. Welding a vertical weld from top to bottom is not very convenient, requires good control of the weld pool, but even in this way you can achieve good results.

How to weld a horizontal weld
A horizontal weld on a vertical plane can be welded either from right to left or from left to right. There is no difference, whoever is more comfortable with it, welds it that way. As when welding a vertical seam, the bath will tend downward. Therefore, the angle of inclination of the electrode is quite large. It is selected depending on the speed of movement and current parameters. The main thing is that the bath remains in place.
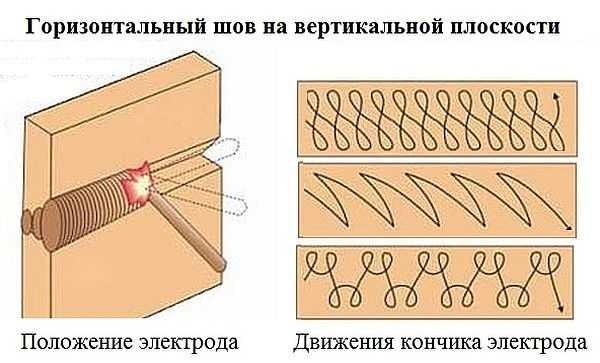
If the metal flows downward, increase the speed of movement, heating the metal less. Another way is to make arc breaks. During these short intervals, the metal cools down a little and does not flow down. You can also slightly reduce the strength of the current. Only all these measures apply step by step, not all at once.
The video below shows how to properly weld metal in a vertical position with a horizontal seam.

Ceiling weld
This type of welded joint is the most difficult. Requires high skill and good control of the weld pool. To perform this weld, the electrode is held at right angles to the ceiling. The arc is short and the speed is constant. Mostly circular movements are performed to widen the weld.

Cleaning of welds
After welding, scale spatters, metal and slag droplets are left on the metal surface. The weld itself is usually convex, protruding above the surface. All these defects can be eliminated: clean up.
Cleaning seams after welding is done in stages. At the first stage, using a chisel and a hammer, knock off the scale and slag from the surface. At the second, if necessary, compare the seam. Here you need a tool: a Bulgarian, equipped with a grinding disk on the metal. Depending on how smooth the surface should be used different abrasive grit.
Defects in welds
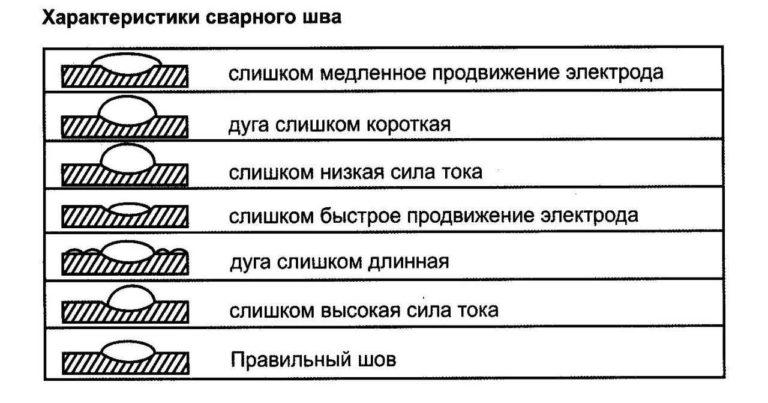
Beginning welders often have mistakes when making welds, which lead to the appearance of defects. Some of them are critical, some are not. In either case, it is important to be able to identify the error so that you can then correct it. The most common defects among beginners are unequal width of the seam and its uneven filling. This occurs due to uneven movements of the electrode tip, changes in speed and amplitude of movements. With the accumulation of experience, these shortcomings become less and less noticeable, after some time disappear altogether.
Other errors – in the choice of current strength and the size of the arc – can be determined by the shape of the seam. It is difficult to describe them in words, it is easier to depict them. The photo below shows the main defects of the form – undercuts and uneven filling, the reasons that caused them are described.
Non-welding
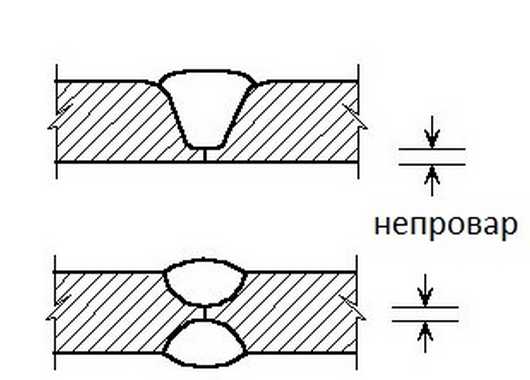
This defect consists of incomplete filling of the joint of the parts. This defect must be corrected, as it affects the strength of the joint. The main causes are:
- insufficient welding current;
- high travel speed;
- insufficient edge preparation (when welding thick metals).
It is eliminated by correcting the current and reducing the arc length. By selecting all the parameters correctly, such a phenomenon is eliminated.
About the choice of inverter welding machine for home and cottage read here.
Undercut
This defect is a groove along the seam on the metal. Usually occur when the arc is too long. The seam becomes wide, the temperature of the arc for heating is not enough. The metal at the edges quickly solidifies, forming these grooves. “Cures” more short arc or adjusting the current strength to a higher side.
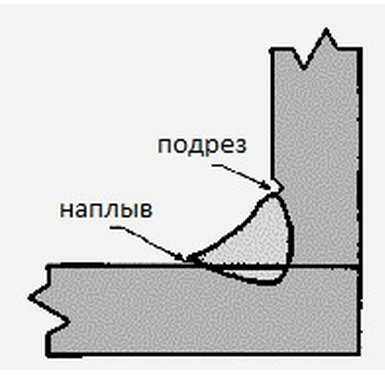
At an angle or T-joint, the undercut is formed because the electrode is more directed to the vertical plane. Then the metal flows downwards and a groove is formed again, but for a different reason: the vertical part of the weld is too hot. This is remedied by reducing the current and/or shortening the arc.
Burn
This is a through hole in the weld. Main causes:
- too much welding current;
- insufficient travel speed;
- too large a gap between the edges.
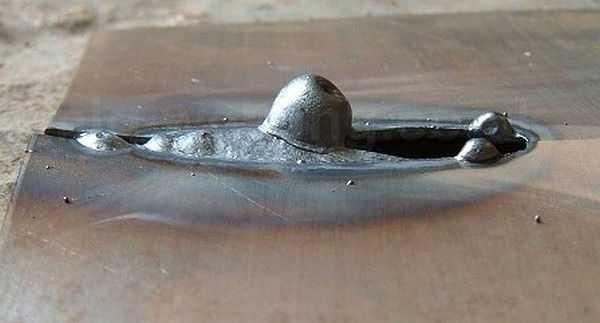
The ways of correction are clear – we try to find the optimal welding mode and electrode speed.
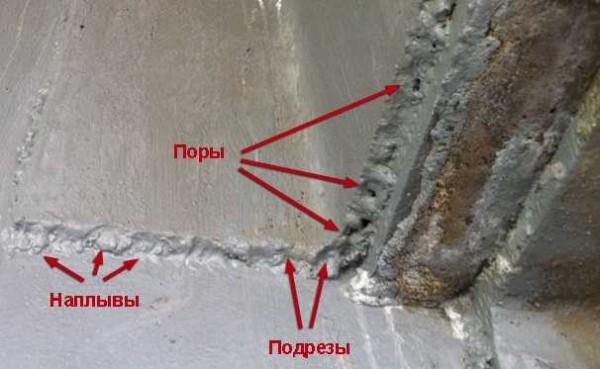
Pores and gouges
Pores look like small holes, which can be grouped in a chain or scattered over the entire surface of the weld. They are an unacceptable defect because they significantly reduce the strength of the joint.
Pores appear:
- at insufficient protection of the weld pool excessive amount of shielding gases (low quality electrodes);
- draught in the welding zone, which deflects shielding gases and oxygen gets to the molten metal;
- the presence of dirt and rust on the metal;
- insufficient cutting of edges.
The heaps appear when welding with filler wires with improperly selected welding modes and parameters. They represent the flowing metal, which did not connect with the main part.
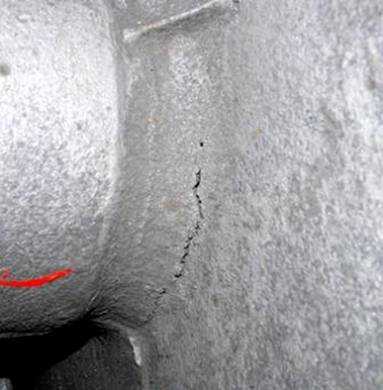
Cold and hot cracks
Hot cracks appear in the process of cooling the metal. They can be directed along or across the weld. Cold cracks appear already on the cold weld when the loads for this type of weld are too high. Cold cracks lead to failure of the welded joint. These defects can only be treated by re-welding. If there are too many defects, the weld is cut and re-welded.
Inverter welding techniques are described here.


Oh man, I remember my first time welding! I was super nervous about those ceiling joints. But once I got the hang of it, I was on fire! The key is keeping that angle just right. Now I can tackle any joint like a pro! Can’t wait to try more!