

When arranging flowerbeds and paths, decorating the yard or adjacent territory, it is often necessary to install dividers. Most often for this purpose curbs are used (also called kerbs). And the installation of the curb is not so difficult to necessarily invite a team. It is quite possible to cope with their own hands. In any case, with helpers.
Conținutul articolului
Purpose and types of curbs
Curbs are used to separate areas with different surfaces and / or different loads. They can separate paths from lawns, flowerbeds, garden or vegetable garden, serve as a boundary between pedestrian and roadway, etc.

They fulfill several functions at once:
- serve for visual design of paths;
- redistribute the load;
- protect the paths from washing out and destruction.
If you want the paths to serve for a long time, you need to install a curb along the edge. It holds all the materials, preventing them from breaking down or changing shape.
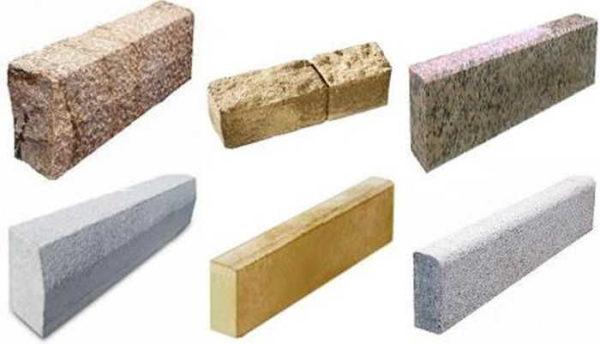
Curbs or curbstones there are different sizes, make them from different materials, apply different technologies. The most common type is concrete curbs, but there are also plastic, vibro-pressed.
Types of concrete curbs and kerbs
Concrete curbs are the most common, there are different sizes. Divide them into two categories:
- Roadstone. Wider and taller, often with reinforcement inside (one or two steel bars with a diameter of 12-14 mm). Used to separate the roadway and pedestrian area.
- Curbstone (also called a curb, garden or sidewalk curb). Smaller in size and weight, without reinforcement. Usually separates walkways from lawns. Can withstand short-term collisions of a passenger car. For more serious and permanent loads it is undesirable to put them, as they deteriorate.
Other types of kerbstones for fencing off the roadway are not used, as they have an insufficient level of strength.
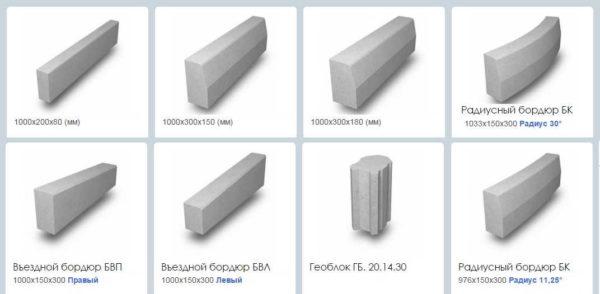
Roads are not always straight – there are curves. Sharp turns at an angle is easy to make – put at the desired angle, and the place of connection to fix the concrete mortar. For smooth turns there are radius fragments with different radii of rounding. They can be used to create a fence for round, oval flowerbeds.
Dimensions
Curb blocks are usually produced with a length of 1000 mm, those designed to separate pedestrian paths from the fertile soil – with a length of 850 mm. There are also elements with lengths of 500 and 400 mm. Usually, these are curbs for paths made of paving slabs. They are produced not only by the technology of cast concrete, but also by the technology of vibro-pressing, which is used to produce the paving slabs themselves.
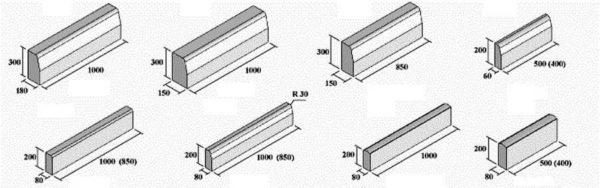
In terms of height, the curbstone can be:
- 300 mm – to separate the sidewalk from the roadway;
- 200 mm, 180 and 150 mm – for paths.
In width 200, 180 mm (road stone), 150, 100, 80 mm (kerb stone).
Installation of the kerb on sand-cement mixture or concrete
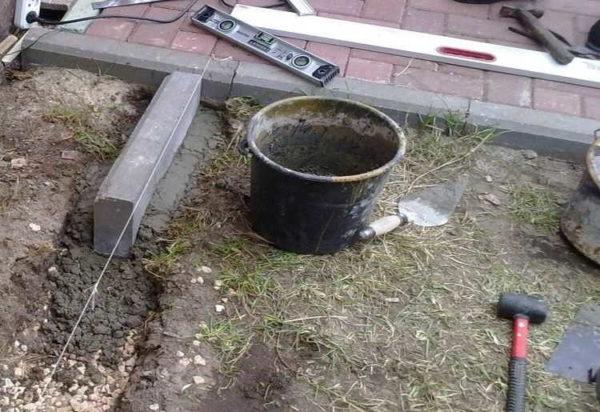
On soils prone to heaving, install the curbstone should be installed on the backfill of sand and crushed stone, on top of which a layer of concrete is laid, in it the curb is laid. With such installation curbs stand for years without problems. The order of actions is as follows:
- With the help of pegs installed in key places and cords stretched between them, markings are made.
- According to the made markings dig a trench. The width should be such that on the sides of the installed stone was a distance of 10-15 cm on each side. The depth is chosen so that the layer of tamped rubble at the bottom was at least 10 cm, on top – at least 5 cm of sand-cement mortar, and the curbstone itself rose above the surface of the path by at least a few centimeters (how much exactly – depends on your desire).

Installation of the curb: scheme - The bottom of the ready trench is leveled and tamped (when using a vibroplate, the width of the trench is made according to the width of the plate).
- Lay a layer of geotextile with a density of at least 160 g/m². This layer is necessary to prevent sand and crushed stone from mixing with the soil. It increases the service life of the curb, reduces the probability of shifts during spring swelling.
- A layer of coarse sand or crushed stone of coarse or medium fraction (20-40 mm) is poured. The minimum layer is 10 cm, the optimal layer is 15 cm. Crushed stone is tamped.
- A thick mortar is mixed from sand (3-4 parts) and cement (1 part) (very little water, just to be able to stir). It is laid 5-7 cm thick (7 cm is better) on the crushed stone.

Carrying out works on installation of kerbs and curbs - On the concrete is laid curbstone, leveled to the level (in the horizon or with a slope – depends on the geology of the site).
- Around the installed and exposed in the desired position of the fragment is laid a lock of sand-cement mixture 5-7 cm thick and about 10 cm high.
- After the concrete sets, the remaining free space between the installed curb and the edge of the trench is filled with sand or crushed stone, tamped, and then covered with soil.
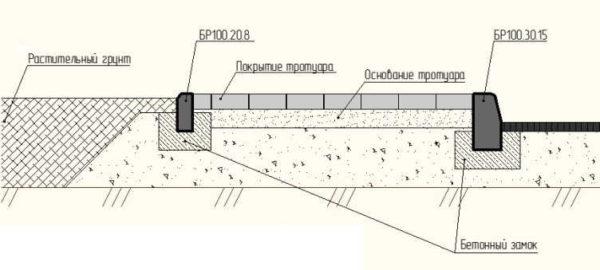
If this technology of curbstone installation is followed, the probability that the curbstone will move out of place during heaving is very low.


