

În ultimii ani, din ce în ce mai multe coșuri de fum sunt realizate din țevi sandwich. Punctul este prețul relativ scăzut, durata lungă de viață, aspectul destul de atractiv. De asemenea, este important faptul că este posibil să instalați independent un coș de fum sandwich. Cazul nu este foarte simplu - o mulțime de nuanțe, dar puteți face față cu propriile mâini, fără a implica specialiști.

Conținutul articolului
Ce este o țeavă sandwich și ce sunt acestea
Țeava sandwich denumită astfel pentru stratul său multiplu: există două straturi de metal, între care există un izolator. O astfel de structură rezolvă multe dintre problemele care erau inerente unui coș de fum simplu realizat din țeavă metalică. În primul rând, stratul izolator nu permite învelișului metalic exterior să se încălzească până la temperaturi critice, din țeavă nu merge radiații dure. Sunt create condiții mai confortabile în cameră. În al doilea rând, același izolator reduce semnificativ cantitatea de condens care se formează atunci când țeava iese afară. În al treilea rând, deoarece învelișul exterior nu mai are o temperatură atât de ridicată, este mai ușor să se facă trecerea coșului de fum prin acoperiș sau perete.
Din ce materiale sunt fabricate
Țevile sandwich sunt fabricate din oțel galvanizat sau inoxidabil. Țevile sandwich galvanizate pentru coșuri de fum sunt rar utilizate. Cu excepția cazului în care se utilizează pentru eliminarea produselor de ardere ale cazanului pe gaz de mică putere montat pe perete sau ale încălzitorului de apă pe gaz. Pot fi utilizate pentru ventilație izolată. Pentru dispozitive de încălzire mai serioase, acestea sunt nepotrivite - la temperaturi ridicate, zincul arde, oțelul ruginește rapid, coșul de fum intră în degradare.
Țevile sandwich pentru gaze arse la temperaturi ridicate sunt fabricate din oțel inoxidabil. Și oțelul inoxidabil este utilizat în diferite grade - de la aliaje cu un conținut mic de metale de aliere, la rezistente la căldură înalt aliate. Diferite pot fi și grosimea metalului - de la 0,5 la 1 mm, precum și grosimea izolației - 30 mm, 50 mm și 100 mm. Este clar că domeniul de aplicare va fi diferit, iar prețul de asemenea.
Principalele clase de oțel care sunt utilizate la fabricarea țevilor sandwich pentru coșuri de fum, scopul și caracteristicile lor principale sunt rezumate în tabel.
| Grad de oțel inoxidabil | Caracteristici principale | Domeniu de aplicare |
|---|---|---|
| AISI 430 | Prezintă o rezistență suficientă la influențele atmosferice, dar nu tolerează bine temperaturile ridicate | Folosit pentru acoperirea exterioară a țevilor sandwich |
| AISI 439 | Conține titan, care crește rezistența la temperaturi ridicate și medii agresive. | Potrivit pentru cazane pe gaz, unități cu combustibil solid de putere redusă (până la 30 kW). |
| AISI 316 | Aditivii de aliere - nichel și molibden - conferă rezistență ridicată la acizi, rezistență sporită la temperatură. | Optim pentru cazanele pe gaz de orice tip. |
| AISI 304 | Versiune mai ieftină a AISI 316 cu mai puțini aditivi de aliere. | Variantă economică pentru cazane pe gaz de capacitate medie și mică |
| AISI 316I, AISI 321 | Poate rezista la temperaturi de până la 850°C | Poate fi utilizat pentru încălzirea sobelor cu combustibil solid |
| AISI 310S | Rezistență la temperaturi mai ridicate - până la 1000°C (și preț) | Pentru sobe cu combustibil solid pentru baie și piroliză |
După cum reiese clar din tabel, diferite grade de oțel inoxidabil au scopuri diferite. Aliajele mai ieftine sunt utilizate pentru învelișul exterior, mai rezistente la căldură și mai scumpe - pentru învelișul interior. Acest lucru este necesar pentru a reduce costul de producție și nu aveți nevoie de rezistență ridicată la temperaturile din afara coșului de fum. Există și mai multe opțiuni bugetare - carcasa exterioară este fabricată din oțel galvanizat. În exterior, aceste produse pierd oțel inoxidabil, dar servesc în mod normal (cu izolație normală și grosimea acesteia).
Izolația și grosimea acesteia
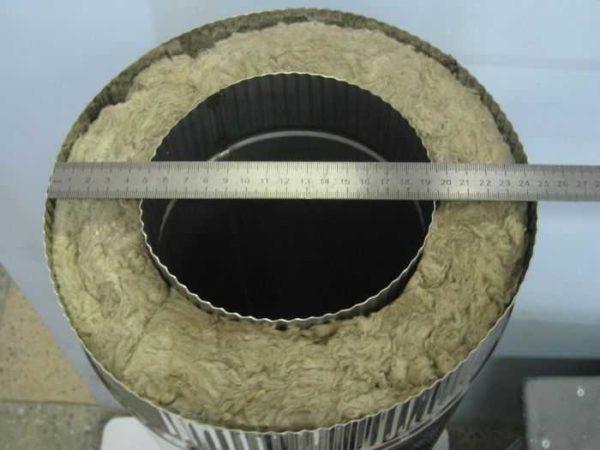
Între cele două straturi de metal există un izolator. Cel mai adesea este vorba de vată de piatră. Grosimea izolatorului este de la 30 la 100 mm:
- Cu o izolație groasă de 30 mm, temperatura gazelor de ardere nu trebuie să depășească 250°C. Numai cazanele pe gaz de capacitate mică și medie produc astfel de temperaturi.
- Un strat de izolație de 50 mm poate rezista la temperaturi de până la 400°C. Domeniul de aplicare - orice cazane pe gaz și combustibil lichid, cazane pe lemne, cu condiția ca coșul de fum să fie exterior (prin perete).
- Stratul de vată de piatră de 100 mm permite să reziste la o încălzire de până la 850°C. Un astfel de coș de fum sandwich poate fi instalat pe un cazan cu combustibil solid de orice tip, în șeminee și cămine.
În plus față de grosimea izolației, este necesar să se acorde atenție mărcii sale, sau mai degrabă - pe intervalul de temperatură în care poate funcționa. Nu orice vată de piatră poate rezista la o încălzire de până la 850 ° C, ci numai unele mărci speciale. Dacă aveți nevoie de un coș de fum pentru cazan cu combustibil solid, va trebui să țineți cont și de rezistența termică a izolației.
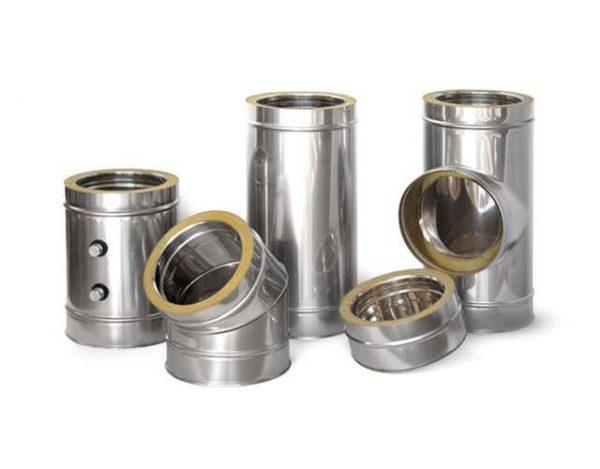
Tipuri de conexiuni
Conectați elementele coșului de fum sandwich pot fi conectate între ele în două moduri: socluri și margini ondulate. Conexiunea Rastrubnoe presupune prezența unui șanfren ușor mai larg pe o parte. Cu acest design realizează un grad ridicat de etanșeitate a coșului de fum. Acest tip de țeavă sandwich este bine adaptat pentru cazanele pe gaz, unde este important să nu se permită scurgeri. Există un dezavantaj: instalarea necesită o precizie ridicată.
Marginea ondulată a sandwich-ului vă permite să asamblați coșul de fum fără probleme. Minusul acestei soluții - pentru a asigura etanșeitatea necesită o cantitate semnificativă de material de etanșare la temperaturi ridicate și costă mult.
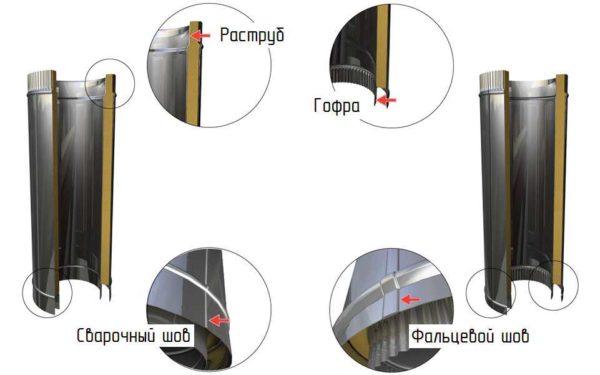
De asemenea, merită acordată atenție cusăturii longitudinale. Aceasta poate fi sudată sau rabatată. În cazul în care cusătura este sudată, aceasta trebuie realizată într-un mediu de protecție cu argon (astfel încât metalele aliate să nu se ardă). Acest tip de conexiune este necesar pentru cazane cu combustibil solid, sobe de saună și șeminee. Pentru toate celelalte pot fi utilizate și racordul cu rabatare.
Metode de instalare
Există două modalități de a conduce coșul de fum în exterior. Primul este de a trece conducta prin perete și apoi pe peretele exterior pentru a ridica la nivelul necesar. Al doilea - în sus prin tavan și acoperiș. Ambele nu sunt ideale.
În cazul în care coșul de fum este pe stradă, din cauza diferenței de temperatură în acesta se formează în mod activ condens. Prin urmare, în partea inferioară a coșului de fum trebuie să fie instalat tee cu colector de condens (cupă) și orificiu de curățare. Această unitate vă permite să efectuați întreținerea coșului de fum fără prea multe dificultăți: cupa este deșurubată, condensul este drenat. De asemenea, fără probleme funingine dislocată periodic - prin orificiul de curățare puteți rula o perie specială pentru coșul de fum.
Dacă coșul de fum va fi scos prin acoperiș, veți avea nevoie de mai multe unități de trecere - numărul de etaje. Dacă casa este cu un etaj, veți avea nevoie de un pasaj prin tavan, iar al doilea - prin acoperiș. De asemenea, va fi necesar să stăpânească flash sau șorț pentru țevi rotunde galvanizate.
Instalarea unui coș de fum sandwich pe stradă necesită un singur ansamblu de trecere - prin perete. Dar va fi necesar să o fixați pe perete la fiecare 1,5-2 metri. Dacă pereții clădirii sunt combustibili (casă din lemn sau casă cu cadre), pereții sunt în mod necesar protejați de un ecran incombustibil.
Prin fum sau condens
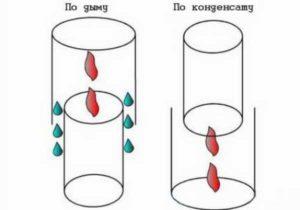
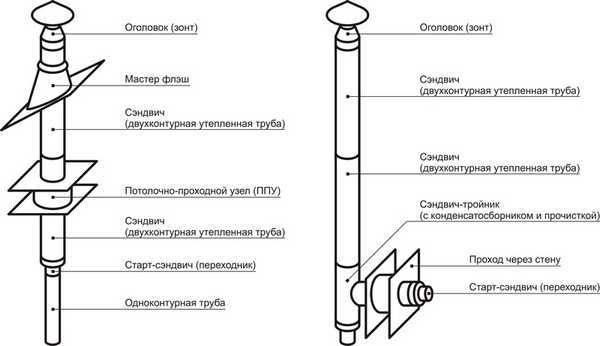
După cum s-a menționat mai sus, o parte a conductei sandwich este puțin mai lată, iar a doua parte este puțin mai îngustă. Datorită acestei diferențe de diametru, modulele sunt conectate unul la celălalt. Dacă capătul mai lat este întors în sus (în imaginea din dreapta), asamblarea se numește "prin condensare". Cu această metodă de asamblare, picăturile de condens curg nestingherite în jos. Dezavantajul acestei metode - în cazul unei etanșări insuficiente a îmbinărilor, fumul se poate infiltra în microcrăpături. Acest tip de instalare a coșului de fum sandwich este utilizat atunci când conducta este condusă prin perete. Acest lucru este exact ceea ce este necesar fluxul liber de condens, iar scurgerile mici de fum nu sunt teribile - ele nu sunt critice pe stradă.
Dacă o margine mai îngustă este întoarsă în sus, al doilea element este pus deasupra sa cu o parte mai largă. Acest tip de asamblare se numește "prin fum" (în figura din stânga). În acest caz, condensul care curge pe perete se poate scurge printr-o îmbinare care nu este bine etanșată. Cu toate acestea, fumul trece liber. Acest tip de ansamblu este utilizat dacă coșul de fum merge în interior (iese prin acoperiș). Condensul care curge pe țeavă strică, desigur, aspectul, dar nu este la fel de periculos ca gazele de ardere care se scurg în încăpere. Cu atât mai mult dacă îmbinările sunt bine etanșate, condensul nu se va scurge nici în exterior.
Pentru ca conectarea modulelor de coș de fum sandwich să fie fiabilă, fiecare dintre ele este de obicei lubrifiată cu material de etanșare rezistent la căldură și apoi încă strânsă cu o clemă.
Parametrii
Șemineele sandwich sunt bune prin faptul că au o structură modulară, care vă permite să asamblați orice configurație, cu orice parametri. Înainte de a merge la magazin, trebuie să știți diametrul necesar al coșului de fum, înălțimea țevii și acele elemente suplimentare care vor fi necesare.
Diametrul coșului de fum
Atunci când alegeți diametrul conductei sandwich, există o regulă simplă: nu poate fi mai mic decât diametrul conductei de ieșire a cazanului. Dacă țeava de ieșire aveți 120 mm, atunci diametrul interior al sandwich-ului trebuie să fie la fel sau mai mare. Poate fi mai lat, dar mai puțin - cu siguranță nu, iar îngustarea nu poate fi făcută pe tot coșul de fum. Dacă coșul de fum este puțin mai lat decât spigotul, se achiziționează un adaptor, care este plasat direct pe ieșirea cazanului, iar apoi există dimensiunea de lucru.
Dacă nu există încă un cazan, dar cunoașteți puterea acestuia, puteți alege un coș de fum orientat pe aceste date:
- puterea cazanului până la 3,5 kW - diametrul intern al sandwich-ului - 80 mm;
- de la 3,5 kW la 5,2 kW - cel puțin 95 mm;
- mai mult de 5,2 kW - 110 mm și mai mult.
Dar este mai bine să cumpărați (sau cel puțin să alegeți) cazanul, iar apoi să determinați deja coșul de fum, deoarece mulți producători sunt asigurați, făcând spițele de ieșire mai largi - pentru a îmbunătăți tirajul.
Înălțimea coșului de fum
Înălțimea coșului de fum deasupra suprafeței acoperișului depinde de locul de ieșire a acestuia, dar înălțimea sa minimă ar trebui să fie de 5 m. Adică, dacă înălțimea casei este mică, țeava în orice caz duce până la o înălțime de 5 metri. Dacă înălțimea casei este mai mare de 5 metri, țeava trebuie să se ridice deasupra materialului de acoperiș până la următoarea înălțime:
- Trebuie să se ridice cu 50 cm deasupra coamei dacă iese la o distanță mai mică de 150 cm de coamă.
- Dacă distanța de la coamă la coșul de fum este mai mare de 300 cm, coșul de fum poate fi mai jos decât nivelul coamei, dar unghiul nu trebuie să fie mai mare de 10° (vezi imaginea).
- Dacă coșul de fum iese la o distanță de 150 până la 300 cm de coamă, înălțimea sa poate fi la același nivel cu elementul de coamă sau mai mare.
În astfel de condiții, este asigurat un tiraj normal. Fumul va ieși în mod normal indiferent de condițiile meteorologice. Pentru a preveni pătrunderea în frunzele coșului de fum, puneți umbrele speciale, burlane, iar în locurile cu vânt - deflectoare, care îmbunătățesc în continuare tirajul.

Dacă nu puteți aduce țeava la această înălțime, puneți o pompă de fum - veți obține un tiraj forțat. Ventilatorul nu va fi necesar tot timpul, dar în anumite condiții, când tirajul natural nu este suficient, tirajul forțat salvează situația.
Instalarea unui coș de fum sandwich prin perete
La retragerea tubului de fum prin perete, există două modalități. Prima opțiune (pe fotografia din stânga) - să o ridicați în cameră mai aproape de tavan și acolo să o conduceți afară. Al doilea - pentru a face o concluzie la nivelul conductei de evacuare a fumului din cazan. În acest caz, aproape întregul coș de fum este pe stradă.
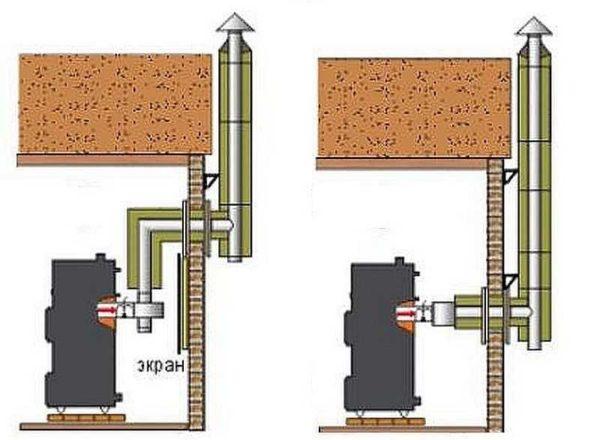
Preferabil a doua opțiune - are un singur cot, ceea ce înseamnă că, în condiții egale, tirajul va fi mai bun. De asemenea, cu o astfel de structură există mai puține șanse de dopuri de funingine.
În cazul în care ieșirea coșului de fum nu este în spatele sobei, ci în partea de sus, schema de instalare se schimbă puțin - se adaugă un cot de 90°, apoi o secțiune dreaptă pentru trecerea prin perete și apoi la fel ca în celelalte scheme.
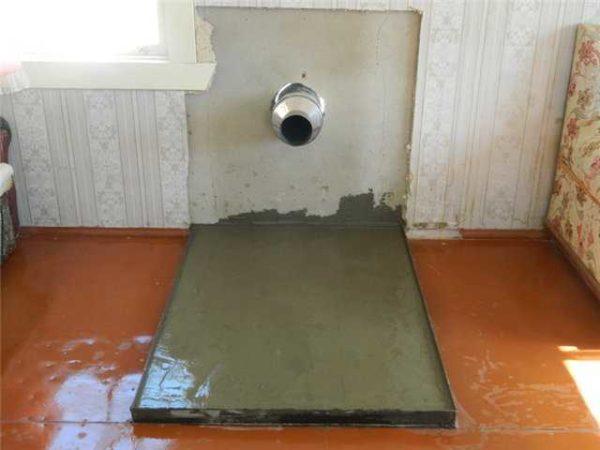
Soba în sine este amplasată pe o bază incombustibilă, iar ecranul incombustibil acoperă peretele din spatele sobei. Cel mai simplu mod este de a fixa o foaie de metal pe perete. Aceasta poate fi fixată pe izolatori ceramici de 2,5-3 cm înălțime. Între foaia de metal și perete va fi un strat de aer, astfel încât peretele va fi sigur. A doua opțiune este de a pune sub metal un material termoizolant - de exemplu, un carton de vată minerală. O altă opțiune - o foaie de azbest (ca în fotografie).
O gaură este făcută în perete. Dimensiunile sale sunt determinate de SNiP - distanța de la țeavă la pereții necombustibili, ar trebui să fie de cel puțin 250 mm pe toate laturile, iar la combustibil - 450 mm. Se dovedește a fi o gaură solidă, mai ales dacă vorbim despre pereți din materiale combustibile. Există un punct, prin care puteți reduce dimensiunea deschiderii pentru trecerea sandwich-ului: faceți dimensiunile în conformitate cu normele pereților necombustibili și acoperiți deschiderea cu material necombustibil.
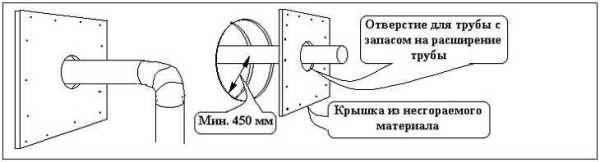
Deschiderea poate fi rotundă sau pătrată, atâta timp cât sunt respectate standardele de rezistență la foc. Deschiderile pătrate sunt mai ușor de realizat și de acoperit, astfel că sunt mai des realizate.
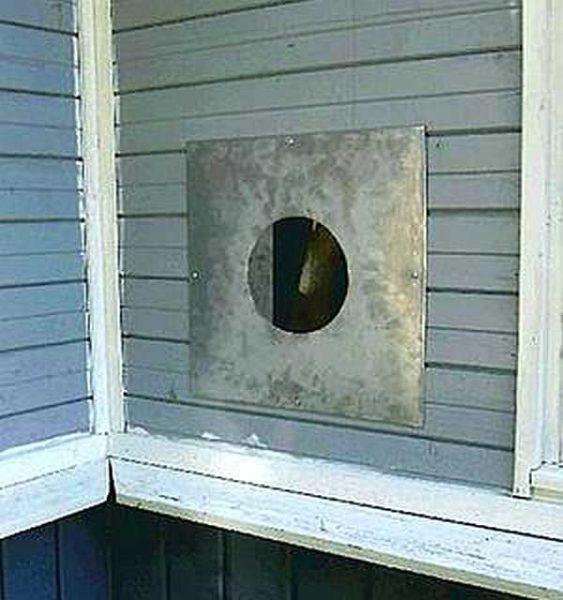
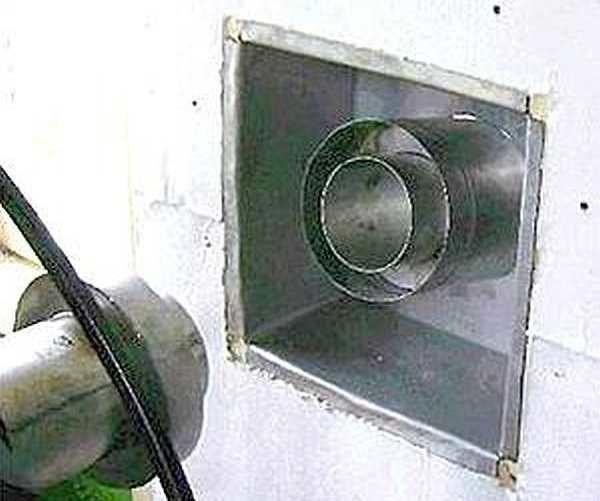
În această gaură este introdusă unitatea de trecere - o cutie din material incombustibil. În ea se înfășoară conducta de coș de fum sandwich, fixată în centru. Toate golurile sunt prevăzute cu izolație termorezistentă, gaura de pe ambele părți este închisă cu material incombustibil. De obicei, este o foaie de metal.
Un punct important: dezvoltarea coșului de fum ar trebui să fie astfel încât în interiorul peretelui nu a existat nici o îmbinare între cele două țevi. Toate îmbinările trebuie să fie vizibile și să poată fi întreținute.
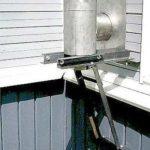
Apoi, este necesar să se facă sau să se instaleze un suport de sprijin gata, care va susține întreaga greutate a țevii. Designul poate diferi în detalii, dar ideea de bază este aceeași - o placă de sprijin care transferă greutatea pe perete cu ajutorul opritorilor.
-

- Platformă de susținere artizanală pentru coșul de fum sandwich exterior, realizată din unghiuri de 50*50 mm și 40*40 mm.
-
- Platformă de susținere de sine stătătoare realizată din bare unghiulare perforate

-
- Construcție din profil metalic în formă de U
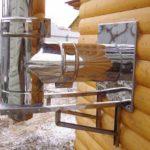
Un model similar poate fi sudat dintr-o țeavă profilată cu o secțiune transversală mică de 25*25 mm sau 25*40 mm.
După cum puteți vedea, un tee este conectat la conducta care trece prin perete. În partea inferioară există o cupă detașabilă, în care se acumulează condensul. Unele modele au un conector cu un robinet mic în partea de jos. Acest lucru este și mai convenabil - nu trebuie să scoateți cupa, puteți conecta un furtun la conector, să îl conduceți la un anumit recipient (este foarte toxic, deci nu trebuie să îl scurgeți în apropierea casei) și să îl scurgeți prin simpla rotire a robinetului.
Apoi, tubul este adus la nivelul necesar. Deoarece în acest caz distanța până la creastă va fi în mod evident mai mare de 3 metri, puteți ca înălțimea coșului de fum să fie ușor mai mică decât creasta - nu mai mică de 10 ° în raport cu linia orizontală trasată de la nivelul crestei.
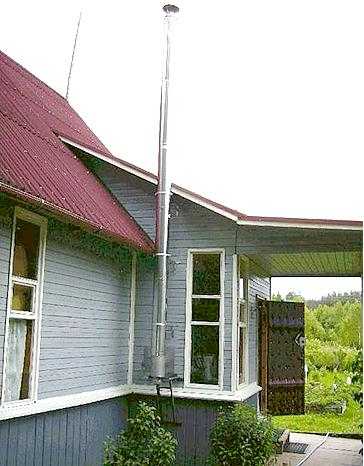
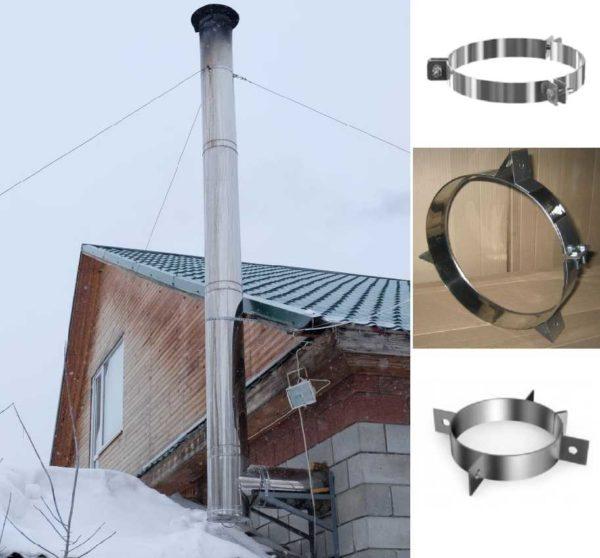
Dar, deoarece casa este situată într-o zonă joasă, coșul de fum a fost ridicat chiar mai sus decât coama pentru a asigura un tiraj. Acesta a fost fixat de perete cu cleme din oțel inoxidabil, cu o înclinare de puțin peste un metru. Pe acoperiș există întinzătoare realizate din bare de oțel cu un diametru de 6 mm. Există cleme speciale "cu urechi" la care sunt fixate întinzătoarele.
Un alt punct important, pe care mulți oameni uită: în locul de instalare a conductei, pe acoperiș trebuie să instalați o secțiune de retarder de zăpadă, în caz contrar, în primăvară, conducta poate fi suflat de zăpadă (în cazul în care conducta nu este condus la partea laterală a frontonului, ca în fotografie).
Cum să instalați coșul de fum prin acoperiș
Atunci când conduceți coșul de fum din conductele sandwich prin acoperiș, trebuie să țineți cont de locația grinzilor de podea și a căpriorilor pe acoperiș. Este necesar să se ajusteze astfel încât țeava să treacă între aceste elemente. Distanța minimă de la peretele exterior al țevii până la elementul combustibil trebuie să fie de cel puțin 13 cm, iar acest lucru - cu condiția ca elementul combustibil să fie protejat de izolație. Pentru a îndeplini această cerință, este adesea necesară deplasarea țevii. Acest lucru se face folosind două unghiuri de 45°.
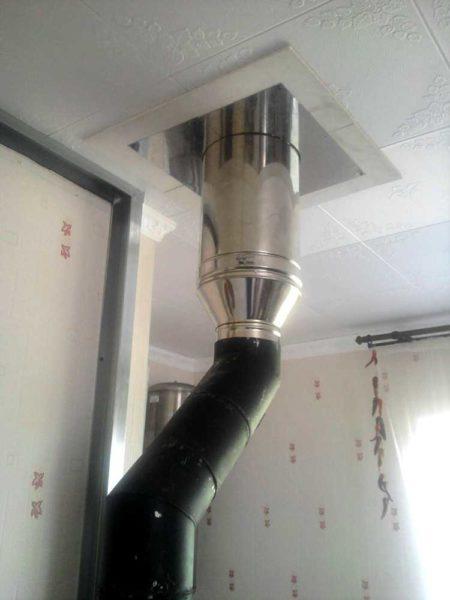
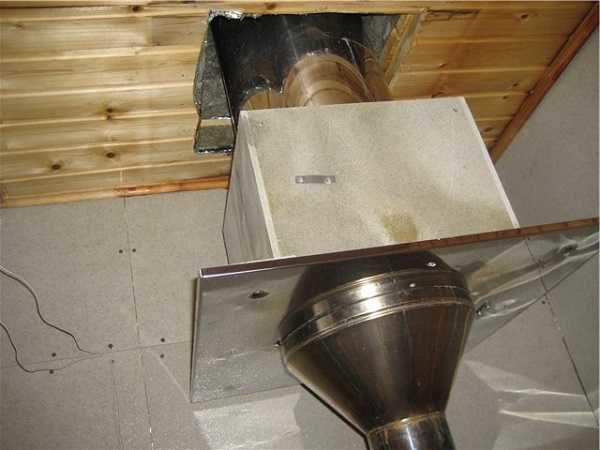
Rețineți că instalarea unui coș de fum sandwich de la un cazan cu combustibil solid începe cu o țeavă metalică fără izolație. În fotografia de mai sus este de culoare neagră. După aceasta se pune un adaptor la sandwich, iar în unitatea de trecere intră conducta de fum cu izolație.
Se taie o gaură în tavan, care respectă normele de protecție împotriva incendiilor - 250 mm de la marginea țevii, dacă tavanul va fi protejat cu material termoizolant. După ce s-a tăiat gaura, marginile acesteia sunt acoperite cu material termoizolant incombustibil. Mineritul este cel mai potrivit pentru acest lucru (bătut în cuie sau fixat cu șuruburi autofiletante pentru lemn).
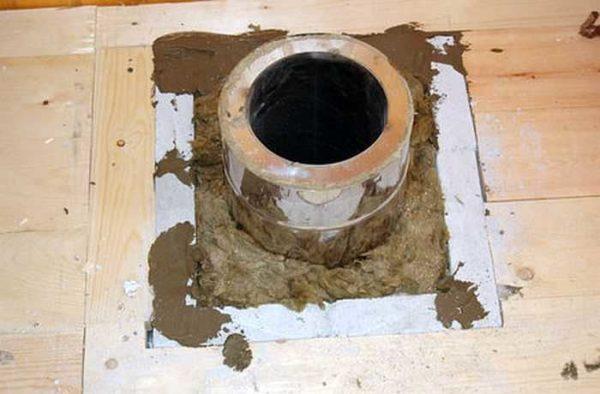
În cutia rezultată, se introduce conducta coșului de fum sandwich. Acesta trebuie să fie direcționat strict vertical, fără nici cea mai mică abatere. Nu îl puteți fixa rigid, îi puteți da direcția doar prin instalarea câtorva benzi care îl vor ține, dar se poate mișca în sus / în jos fără dificultate. Acest lucru este necesar deoarece lungimea sa crește considerabil atunci când este încălzită.
Spațiul rămas este așezat cu vată de bazalt (verificați intervalul de temperatură). O altă opțiune este de a turna argilă expandată, sticlă spumă granulată. Anterior, nisipul a fost încă turnat, dar mai devreme sau mai târziu, totul sa vărsat prin fisuri, deci acum această opțiune este nepopulară. Pe partea din față a toată această "frumusețe" este închisă cu o foaie de oțel inoxidabil, sub care este pus (între ea și tavan) un material incombustibil. Anterior a fost o foaie de azbest, dar din moment ce azbestul este recunoscut ca un cancerigen, au început să folosească carton din vată minerală.
Există o altă opțiune. Acoperiți marginile găurii cu vată minerală și apoi introduceți un ansamblu de trecere prin tavan gata făcut din oțel inoxidabil. Acesta are atât o cutie, cât și un ecran decorativ din oțel inoxidabil în același timp.
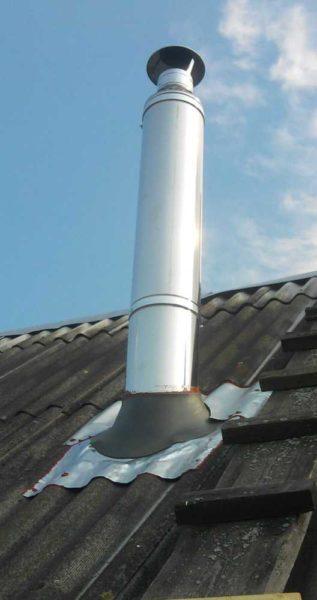
După ce a condus conducta la mansardă, face o gaură în plăcintă acoperiș. Toate filmele din locul de trecere (barieră de vapori și impermeabilizare) tăiate transversal. Triunghiurile rezultate sunt înfășurate și fixate cu capse de la un capsator. În acest fel daunele sunt reduse la minimum. Șarpantele expuse sunt tăiate astfel încât până la țeavă să fie de cel puțin 13 cm.

În fotografia din dreapta de mai sus, trecerea prin acoperiș este greșită - distanța dintre țeavă și plăci este prea mică. Este necesar să le tăiați în conformitate cu standardul și să le acoperiți cu același minerit. Ar trebui să obțineți ceva similar cu următoarea fotografie.
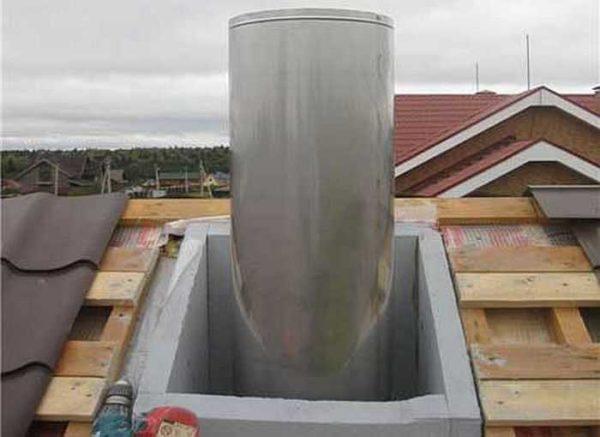
Mai mult, după ce materialul de acoperiș este pus, conducta este pusă pe master-flush, fusta este dată forma dorită (sub forma materialului de acoperiș).
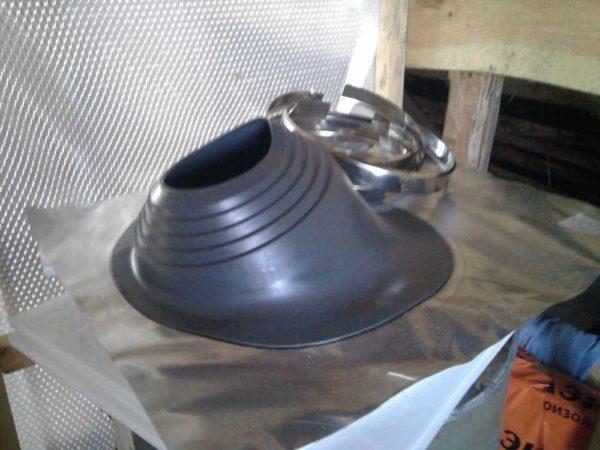
Îmbinarea dintre cauciuc și țeavă este sigilată cu material de etanșare rezistent la căldură. Etanșantul este aplicat și pe suprafața acoperișului sub "fustă".
Rețineți, fiecare conexiune a modulelor sandwich este strânsă cu o clemă. Acest lucru este valabil și pentru coșul de fum intern.


Am instalat recent un coș de fum cu țevi sandwich și a fost o schimbare de joc! Ghidul pas cu pas a făcut-o foarte ușoară. Îmi place cum păstrează căldura și arată și elegant. Felicitări tuturor celor care s-au ocupat de acest proiect - sunteți niște campioni!