

Instalarea și înlocuirea unei sonerii nu este cea mai dificilă sarcină. Dacă știți cum să lucrați cel puțin un pic cu electricitatea, veți reuși. În continuare vom vorbi despre cum să conectați soneria în apartament, casă - cu fir și fără fir.
Conținutul articolului
Tipuri de clopote de apartament
Apartamentul electric solicită pe metoda de conectare sunt de două tipuri - cu fir și fără fir. Cablate sunt conectate la rețeaua de 220 V, există modele care funcționează de la o tensiune redusă de 12 V. Numite cablate, deoarece butonul clopotului și unitatea internă trebuie să fie conectate prin fire.
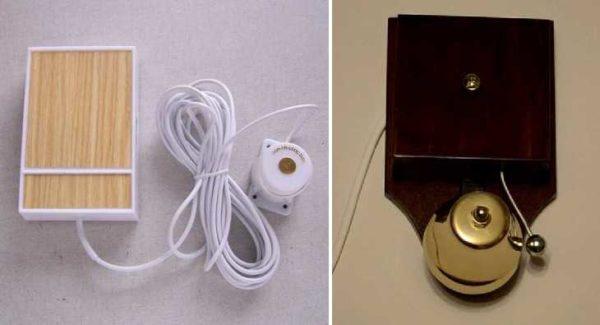
În cazul soneriilor fără fir, butonul și unitatea internă nu sunt conectate fizic. Acestea au un emițător miniatural (în buton) și un receptor (în unitatea internă). Acestea comunică între ele pe o anumită frecvență. Există două tipuri de surse de alimentare pentru sonerii fără fir:
- Unitatea interioară și butonul sunt alimentate de baterii.
- Butonul este alimentat de baterii, unitatea internă - din rețeaua de 220 V. Și există două moduri de realizare a blocurilor interne: cu o conexiune standard la cablurile cu fire și cu instalarea într-o priză. În ultima opțiune pe corp există o fișă electrică convențională. În acest caz, conectați clopotul în apartament și casă este foarte simplu: trebuie să instalați unitatea internă în priză, să înșurubați butonul pe intrare / țiglă și să introduceți bateria.

După cum s-a menționat deja, în versiunea fără fir, butonul și clopotul electric "comunică" între ele prin intermediul semnalelor. Semnalele pot fi transmise în format analogic sau digital. Transmiterea semnalului mai fiabilă în format digital - mai puțin predispusă la distorsiuni. În plus, astfel de modele au capacitatea de a schimba canalul pe care are loc recepția/transmisia. Atunci când transmiteți un semnal analogic, nu există o astfel de posibilitate. Ce este rău? Gama de apeluri - 100 de metri și mai mult. Și dacă în această zonă există un dispozitiv care funcționează pe aceeași frecvență (apel sau altul), receptorul dvs. poate capta semnalele sale. În acest caz, există alarme false.
Mai multe sonerii sunt împărțite nu apartament și stradă. Ele diferă prin faptul că pentru cele care sunt instalate pe stradă, butoanele fac ermetic sigilate și rezistente la praf. În plus, este recomandat să le instalați sub o vizieră mică - vor exista mai puține probleme.
Conectarea soneriilor electrice cablate
După cum am spus deja mai devreme, soneriile cu fir se disting prin faptul că butonul și unitatea internă trebuie să fie conectate prin fire. Schema de conectare prin cutia de joncțiune din fotografia de mai jos.
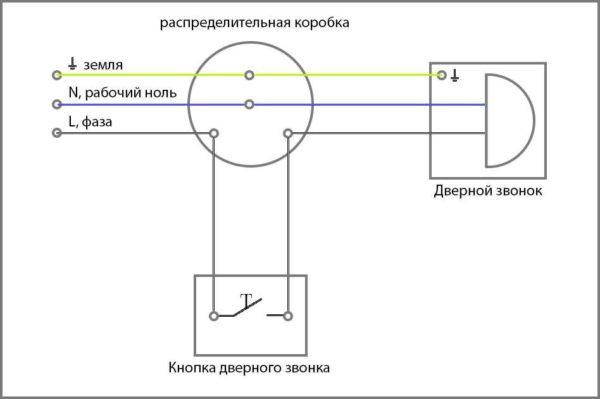
Pe butonul conduce firul de fază, de la al doilea terminal al clopotului, acesta merge la unul dintre firele unității interne. Pe al doilea fir rămas liber se conectează cutia de joncțiune "zero" (în conformitate cu codul de culori este de obicei albastru sau de culoare albastră). Dacă unitatea interioară are un terminal pentru conectarea la masă, acesta este conectat la un conductor de culoare galben-verde, care ar trebui să meargă, de asemenea, de la cutia de joncțiune. Dacă nu există un astfel de terminal, dar există un conductor, acesta este izolat.
Complexitatea conectării soneriei apartamentului este că firele trebuie să fie conduse prin perete. Uneori acest lucru este prea incomod, atunci gaura este făcută lângă rama ușii.
Dacă această conexiune pare prea complicată pentru dvs., căutați modele de clopote cu fir cu un bloc intern, care este introdus în priză. Există, de asemenea, astfel. Exemplu pe fotografie.
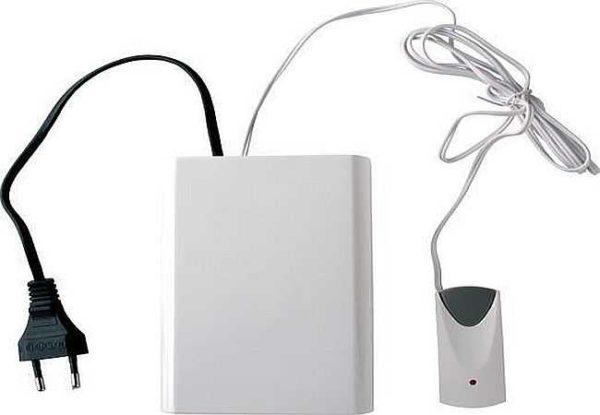
Cum să conectați clopotul în apartament dacă are o priză electrică, toată lumea știe. În acest caz, va fi necesar doar să trageți firul care leagă cele două unități prin perete. Pentru a face acest lucru, va fi necesar să o deconectați de la una dintre părți, trageți-o prin gaura pregătită, apoi conectați firele în loc.
Conectarea și alimentarea apelurilor fără fir
Mai întâi vom vorbi despre acele modele ale căror blocuri interne sunt conectate la rețeaua de 220 V. Dacă există o fișă pe corp, știți exact ce trebuie să faceți. Dacă nu există fișă, dar există două fire, la ele conectați două fire care provin din cutia de joncțiune. Dacă există trei fire, îl izolați pe cel galben-verde și îl conectați pe cel albastru și pe al doilea (poate fi maro, roșu, negru, alb etc., dar cu siguranță nu verde sau galben-verde).

Dacă ambele unități sunt alimentate cu baterii
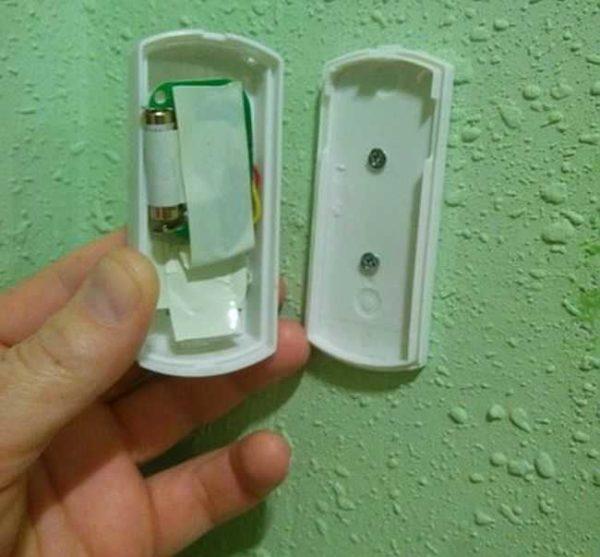
Cu modul de conectare a clopotului într-un apartament sau casă dacă ambele unități sunt alimentate de baterii, nu există probleme. Doar într-un loc potrivit în casă bateți un cui sau înșurubați un șurub, pe care fixați unitatea internă, puneți baterii. Faceți același lucru cu butonul, dar acesta este montat afară - lângă ușă sau poartă. Pentru a fixa butonul, carcasa trebuie deschisă (pot exista șuruburi mici, dar, de obicei, trebuie doar să faceți pârghie în carcasă cu o șurubelniță).
Pe peretele din spate există mai multe găuri pentru elemente de fixare. Fixați capacul din spate pe șuruburi autofiletante sau dibluri (depinde de material), apoi instalați bateriile și închideți capacul. Acest lucru finalizează conectarea clopotului fără fir.
Cum să alimentați un buton fără fir în condiții de îngheț
Clopoțeii fără fir sunt buni pentru orice, cu excepția faptului că iarna pot apărea probleme: unele tipuri de baterii îngheață și nu mai funcționează. Acestea trebuie să fie înlocuite la fiecare 10-15 zile. Foarte incomod, deoarece este dificil să vă dați seama că apelul a încetat să funcționeze din cauza unei baterii descărcate. Puteți scăpa de această situație în următoarele moduri:
- Utilizați baterii cu litiu. Acestea nu se tem de îngheț - pot funcționa fără probleme până la -30°C.
- Dar bateriile de acest tip pentru 9 V sau 12 V sunt pur și simplu nerealiste de găsit. Acestea sunt aproape epuizate din stoc. Ieșiri:
- Pentru a pune baterii în casă, la butonul pentru a trage fire.
După ce ați finalizat sistemul în oricare dintre modurile propuse, problemele cu alimentarea cu energie a butonului de apel pe stradă pe care le veți avea mult mai puțin. Acum știți nu numai cum să conectați clopotul în apartament și pe stradă, ci și cum să asigurați funcționarea acestuia pe vreme geroasă.
Echipamente non-standard
În unele cazuri, sunt necesare două butoane sau două unități de sonerie. Dacă sunt necesare două butoane, acestea sunt conectate în paralel.
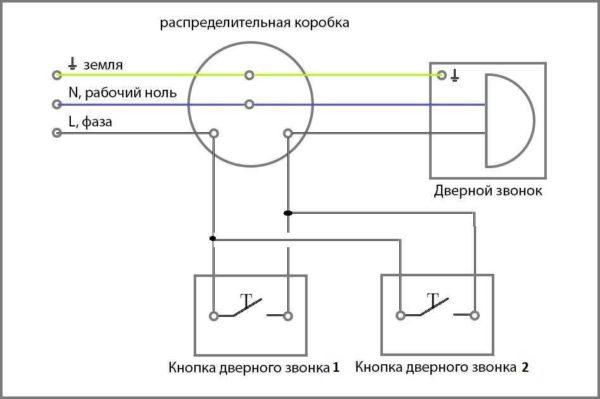
În practică, acest lucru înseamnă că faza vine la primul buton, iar conductorul care merge la al doilea buton este conectat la același contact. De la al doilea contact al butonului #2, conductorul merge la contactul liber al butonului #1, iar apoi merge la sonerie.
Firul care conectează cele două butoane este de dorit să găsească aceeași culoare care vine din cutia de joncțiune. Puteți și altele, dar nu albastru sau galben-verde. Toate, știți cum să conectați clopotul în apartament cu două butoane.
În alte situații, trebuie să conectați două clopote. Acest lucru este adesea necesar atunci când instalați un clopot electric într-o casă privată. De exemplu, unul în casă, al doilea pe stradă sau pe etaje diferite, în două aripi diferite ale casei, în bucătăria de vară. În general, există multe opțiuni.
Printre soneriile fără fir există astfel de seturi - în două clopote și sunt setate la o frecvență, deci trebuie doar să le instalați în locurile potrivite. Cu fir va trebui să vă jucați - să trageți fire. În acest caz, soneriile sunt conectate în paralel.

Conexiunea electrică este similară cu cea descrisă mai sus. Faza de la buton merge la un clopot, de la acesta merge la al doilea. Pe contactele libere ale unuia și celuilalt clopot conectați firul neutru de la tabloul de distribuție.

")


Îmi amintesc când mi-am instalat clopotul electric. A fost nevoie de un pic de încercări și erori, dar odată ce am reușit să fac cablajul corect, a fost atât de satisfăcător! Urmați îndeaproape manualul și verificați de două ori conexiunile. Este un upgrade la îndemână pentru orice apartament sau casă!
Installing an electric bell in your apartment is a game-changer! The convenience of not having to run to the door every time is priceless. Trust me, once you’ve got it set up, you’ll wonder how you lived without it. It’s low-key affordable and super easy to install!
I remember when I finally hooked up the electric bell in my apartment! It was a game changer! No more running to the door every time someone knocked. I had to deal with some wires, but it was totally worth it. Now I feel like a tech whiz!
Installing an electric bell in my apartment was a game changer! It’s super handy, and I love how it adds a modern touch. Last week, it rang while I was cooking, and I felt like a pro rushing to answer the door. Definitely recommend it for every home!