

A fireplace is usually placed in the living room. Where else to admire the fire, as not in the room for resting and receiving guests. Use it as the main source of heat is not possible with all designs, but as an additional, in the fall and spring period, it is very even comfortable. Will help the fireplace and in especially severe cold weather, when the main heating power is insufficient. Put a simple fireplace can be made with your own hands. It is not easy, but it is possible.
Although the construction of a fireplace requires much less bricks, but it is very important to lay out all the elements correctly. Due to constructive errors, the fireplace can work inefficiently or not work at all. In addition to the heating function of the fireplace performs in many ways still aesthetic functions because it is often chosen for its appearance, not forgetting about the technical features.
Treść artykułu
Dutch fireplaces
This heating device, although it has a traditional for fireplaces large-format furnace, is in fact a stove – it has a multi-turn chimney. So it is a heavy, difficult to execute massive structure. It has only two key differences from a stove – the size of the firebox portal and the lack of a blowpipe. If you know how to fold the Dutch oven, making simple adjustments, you can turn it into a fireplace. Moreover, if the house is an old Dutch oven, even requiring major repairs, it is easily turned into a fireplace. It is only required to disassemble the front furnace part, insert a suitably sized ready-made metal firebox, connecting it to the chimneys and decorate it.
This is the type of unit with an open firebox, which can be used as the main heating device. The Dutch have long been forced to save on fuel and do not allow themselves to let the heat go down the chimney.
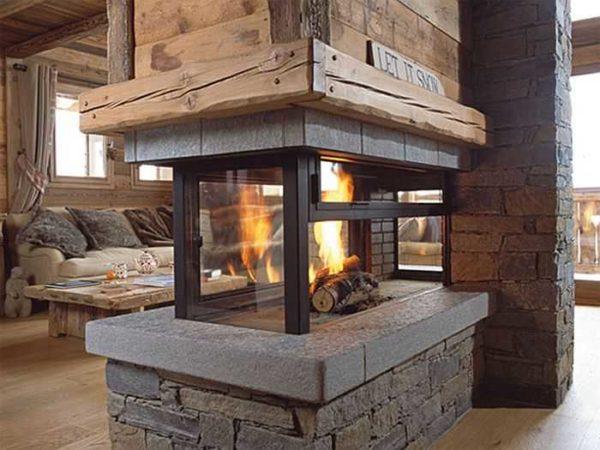
Open or Alpine (Swiss).
This type of fireplace has only recently become popular. In fact, it is also not a fireplace in its purest form, but for a different reason. Rather, it is simply an open or semi-enclosed hearth, over which a hood is made, passing into the chimney.

It fits perfectly into the interiors of the chalet style, because that’s where it came to us. The device, in general, is not complicated, but not very effective in terms of heating. But very decorative.
The option that you see in the photo above is made in the rustic style – from natural treated stone. Such work costs a lot of money: you have to adjust, undercut hard stone, which requires a high level of skill.
Classic English
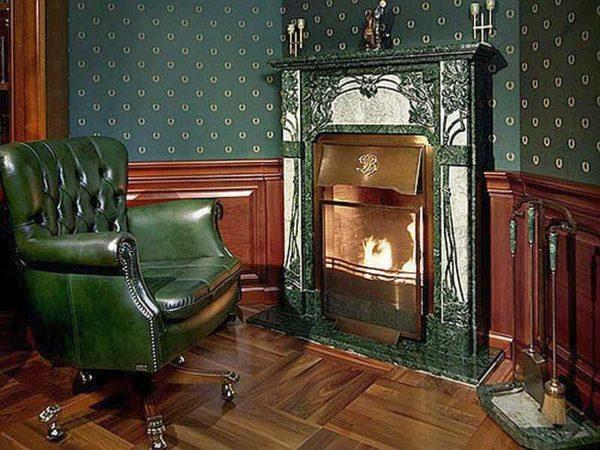
Traditional fireplace is the way we imagine it. Open wide portal firebox, in which the wood is burning. And its finish can be any, as flamboyant under the appropriate interiors, and restrained, which fits into high-tech and minimalism.
With all that it takes, it seems, and not very much space, for the manufacture of a classic fireplace together with the average length of the chimney will take about 800 pieces of bricks. The total mass of such a structure – in the region of a ton. Under the smallest classic fireplace requires a solid separate foundation, such as that arranged for the furnace – at the same depth as the foundation of the house, and in size it should be larger on all sides by at least 15 cm. It should be level with the floor.
Device and how it works
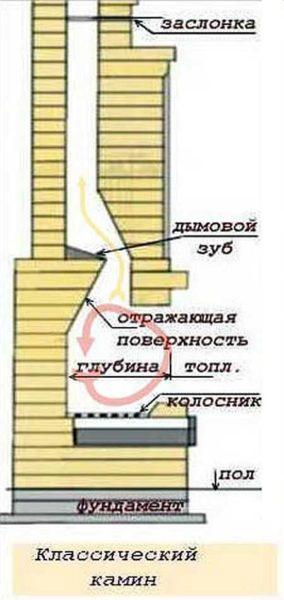
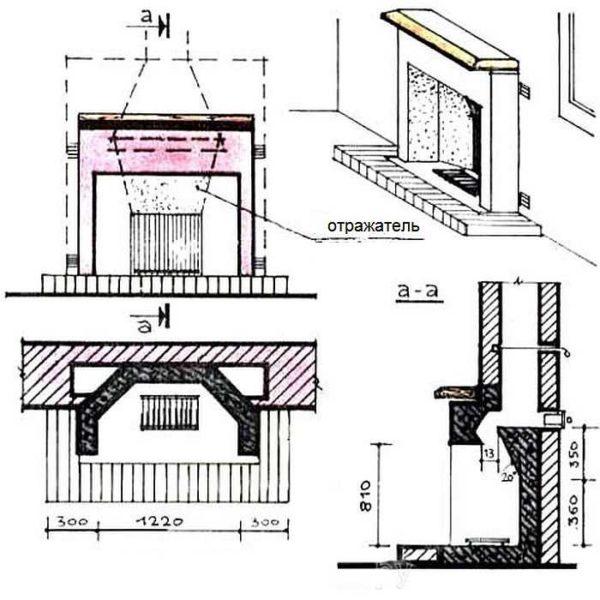
If you look at the photo, it seems that there is nothing complicated: a box with a pipe and that’s it. But what looks simple is actually far from simple. First of all, there is a smoke tooth in the upper part of the firebox. And not just any protrusion, but with a reflective surface. It narrows the cross-section of the pipe, twisting the flame inside the firebox.
Secondly, the bottom part of the firebox does not have a blowhole, and the front wall is made with an inward slope. These two components make it possible to achieve that the flame spins for a long time in the firebox, giving off heat as much as possible.
Thirdly, there is a damper in the pipe, which effectively, and very importantly, safely regulate the intensity of combustion. Safe – because a properly built fireplace under no circumstances does not form carbon monoxide in dangerous quantities. After all, it is formed when there is a lack of oxygen, and when the portal of a classic fireplace is open, there is always enough air and oxygen.
Another point of the fireplace vent is that in it, as in a slide gate, cut a hole in the area equal to 10% of the cross-section of the chimney. This gap is necessary for a minimum draught, which in any case will not allow the flame and smoke to “fall out” of the firebox. Even when the damper is closed, the fire spins inside, and the smoke goes into the chimney.
Such a design allows efficient use of heat even when burning high-calorie fuel. Long-spinning flame maximizes the heating of the furnace walls, and they perfectly heat the room.
If we talk about the possibility of heating water, it is not possible to put anything in the firebox: the whole dynamics is violated. But above the tooth on the pipe, you can put a heat exchanger. Another issue is that the temperatures there are not so high and to heat water for heating will not work, but for DHW in a small volume (storage boiler), the heat will be enough.
In the earliest English fireplaces under was without grates, with a slope outward. In this case, the slightest inaccuracy in the execution led to the fact that the flame began to rotate to the other side. At the same time coals could fly out of the firebox, which is not good at all. That’s why in the Middle Ages they began to make small grates and an under-blower, which was opened only during heating. When the wood is burning, the under-blower is closed, which gives impetus to the formation of a fire whirl in the firebox.
Modern English fireplaces are made with both a blind hearth and a grate. When igniting blind models, ignition liquids are used to ignite the fire. They themselves give enough impetus for the formation of a vortex.
Layout of a classic fireplace
Traditional English fireplaces constructively differ from each other by the shape of the smoke tooth. For its accurate reproduction only “straight hands” is not enough. It requires experience and a lot of it. But there are models that are not so critical to this detail. Such a fireplace with your own hands can be folded, if you know how to handle a master and level.
In this version, the grate is small and is located at the very end of the firebox. This made it possible not to wisecrack with the tooth, and make it ordinary, stepped. But in this fireplace it is impossible to close the under-blower during heating. The fire is “spinning” precisely due to the flow of air into the rear part of the firebox.
Rumford fireplace
One of the varieties of the classic is called the Rumford fireplace (Rumford). The principle of operation is the same, but provides whirling not a smoke tooth, but a narrowed neck of the chimney, the shape of which repeats one of the branches of the hyperbola.
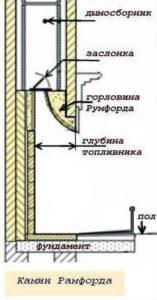
Structurally, it is simpler and requires less space – the firebox can be less deep. All the problems are that the neck must be made with very high accuracy. Deviation of only 5% from the required shape leads to inoperability. This is the main difficulty, so making this fireplace with your own hands is not advised.
With a factory furnace
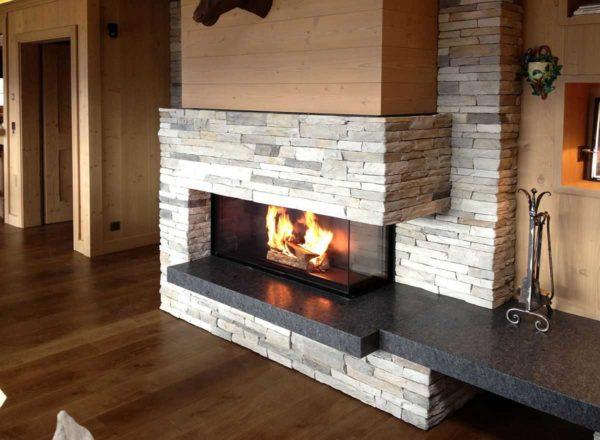
If there are metal stoves, then why not be metal fireplaces? And they are. Fireplace fireboxes are made of complex alloys – silicon, composite and special. The processes occurring in the fireplace firebox are modeled by special programs, so the efficiency of these heating devices is great, the complexity of installation – medium. Another advantage is that you can connect the usual metal chimney.
Another nice point: the weight of the firebox is about 100 kg. If the finish will weigh a little, you can put such a fireplace on a reinforced concrete slab. If you want a natural stone, you will have to make a foundation for the fireplace.
When installing a fireplace with a firebox must comply with a number of requirements:
- the walls near which the heater will be mounted should be covered with non-combustible materials and heat insulation with a reflective layer;
- the distance from the heater to the wall must be at least 10 cm and to the insulation at least 5 cm;
- the ash pan should facilitate cleaning and its inlet should be as close as possible to the firebox;
- the chimney must correspond to the parameters of the firebox;
- the joints of the chimney should be sealed with high-temperature sealant;
- the gap between the firebox wall and the cladding must be at least 1 cm;
The principle and procedure for installing a fireplace firebox, see the video.
Obtaining authorization
A little about whether to order the installation of a fireplace in a firm or to do with your own hands. The matter here is not only in the technical side of the question. Usually difficulties arise long before this – even when drawing up documents. Firefighters do not like to give permission for fireplaces. And permits are necessary when installing a fireplace in any residential premises. The difficulty is that there is no legal framework that would prescribe the rules of installation. For stoves there is such a document, but for fireplaces – no. But there is a phrase in SNiP 2.04.05-91 (on the device heating and cooking stoves) that in any residential premises prohibited device heating devices with an open firebox. From this point of view, you are lucky if you plan to make a fireplace on the dacha, located in a dacha settlement – it is not considered a dwelling.
As is often the case, there is another document (MGSN 3.01-96), which in Moscow allows the installation of fireplaces on the top floors, if the owner is one. So in the capital, there is a chance to get permission, although not all.
There is a loophole and the residents of old brick stalinka and Khrushchevok, in which in addition to the ventilation ducts in each apartment there are also chimneys. Under the same category fall houses of modern construction, which also have chimney channels. In all these buildings it is allowed to put heating equipment on the flame. In general, a furnace is implied, but this fact is not prescribed anywhere.
“Push” the permission can be, drawing up papers a complex redevelopment with the transfer of heating devices.Example – the transfer of walls, partitions, association with a balcony or loggia. In the papers do not write about the registers or central heating batteries. It is in such a general formulation – heating devices. In the same document you write that you are going to put the heater on the flame, attaching the project made in the design organization. In this case, homemade papers do not pass. There is a chance. But in general, the owners of houses and apartments will chase long and hard. And do not try to argue, otherwise you will never get permission. Redo everything they demand. There’s no other way. A little easier will have to house owners. The logic is clear – if there are problems, you will burn yourself. With the owners of apartments talk tough, but you can still get permission.
Here if you do not want to mess with all this, you can order the installation of the same fireplace with a firebox in a specialized organization. As a rule, they provide services for the execution of documentation. They have already trampled paths, the chances are much better. In addition, when accepting your heater may require (and most likely will require) certificates for all materials, including bolts, screws and furnace hardware. This is also something to be aware of and keep in mind. And with such a task, buying materials turns into a difficult quest.

Corner fireplace – poryadovka and video
Very often fireplaces are made in the corner. This is convenient and practical: so it occupies the most difficult to decorate the area and itself serves as an excellent decoration. Choosing a place under the fireplace, take into account such a nuance as the height of the pipe. When laying the fireplace almost half of the material and time is spent on the formation of the pipe. On the one hand, a high pipe – this is good – there will be a good draft. On the other hand – high costs. To reduce them, the fireplace can be placed in the corner where the roof slope is located, not its ridge. The height of the chimney should still be enough to ensure the draught, and the costs will be less.
How to make a protective screen
If the fireplace will stand in a wooden house, the walls need to be protected. Optimally, it should look like this:
- wooden walls are sheathed with thermal insulation (you can cardboard made of basalt wool with an operating temperature of up to 800°C with a thickness of 1,5-2 cm);
- attach a metal screen on top of it on ceramic insulators with a height of 3 cm or more.
The walls of the fireplace can be 5-7 cm away from the screen. The size of the metal sheet is 15-20 cm larger than the dimensions of the firebox. Such a multi-layer system will prevent the heating of wooden walls to any significant temperatures.
Materials, staging, comments
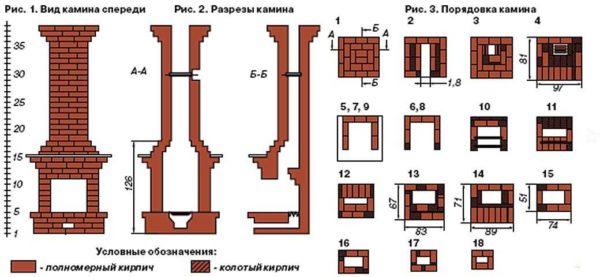
This fireplace has dimensions of 890*890*1610 mm (excluding the pipe). For its manufacture it will require:
- red kiln brick 356 pcs (without the pipe);
- fireproof brick SHA-8 – 55 pcs;
- flue bolt 250*130 mm;
- steel angle with wall thickness of 5 mm: 50*600 mm – 1 piece; 50*800 mm – 2 pieces;
- steel sheet with a thickness of 3 mm 400*600 mm.

The above layout is one of the types of classic fireplace for installing it in the corner. The scheme is quite simple, but in it a large number of bricks require trimming. To lay this brick fireplace, you will definitely need a good chisel and a large number of stone disks.
When forming the tooth in the firebox (rows 10-13) fireclay refractory bricks are trimmed. The upper edge of the brick of each subsequent row should protrude above the previous one by 30 mm. This edge is hemmed so that it is sloping and flat. As a result of laying all 4 rows forming the tooth, the surface should be flat and smooth. It will “twist” the flame and reflect heat into the room, so this moment pay maximum attention.
Sufficiently detailed instructions for laying this fireplace are given in the video.
Laying conditions and materials
Start laying the fireplace with your own hands should be in the fall-spring period, when the temperature stays within 15-20 ° C. Under other conditions, it is difficult to work and requires solid experience.
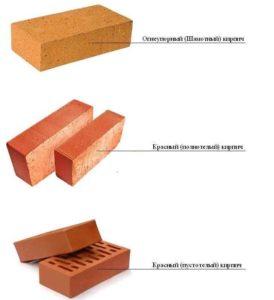
Brick take kiln brick, red, full-body. Face and smooth bricks are not suitable – they will not withstand temperature fluctuations and will fall apart. When choosing a kiln brick pay attention to the geometry and color. Burnt “iron” is not suitable for us, as well as bloated and shattered bricks. Only even, of the same color, making a clear sound when tapping.
The masonry is carried out on clay-sand mortar. Clay – purchased construction, as well as sand – river, not quarry. Soaked to a doughy state clay is mixed with sand in a proportion of 1:3, water is added to obtain a solution of medium plasticity. Be sure to check the fatness of the mortar: take the mortar on a trowel, tilt it. The mortar should fall, leaving a layer of 1.5-3 mm on the metal. If the layer is thinner, metal is visible, add clay, if the residue is lumpy and thick – add sand and a little water. As a result, you should get a mortar with the specified conditions.
It can be mixed at once for the entire volume. At night, the container with the solution is covered with a wet sackcloth, and before work several times stirred.
When laying the thickness of the joints 6-13 mm. Ideally – 8-10 mm. If the fireplace with your own hands put the first time, constantly use the level and plumb line. Check each row and even each stone. Fireplaces – devices tall and narrow with a high center of gravity. Such structures do not forgive even the slightest deviation. Therefore, the level must be of good quality, ideally if you have a calibrated plane builder (laser level).
Drying and stoking
The finished fireplace should be dried for at least 20 days, in a well-ventilated room. You can arrange a draft, but the walls should not fall sunlight. For shading on windows and doors you can hang sheets or cover the openings with gauze.
After three weeks of drying it is possible to carry out stoking. Slow-burning fuel (coal-seed coal, blacksmith’s coal) is used. If the kiln was dried in good conditions, melt, add fuel in small portions, stoke for a while. After three days it can be used “to the full”. If the conditions were “not very good”, start with 3/4 of the tab, gradually bringing it to full over several days.


I remember when I tried to build a fireplace in my backyard. It was a fun project, but I definitely learned the importance of choosing the right materials and planning ahead. Nothing beats a cozy fire on a chilly night, though! Just gotta make sure it’s safe!
Totally feel you on that! I once tried to make a pizza oven. Thought it’d be a breeze, but I picked the wrong bricks and ended up with a flop. Planning is key! Now I just stick to campfires—way less stress and still cozy vibes!