

A seemingly uncomplicated operation – installing a new chandelier – a person unfamiliar with electricity can be stumped: a lot of wires and it is unclear what and what to connect. How to connect the chandelier with a different number of horns (and wires) to the switch and we will discuss.
Raksta saturs
Preparation: piercing and determining the phases on the ceiling
Those who are at least a little familiar with electrical networks will not need this, the rest will be useful. A person who is not constantly dealing with electricity can be difficult to navigate. In order not to be confused, we will tell everything in order: how to find in the wires on the ceiling phase (or phases) and zero, what to do with grounding. And then, how a whole bunch of wires on the chandelier, connect to those that stick out on top. As a result, connecting the chandelier with your own hands will be a simple task for you.
Ground wire
If the wiring is already done, there are two, three or four wires sticking out on the ceiling. One of them – exactly “zero”, the others – phase, there may still be grounding.
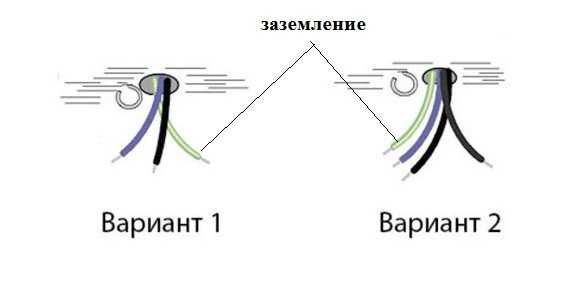
The ground wire is not always present, only in houses of new construction or after major renovation with replacement of wiring. According to the standard it has a yellow-green color and is connected to the same wire on the chandelier. If your chandelier does not have it, the bare wire should be carefully insulated and left like that. Do not leave it uninsulated – you may short-circuit it by accident.
Looking for the phase and zero
With the rest of the wires you need to sort out: where is the “phase” and where is the “zero”. In old houses, all wires are usually the same color. Most often – black. In new buildings can be black and blue, or brown and blue. Sometimes there is red. To avoid guessing by color, it is easier to call them.
If you have three wires on the ceiling and a two-key switch on the wall, you should have two “phases” – for each of the keys and one “zero” – the common wire. You can test with a multimeter (tester) or an indicator screwdriver (this is a special screwdriver with a light bulb that lights up when there is voltage). When working, turn the breaker key to the “on” position (the input circuit breaker on the switchboard is also on). After testing, turn the breaker key to the “off” position. If possible, it is better to turn off the circuit breaker on the switchboard and connect the chandelier with the power off.
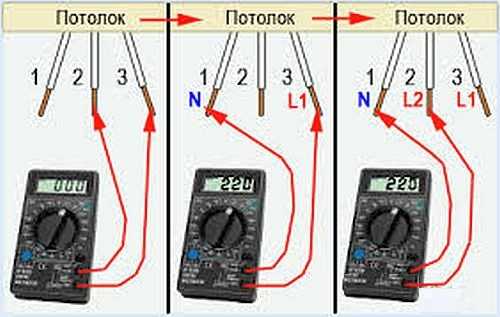
How to dial and identify the wires with a tester is shown in the photo. You put the switch in the position “volts”, select the scale (more than 220 V). Alternately touch pairs of wires with feelers (feelers, hold the handles, do not touch the bare conductors). Two phases do not “ring” each other – there will be no changes on the indicator. If you have found such a pair, most likely – it is two phases. The third wire is most likely “zero”. Now connect each of the proposed phases with the probes to zero. The indicator should show 220V. You have found zero – in the international specification it is denoted by the letter N – and two phases – denoted by L. If all the wires are the same color, mark them somehow: paint, colored marker, a piece of sticky tape. Phases – one color, zero – another.
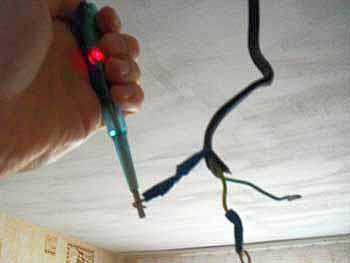
It is easier to work with an indicator screwdriver: just touch its end to the bare conductor. If it lights up, it’s phase, if it doesn’t, it’s zero. Very simple.
If there are only two wires sticking out, one of them is phase, the other is zero. In this case, there is one key on the switch. There are no other options.
Read about the rules and methods of connecting wires in the junction box here.
Wires on the chandelier
Connect the chandelier with 2 wires is simple: one of them screwed to the phase, the other to zero. Which one goes where – it does not matter. If the phases on the ceiling are two, and the switch on the wall is two-key, there are options:
- Twist the phases together, and connect one of the wires from the chandelier to them. In this case, to turn off you will have to move both keys to the “off” position, and the lighting will be turned on from either of them.
- Connect the wire to one of the phases, and insulate the second one. Then only one key will be working. The second one will be empty.

On multi-arm chandeliers, there are definitely more than two wires. With the purpose of yellow-green we have determined. This is grounding. If the same wire is on the ceiling, connect to it. With the rest also need to be sorted out.
Chandelier with 3 wires is connected a little more difficult. If one of them – ground (yellow-green color) it can:
- ignore – if there is no wire of this color (or similar) on the ceiling,
- connect it to the same color.
Actually, there are no other options. Three wires are mostly in fixtures with one bulb. With two – this is an outdated design, with three – a more modern, corresponding to current recommendations.
Connection to a double switch
Connect a five-, four-, three-arm chandelier to a two-key switch on the same principle. From each of the horns goes two different-colored wires. Most often these are blue and brown wires, but there are other variations. To connect to a double switch, all of them need to be divided into three groups: two phases and one zero.
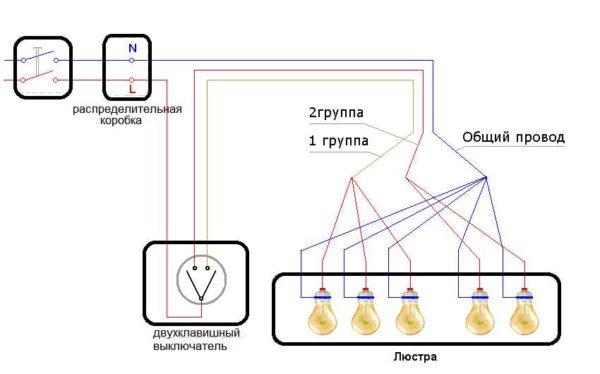
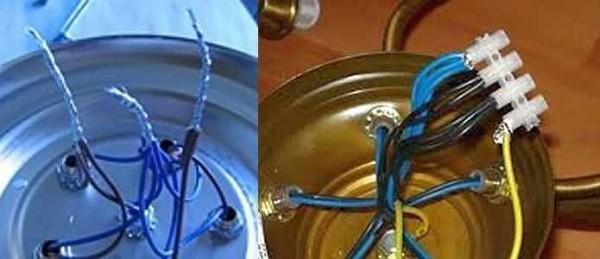
First, all the blue wires are joined together and twisted well. This is the zero. In principle, you can take wires of another color – for lighting fixtures it does not matter. But according to the standard blue color denotes exactly “zero”. It is important only that in the twist did not get into the conductors painted in a different color. In the photo below you can see that all conductors of blue color are combined into one group. This is the “zero”.
Now the remaining ones are divided into two groups. The division is arbitrary. One group of bulbs will be turned on from one key, the second – from another. In a five-arm chandelier usually combine 2+3, but you can also 1+4. In a four-arm chandelier, too, there are two options – 2+2 or 1+3. And here with three bulbs without options: 1+2. The separated wires are twisted together. Got two groups, which connect to the “phases” on the ceiling.
How to connect a chandelier to a single switch
If the wires on the ceiling are only two, and on the chandelier – a lot, but only two colors, everything is simple. All conductors of the same color twist bare parts and connect to one of the wires on the ceiling (it does not matter which one). Collect in one bundle all the conductors of the second color and connect to the second ceiling. The scheme of connection of the chandelier in this case is shown in the figure below.
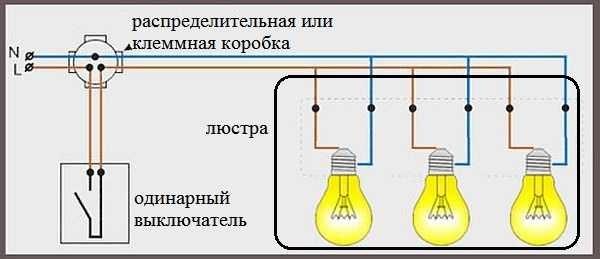
With such an inclusion, all the bulbs will light up simultaneously.
Rules for connecting wires
When working with electricity, there are no trifles. Therefore, the connection of wires in the chandelier do according to all the rules. When combining in one group, it is not enough to simply twist them and screw on a protective cap.
Such a twist sooner or later will oxidize and begin to heat. It is very desirable to solder such connections. If you know how to handle a soldering iron and tin, be sure to do it. This will guarantee normal contact and the connection will not heat up.
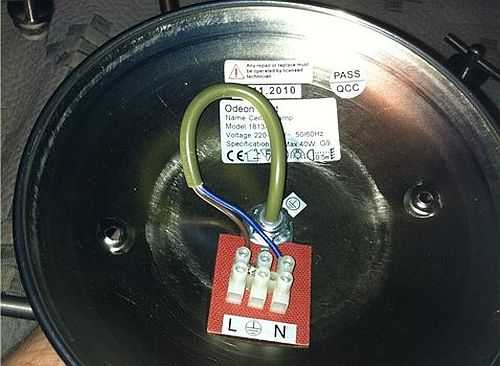
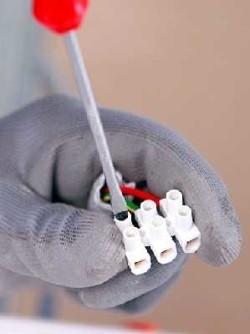
Now about how to connect the wires from the chandelier with the wires from the switch (which are on the ceiling). According to the latest rules, twisting is inadmissible. It is necessary to use terminal boxes. Most modern chandeliers are equipped with them. If not – buy in any building store or selling lighting fixtures.
When using such a terminal box there is a problem: a twist of a large number of wires in the hole simply does not fit. The solution: to solder a conductor (copper, single or stranded, cross-section of at least 0.5 mm2) to the connection. Insulate this connection well, and insert the free end of the soldered conductor into the terminal box (you don’t need a long one – 10 cm is more than enough).
After inserting all the wires from the chandelier into the terminal box and tightening the screws, the whole structure is raised under the ceiling. There it is pre-fastened, after which the wires are connected in the terminal in the necessary order. In this case, it is important to set the “zeros” one opposite the other. Phases to phases are connected in any order.
The correct connection of wires in the junction box is described here.
How to separate the wires on the chandelier, how to connect the conductor and the chandelier to the terminal – all this is in the video.
Connecting a Chinese chandelier
Most of the relatively inexpensive chandeliers on the market come from China. What they are good, so it is a large range, but with the quality of electrical assembly can be problems. Therefore, before you connect the chandelier, you need to check its electrical characteristics.
First check the integrity of the insulation. They can be collected in one bundle and shorted to the body. The tester should not show anything. If some readings, you have two options: look for and replace the damaged wire or take it to the exchange.
The second step is to check each horn. From the horn go two wires. They are soldered to two contacts in the cartridge. Each wire is tested with the corresponding contact. The device should show short circuit (short circuit or infinity sign depending on the model).
After checking, you start grouping the wires as described above.
Connecting a halogen chandelier (with and without a remote control)
Halogen lamps do not work from 220 V, but from 12 V or 24 V. Therefore, step-down transformers are installed in each of them and the entire circuit is assembled and ready for installation. Free remain only two conductors, which and need to connect to the wires sticking out on the ceiling. Connected in any order, “phase” and “zero” – does not matter.
If the chandelier is equipped with a remote control, a control unit is added to the transformers. Connection is similar: there are two conductors that need to be connected to those that are on the ceiling. Coming from the other side of the third conductor (it is thin) is an antenna, with which “communicate” remote control and control unit. This conductor remains inside the glass as it is.
How to connect a chandelier with a remote control, see the following video.

")


