

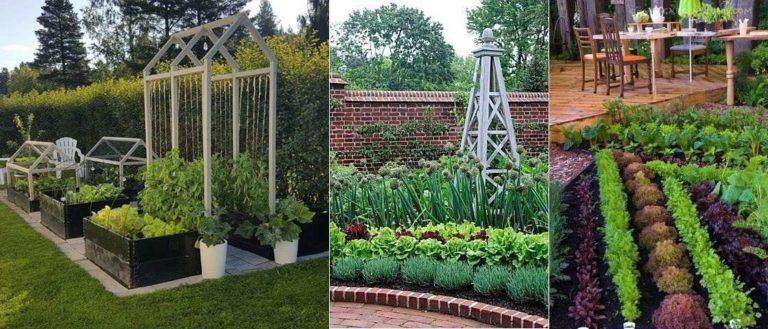
Sempre più spesso la dacia non è solo un luogo per risolvere i problemi alimentari, ma anche un luogo di svago. E non tutta la superficie è destinata all'orto. Come pianificare un orto, in modo che non solo il raccolto sia buono, ma che sia anche bello? E si vuole anche lasciare spazio alla "bellezza" del giardino. Tutto è possibile, basta trovare il giusto approccio.
Contenuto dell'articolo
Scegliere un luogo per l'orto
La maggior parte delle piante ama la luce del sole. Così crescono e fruttificano normalmente. La scelta di un posto per l'orto deve tenere conto di questo fatto. È particolarmente importante destinare a un orto un terreno ben illuminato per le regioni della fascia centrale e del nord.
Prima di pianificare, osservate attentamente come si distribuisce l'ombra sul vostro terreno durante il giorno. Non sono solo gli edifici a proiettarla. Un'altra ombra è data da una solida recinzione, da alberi e arbusti. In base ai risultati delle osservazioni, dividete l'area in tre gruppi: illuminata tutto il giorno, prima di mezzogiorno e tutto il giorno all'ombra.
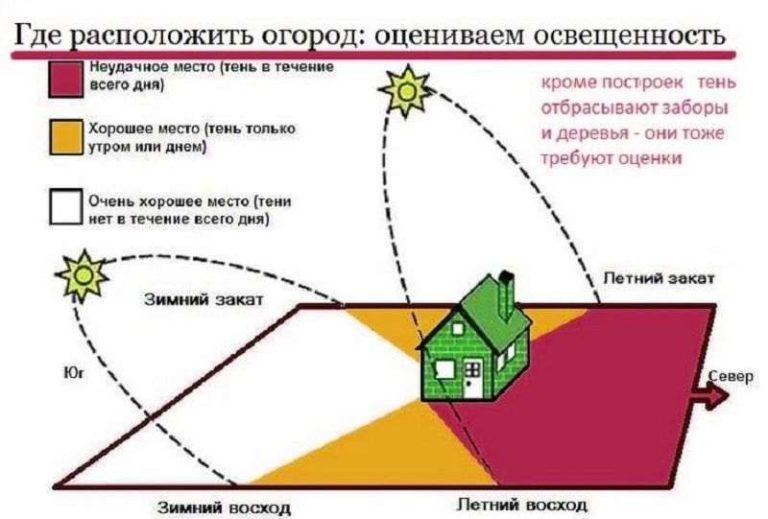
Per le regioni con un clima fresco, il posto migliore per un orto è quello in cui il sole splende per tutto il giorno. Nel sud, scegliete altre zone - nella penombra. Per le regioni meridionali, l'ideale è che ci sia il sole solo al mattino e che nel pomeriggio l'appezzamento sia coperto dall'ombra. Se c'è ombra per tutto il giorno, si possono piantare solo piante amanti dell'ombra. Nell'orto ce ne sono poche, ma ci sono abbastanza fiori o piante ornamentali. Si può quindi realizzare un'aiuola.
Quanti letti sono necessari
Per progettare l'orto, è necessario conoscere la superficie da destinare a ciascun tipo di pianta. Una volta decisa la superficie, sarà possibile, già in fase di progettazione, scegliere le dimensioni delle aiuole e la loro forma. Quindi, di quante aiuole ho bisogno? Prima di tutto, bisogna decidere cosa si vuole coltivare nell'orto e quanti chilogrammi si desidera avere per ogni coltura. È più facile formalizzare il tutto sotto forma di tabella.
| Coltura vegetale | Resa in kg per ettaro |
|---|---|
| Patata | 250-300 kg |
| Carote | 230-270 kg |
| Cavolo | 500-600 kg |
| Barbabietola | 300-370 kg |
| Cipolle | 100-120 kg |
| Pomodori | 60-70 kg |
| Cetrioli | 350-420 kg |
| Melanzane | 200-350 kg |
| Pepe dolce | 150-200 kg |
Poi bisogna trovare i dati sulle rese per ettaro nella propria regione. I dati sono necessari per ogni tipo di pianta che si vuole coltivare. La tabella mostra la resa media in Russia. Le abbiamo ricalcolate in chilogrammi per ettaro di superficie. A seconda della regione, le rese differiscono e in modo significativo. Ma per una prima stima, si possono prendere queste cifre. Dopo il primo raccolto, si potranno fare degli aggiustamenti. Potete comunque cercare di scoprire dai vicini quanti ortaggi coltivano e concentrarvi sugli indicatori locali.
Calcolo della superficie delle aiuole per le colture
Per calcolare la superficie delle aiuole basta dividere la cifra che si prevede di ottenere sotto forma di raccolto per la resa della coltura. Ottenete quanti ettari dovrebbero essere destinati a questo ortaggio. Poi, al momento di pianificare l'orto, decidete la lunghezza e la larghezza delle aiuole e potrete finalmente capire quanto spazio sarà necessario.

Let’s look at an example. For example, we want to grow 250 kg of potatoes, 50 kg of onions, 50 kg of tomatoes and 50 kg of cucumbers. Let’s calculate:
- The yield of potatoes 250-300 kg per hectare. We want the same 250 kg. That is, for potatoes we will allocate 1 hectare.
- We want 50 kilograms of onions. Yield – 100-120 kg. Calculate: 50/100 = 0.5 hectares.
- Tomatoes need 50 kg. Yield 60-70 kg. Calculation: 50/60 = 0,8 hectares.
- Cucumbers plan to get 50 kg. Yield 400 kg, we get 50/400 = 0,125 hundred.
In the same way count for all the plants that we want to grow in the vegetable garden. The resulting figures are added up and the result is checked with the area that we can allocate to the vegetable garden, make adjustments.
This is if you do “by science”. If for you the vegetable garden – more like a pleasure, then take the site plan in scale, in the same scale make templates of beds of different shapes and sizes. Move the beds around the plot until you have a picture that you like. Then just distribute the vegetables on the beds. Even so, you have to take light into account.
Posizione dei letti
If we talk about orientation to the sides of the world, then the most optimal placement of beds – from north to south. In this case, the planting will be illuminated all day long, shading will be minimal. But this is relevant for regions with cool summers. In the southern regions, the problem is different. It is not how to achieve better lighting, but how not to let the sun burn the plants. The task is the opposite, but it is no easier. The plus here is that the orientation of the beds is not so important.
Regioni settentrionali
The choice of location for vegetable crops is also influenced by the location of the region and the presence/depth of groundwater. Recommendations for northern regions:
- Position the beds from north to south.
- Make sure that the shade of the house or trees falls on the vegetable garden least of all.
- If the water level is high, we try to allocate the highest areas for the vegetable garden or make perimeter ditches for water drainage.
- We arrange high or raised beds.

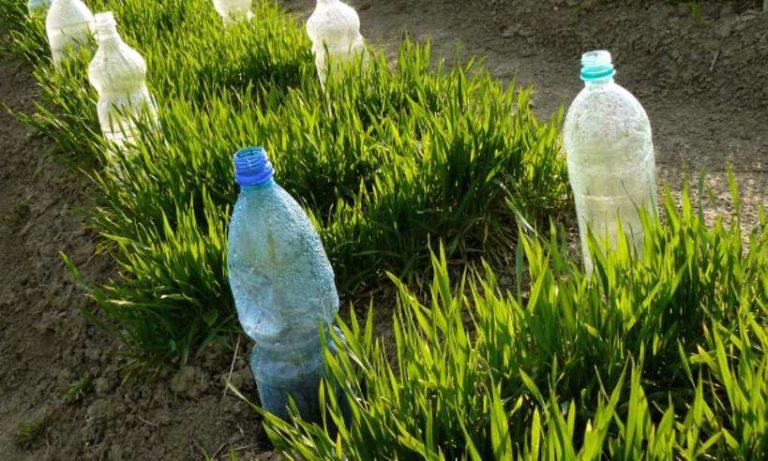
These are general principles and rules. See for yourself what suits you and what does not. About high beds, it should be said that they require more time and money for the device. But they justify themselves. Firstly, they warm up earlier, secondly, soil water and dissolved substances in them have a minimal impact on plants. Thirdly, the vegetable garden season can be extended, since it is easy to make something like a greenhouse, making arcs, on which to stretch the covering material. This will also help to protect the harvest from sudden frosts.
Orto a sud
For southern regions, the layout of the vegetable garden is subject to other principles. It is necessary to protect plants from the scorching sun and provide normal watering. Here’s what you can do:
High beds in the south are also applicable, but really high and with light-colored walls (whitewashed). The reasoning here is different. In the southern regions with dark soil it gets so hot that it is impossible to walk barefoot – it feels like a frying pan. With high beds lift plants above the hot soil. Well, and a limited amount of soil is easier to spill. In addition, you can also put arcs and stretch a covering material or shading net to protect from the scorching sun.
Metodo di coltivazione, larghezza delle aiuole e distanza tra le file
Not all vegetable gardeners divide their plots into beds. Many simply plant in rows, not even always separating one crop from another. Sometimes the separation is a wider “pedestrian” inter-row. In principle, you can do this, but the division into beds makes the work of care easier, makes the vegetable garden more attractive. With proper treatment, it increases yields.
Come progettare l'orto sotto le aiuole
There are several systems of division into beds. They determine the width, the length of the planting, and some also determine the width of the row spacing.
- Narrow beds. The width of the beds is 45 cm, the distance between them is 90 cm. Why so? In a normal bed, the outermost plants are usually taller and stronger because they get more light. For this reason, a 45 cm wide bed is made by planting only two rows of plants. In this way you can achieve high yields, even sun-loving varieties mature in the middle zone. But there is a significant disadvantage: wide row spacing reduces the “working” area, and they overgrow with grass, with which you have to fight.

- Normal beds or normal width – from 50 cm to 90 cmo even up to 1 meter. The width of the row spacing – from 40 cm to 60 cm. They can be level with the ground or raised. Elevated is without walls, but the seedbed is higher than the level of the row spacing. The height difference is formed due to the soil brought in or added from other places on the plot.
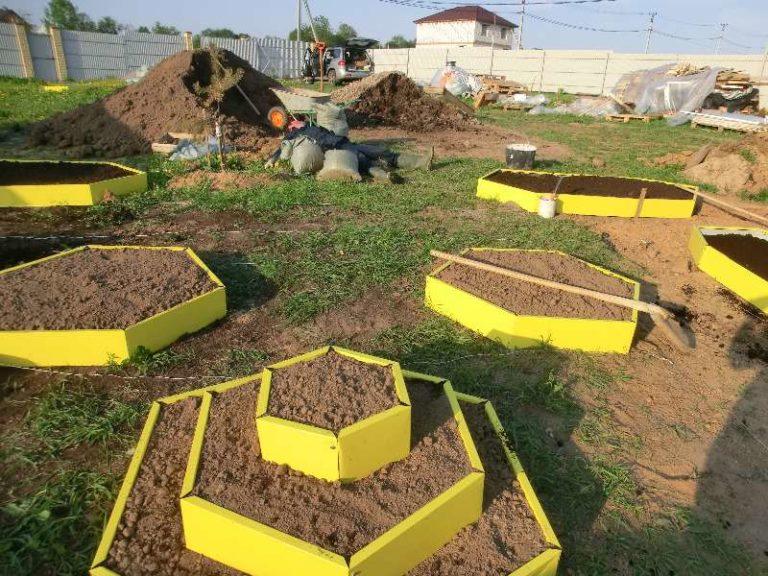
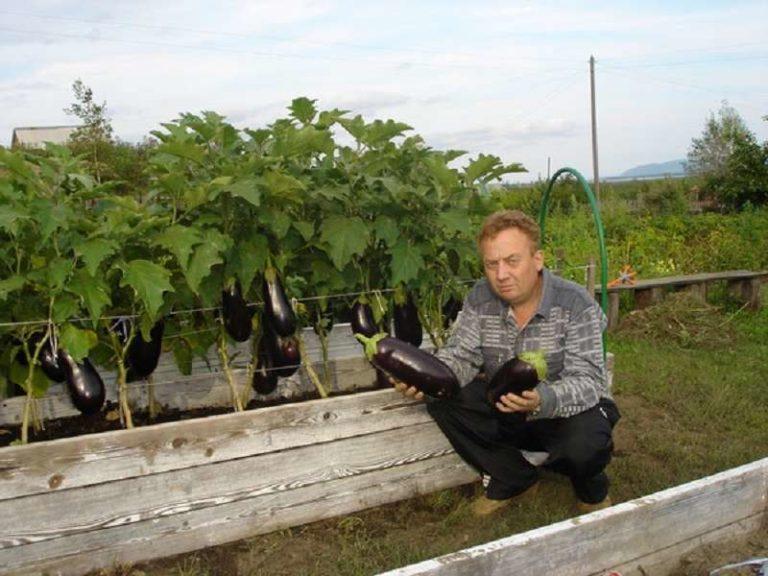
- High beds. From boards, slate or other similar material make walls, inside the box pour humus, a layer of earth. Such beds are not flooded by floods or rains, better warmed. They are more convenient – it is easier to process, you do not need to bend too low. But costs and time for the device require more.

- Warm beds. They differ from the high “stuffing”. Inside the box made of boards or slate are laid in layers of branches, leaves, humus, a layer of soil in which plants are already planted. Width – up to 1 meter. They are good because the decomposing leaves warm the soil, which allows you to plant plants earlier. This is important for northern regions, for southern regions it is not so relevant, but it is also practical because of the better results that the prepared soil gives.
You can use any of the methods of growing plants in the beds. You can also choose any width of the bed. Optimally – not more than one meter. You can do less. We choose it individually: it is important that you can reach the middle without much difficulty. And not only reach – you will have to work the middle of the planting, and it should not be too uncomfortable.
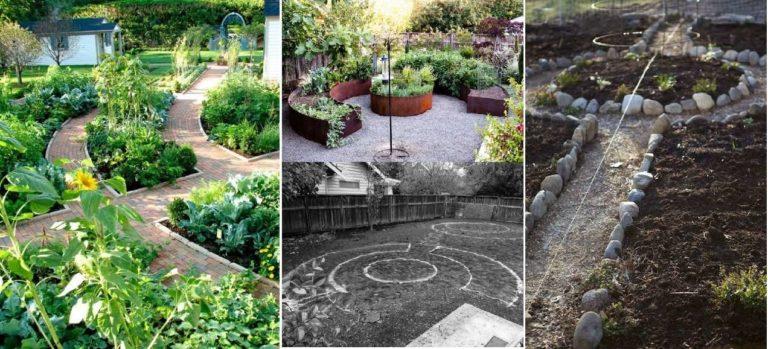
Forme del letto
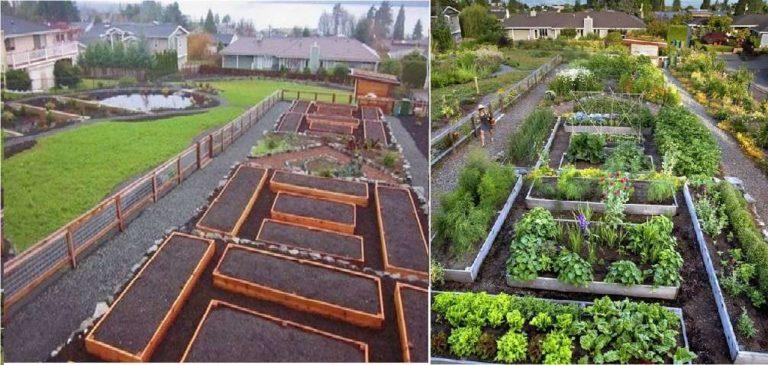
The traditional shape of a bed is a rectangle. Its width, as you realized, from 45 cm to 100 cm and depends only on your desire and the chosen method of cultivation. The length of the bed – again depends on your desire or the layout of the plot. Why choose a rectangle more often? Because this is the most efficient way to utilize the area of the vegetable garden.
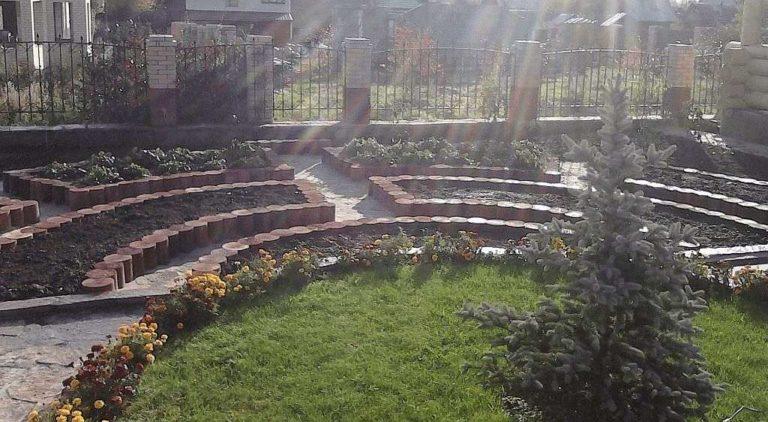
And in general, there can be beds of any shape: square, triangle, polygon, circle, oval and more complex figures. These shapes, perhaps, look more aesthetically pleasing, but more space “walks”. So the shape of the beds you choose at your discretion. It affects the yield insignificantly, but the appearance of the vegetable garden is very different.
Letti sull'appezzamento con una pendenza
To plan a vegetable garden on a plot with a slope is more difficult. Here retaining walls set the direction of beds and change something too difficult and expensive. You have to use what is available, to the maximum. On the southern slope everything is perfect – the illumination is ideal, and retaining walls additionally warm the plantings – they accumulate heat, then warming the air. Therefore, we make paths closer to the edge of the leveled site – so that the heat from the walls reached the plants.
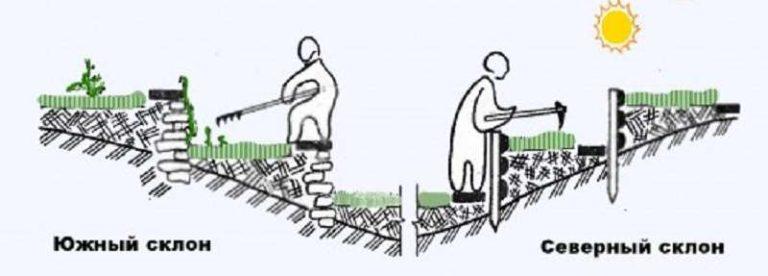
On the northern slope, the retaining wall gives shade. At the wall itself, it lies almost all day, while the edge receives more sun. Therefore, paths are made at the wall itself, pushing the beds to the edge of the site. In this case, it is more convenient to process the plantings one level higher. So you do not have to bend at all.
How to break the beds on the eastern or western slope? Observe which part is illuminated more, which receives less light. Make paths where there is less light.
You can also make small beds on an unleveled slope with support walls (example in the photo below). Install two wide boards in parallel (or make a couple of narrower boards). The distance between the boards is the width of your bed. Optimally – 70-90 cm.
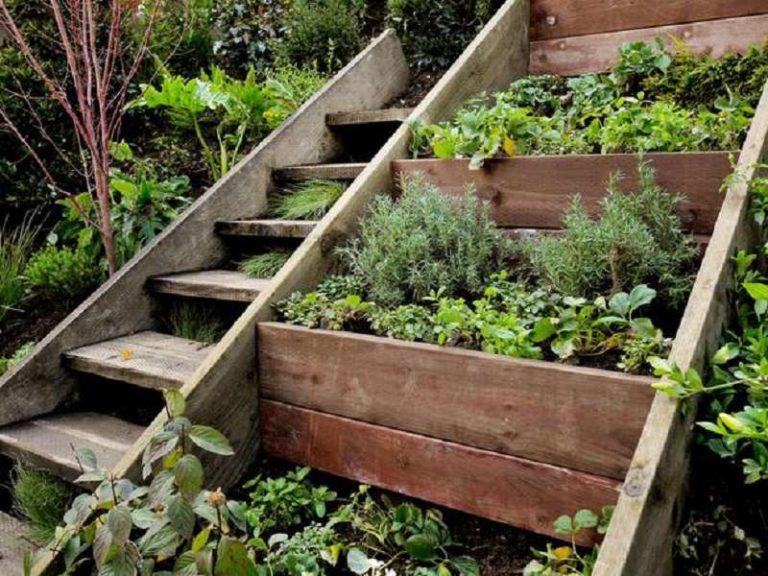
Lay the boards on the slope “on the rib”. You can dig in a little, burying the bottom edge in the soil. On both sides of the board, hammer in pins that will hold it in this position. From short pieces of boards make mini retaining walls, fill the voids with soil. Now you can plant plants.
On such beds it is convenient to grow greens, aromatic crops. Suitable for strawberries, you can plant tomatoes or bush beans. In principle, the selection of crops depends on the illumination. And one more thing: wicker or giving a large volume of plants are not too good on such a slope. And note that the walls will accumulate heat almost not, except in spring. Later they will be covered with greenery.
Come organizzare un orto su una superficie ridotta
Not everyone wants to have a large vegetable garden. More and more dacha dwellers prefer to relax at the dacha, not to process plantings. Nevertheless, to go to the dacha with a full set of products, for many – “too much”. Therefore, they make a couple of beds, where they plant greens and a couple or three bushes of various vegetables. In principle, this is a global trend, so there are more than enough ideas for organizing beds in a small space.
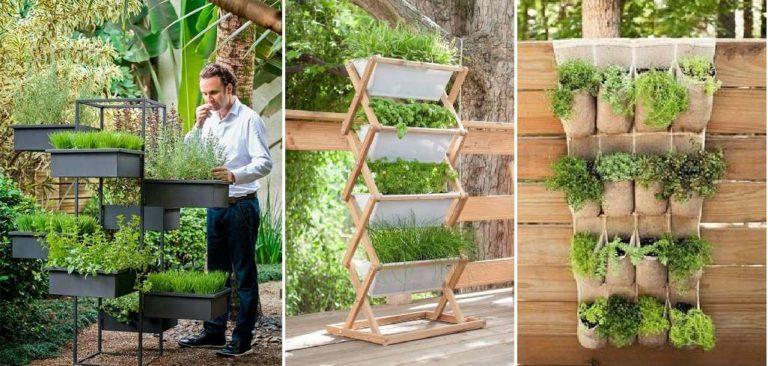
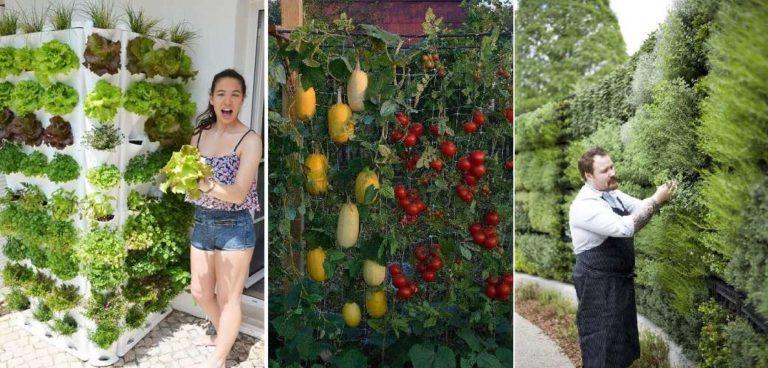
Letti verticali
An interesting idea is to grow plants on vertical beds. Under this name there are many different ways. The only thing they have in common is that the plants are placed on top of each other. They may be offset or exactly one below the other, but they all tend upward and take up a minimum of space.
Option one is a vegetable garden wall. On an existing or specially built wall or fence, trays, boxes with soil are hung, in which plants are planted/sown. This is how green crops and various herbs are grown. If you want, you can plant curly or wicker. But it makes sense to plant them together, giving support in the form of a grid, wooden lattice.
Hanging boxes for planting plants on the wall – not everyone likes this idea. After all, you will have to water, so the wall can get wet or the finish will be spoiled. In this case, you make a rack on which you place containers. And this stand can be not near the wall or fence. It can, for example, separate the vegetable garden from the garden. Or cover some areas or buildings (in front of the toilet, shed, compost pit).
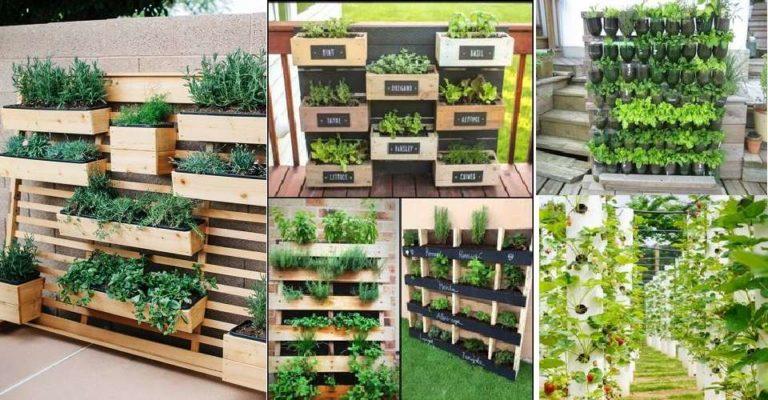
You can even use vertically or horizontally fixed plastic pipes of large diameter, in which to cut “windows” for planting plants. Strawberries feel best in such plantings, but also greens and aromatic plants will not be offended.
Un orto lungo la recinzione
Not everyone has a fence around the perimeter of the entire plot. But if there is one, you can make beds under it. Exception – fences made of corrugated steel in warm regions. Metal heats up so that everything will simply burn. In the north and it is not a hindrance – it will additionally heat the plants.
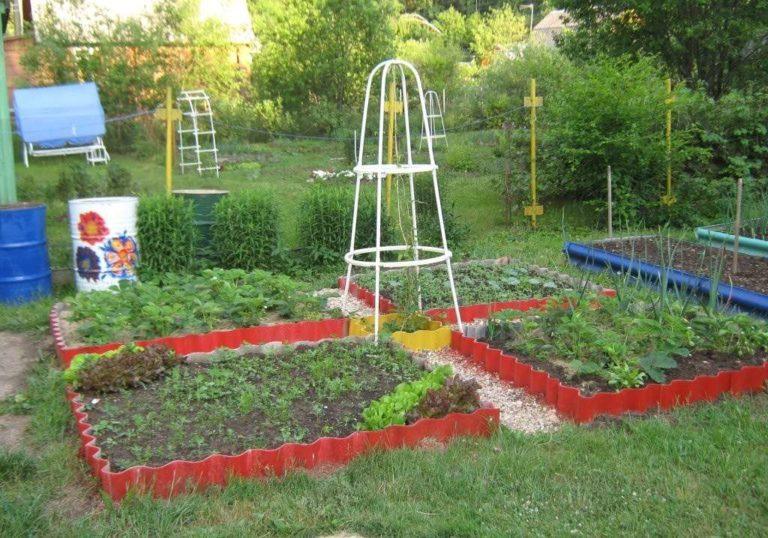
The way of organizing beds under the fence depends on the water table, soil type and rainfall. If the soil is good, the water does not stand even after a heavy rain, you can simply separate the part under planting. The bed width of 50-60 cm scooped, put a curb.
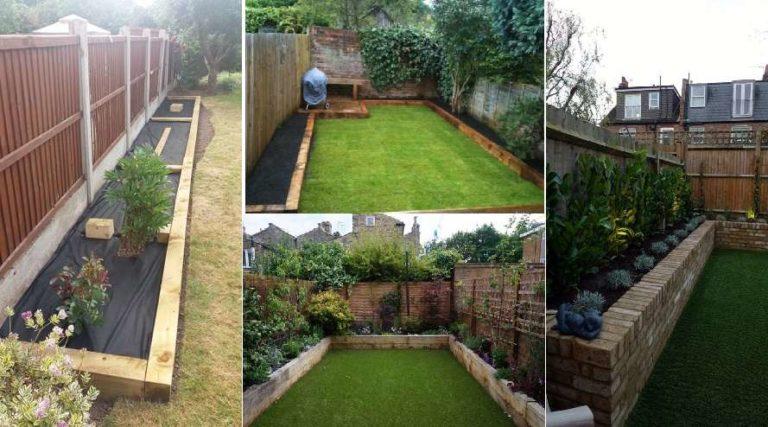
If the soil is “not very”, a lot of water or just want a better groomed look, we make high beds. You add dividers and get space for herbs, cucumbers / tomatoes. If you do not want to “spoil” the fence, you can make a full-fledged box. In any case, it is tightened from the inside with geotextile. To protect against moles, you can lay a fine-mesh metal mesh at the bottom.
As mentioned above, the width of such a bed is 50-60 cm. You need to effortlessly reach the far edge. And stand in this position for some time – to plant, weed, water. The height is entirely at your discretion. As is the material of the walls.
Un paio di idee per piccoli orti
If you have a small vegetable garden and you want to maximize results, give preference to plants that grow well in your region and are guaranteed to yield. It is possible to take up squares for exotics that probably won’t survive, but if the area is large. The same goes for time. If the time to care for the vegetable garden can allocate a minimum, do not plant plants with complex agrotechnics. They take a lot of time, and a positive result is not guaranteed.
Sfruttare al meglio gli spazi ridotti: la compattazione
Use the principles of compacted planting – this is when another species is planted between plants of one species. Relevant for narrow beds or small vegetable gardens. The rules for selecting plants are:
- that they are not affected by the same diseases,
- that they take nutrition from different depths,
- the “compactors” mature earlier than the “main” ones.
It is also necessary to take into account the place of planting. For example, it is better to plant salads and cabbage in the inter-row. Other crops – in the same row as the main species. List of what can be compacted with what:
- beets – dill, lettuce;
- potatoes – garlic, beans, radishes;
- cabbage with lettuce, dill, spinach;
- carrots – spinach, radish;
- zucchini, patissons – beans, beans, dill, corn on the cob (harvest young).
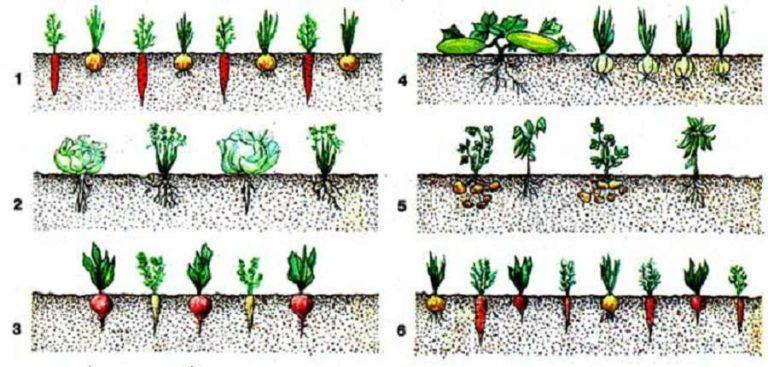
These are the most common schemes of joint cultivation. As you can see, under dill, radishes and salads, you can not allocate a separate place at all. They perfectly combine with various vegetable crops. Just do not sow them all at once. Optimally – with an interval of a week or 10 days, otherwise everything will reach maturity at the same time, you will not know where to go.
Pre-semina e post-semina
Another way to optimize your vegetable garden is to use pre-sowing or post-sowing. Post-sowing is when new plants are planted in place of mature plants. If fast maturing species are sown in place of late planted species in early spring, this is called pre-sowing. Radishes, lettuce, herbs, chives and cress are suitable for sowing before or after sowing.
Principi della rotazione delle colture
To have a harvest every year, change the area for planting plants of the same species. For example, don’t plant tomatoes in the same place every year. Pests, diseases of a particular species accumulate in the soil. By changing plants, sowing disinfectant plants, you eliminate pests.
Tomatoes, eggplants, potatoes – these are all nightshades and have the same pests.
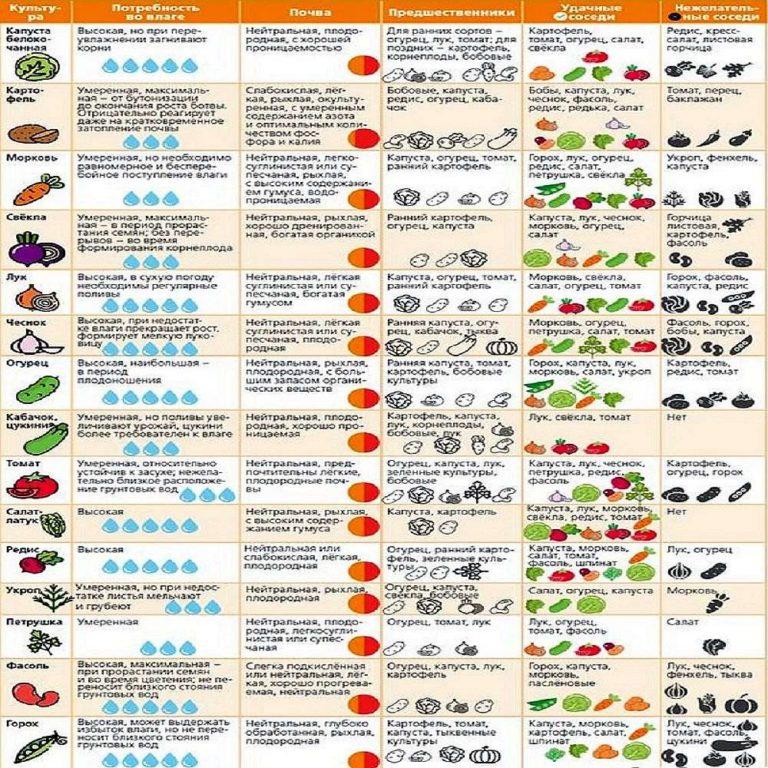
So when selecting plants, it is worth looking at the classification of species as well. To make it easier to orient yourself, we will give a table of the order/combination of cultures.
| Crop to be planted | Good predecessors | Acceptable predecessors | Bad predecessors |
|---|---|---|---|
| Medium and late varieties of cabbage | Peas, beans, beans, cucumber, carrots, early potatoes | Beet, cabbage | |
| Early cabbage, cauliflower | Onions, cucumbers beans, peas, beans, sedums. | Carrots, tomatoes. | Root crops, cabbage |
| Beets | Potatoes, cucumbers, greens, sidedresses. | Tomatoes, onions, carrots, cauliflower and early cabbage, | Beets, late and mid-maturing cabbage. |
| Cucumbers, zucchini, patissons, zucchini. | All legumes, onions, garlic, cabbage, except late cabbage. | Potatoes, beets, greens | Tomatoes, carrots, late cabbage. |
| Pomodori | Cucumbers, turnips, cauliflower, greens, sidedresses. | Onions, beets, medium and late cabbage. | Tomatoes, potatoes |
| Onions, garlic | Legumes, potatoes, cucumbers, cauliflower and early cabbage | Beets, tomatoes, late cabbage | Herbs, carrots |
| Potatoes | Legumes, sidedresses, cucumbers, cauliflower and early cabbage | Beets, carrots, medium and late cabbage, greens | Tomatoes, potatoes |
| Herbs | Legumes, onions, cauliflower and early cabbage, cucumbers, sidedresses | Potatoes, beets, greens, tomatoes | Carrots, late cabbage |
| Legumes | Potatoes, onions, garlic, all cabbage, cucumbers | Root crops, sidedresses, herbs, tomatoes | Legumes |
Come "scambiare" le verdure nelle aiuole
If you change the places for planting plants according to the table above, it is most convenient to divide the vegetable garden into 4 parts. In the first time to plant plants with the same requirements for soils, fertilizers in a certain area. For example:
- Reacting to the introduction of organic matter: pumpkin, cucumbers, cucumbers, patissons, cabbage.
- Less demanding to soil quality: tomatoes, peppers, eggplants.
- Root crops (carrots, beets, turnips, turnips, rutabagas).
- Potatoes.
Next year everything is shifted. Since the fall, on the site where there were potatoes, we bring humus. There we plant plants of the first group. Plants from the second group move to 1 plot, etc. Schematically, the first variant of crop rotation for a vegetable garden is shown in the left picture below.
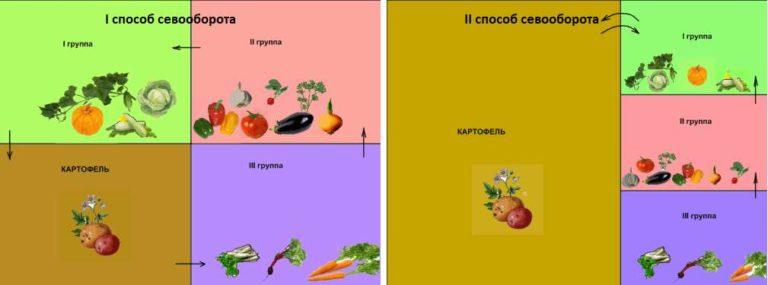
Sometimes potatoes and tomatoes occupy half of the area. In this case, we divide the other half into three plots, where we place the plants of the other groups. Every year potatoes / tomatoes move from one half to the other, and the vegetables on the second half still and alternate among themselves. Schematically, such a crop rotation is shown in the right picture.
Siderati
The vegetable gardener has two global tasks: to maintain or improve soil fertility and to fight weeds. There is one method that will solve both tasks at once – the use of siderates. These are such plants that grow quickly, form dense greenery, which muffles the development of weeds. They are sown after or before the main sowing/planting, then cut the greens, leaving the roots to rot in the ground. By rotting, they enrich the soil and also make it more friable. And some of the siderates also kill diseases. So this agrotechnical technique is really very important.
Regole di applicazione
A few basic techniques for the use of siderates. They are sown immediately after harvesting a continuous carpet (lupine, rape, phacelia). Or in early spring before planting the main crops. Spread the seeds on the surface, then embed them with a rake. Two to three weeks before planting the main plants, siderates are mowed. The greenery can be used for mulching. Cut it before the moment of the appearance of seeds, otherwise you will get a new kind of weed.
When planting seedlings, siderates can be mowed without mowing. Just make the hole bigger, plant the seedlings, and mulch the soil. If the siderates cover the sun, they can be trimmed, but in general, they equalize temperature fluctuations. When the seedlings have taken root, you can cut the siderates, leaves to mulch the soil.
Quali sono le piante siderate e la loro scelta?
Many plants are suitable for improving the condition of the soil. When choosing a siderate, take into account what you will plant after it.
- Enrich with nitrogen almost like the application of manure: alfalfa, clover, melilot, china, lentils, peas, beans, etc. They also kill nematodes.
- General topsoil improvement and nematode control: winter rye and wheat, spring oats and barley, Sudan grass, millet, fescue. The dense greens do not rot well, but serve as an excellent mulch. Suitable for all types of soils, including acidified.

- Soil enrichment (not suitable for acidified soils): rape, mustard, woodchuck, radish. The greens are soft, perfectly rotting, but it is necessary to mow before kicking out the “arrows”. After siderates of this group can not be planted cruciferous – cabbage, radish, radish, spinach, arugula.
- Phacelia, mallow, amaranth, flax, marigold, tagetes (velveteen) – are also good for increasing soil fertility. Mow before buds appear.
To suppress weeds, sow siderates can be sown not only in the spring or fall – the inter-row can be sown in the summer. Just do not forget to mow in time. The greens will go for mulch. For regions with a hot climate siderates can be planted after the main plants take root. In this case, dense greenery will keep the soil from overheating.
If you plant oats/barley and legumes, or flax and marigold in the potato row, there will be fewer Colorado potato beetles and nematodes. And to get rid of wireworm will help phacelia and mustard. Between tomato bushes, plant milkweed and lupine – they will prevent the development of terminal rot and phytophthora.


I totally vibe with this! When I first planned my garden, I made a mess. But now, I sketch it out and pick colors that pop! My veggies thrive, and it looks amazing. Can’t wait to try more tips from this! Happy gardening, everyone!