

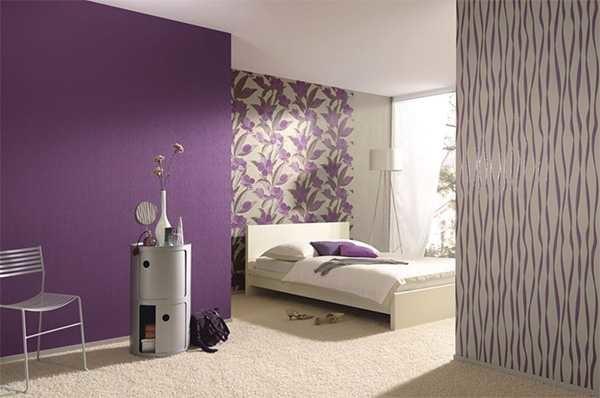
Uno dei tipi più popolari di finitura degli ambienti è la carta da parati. Ma per rendere il risultato gradevole, è necessario sapere come incollare correttamente la carta da parati. Esiste un numero sufficiente di sfumature che influiscono sulla qualità della finitura.
Contenuto dell'articolo
Fase preparatoria
Per prima cosa, nella stanza rimuovere tutto ciò che può essere rimosso, compresi i rivestimenti delle porte e i battiscopa, se possibile. Rimuovete anche le prese e gli interruttori, chiudendo le scatole con tappi di plastica o di legno.
Scollegare le prese elettriche
Quando si lavora con l'elettricità, la stanza è priva di corrente e, finché non abbiamo finito, non va accesa. È consigliabile eseguire tutti i lavori, compreso l'incollaggio della carta da parati, a macchina spenta. Il lavoro è "bagnato" e l'acqua o la colla possono finire sui fili e provocare un cortocircuito. Se il cablaggio è realizzato secondo tutte le regole e ci sono interruttori di protezione, non è terribile. Basta che interrompano l'alimentazione e il gioco è fatto.
Se il cablaggio è ancora fatto alla vecchia maniera, può essere pericoloso. La cosa peggiore è che in questo caso spesso non c'è modo di staccare la corrente in una singola stanza. Solo nell'intero appartamento o, al massimo, nella sua metà. Allora la soluzione è rimuovere i fili della corrente da prese e interruttori (ovviamente a corrente spenta) e isolare accuratamente le estremità, quindi nasconderle sotto le spine. Poi dovrete srotolarli e metterli al loro posto, ma sarà sicuro.
L'illuminazione durante i lavori è temporanea: tirare le prolunghe da altre stanze e includere luci portatili. Dopo essersi occupati dell'elettricità, si può passare ad altro.
Se le pareti sono solo livellate e stuccate, non c'è bisogno di fare nulla, a parte la mano di fondo. Se invece sono ricoperte da un vecchio rivestimento (carta da parati o vernice), dovrete lavorare. Per prima cosa rimuovete la finitura precedente.
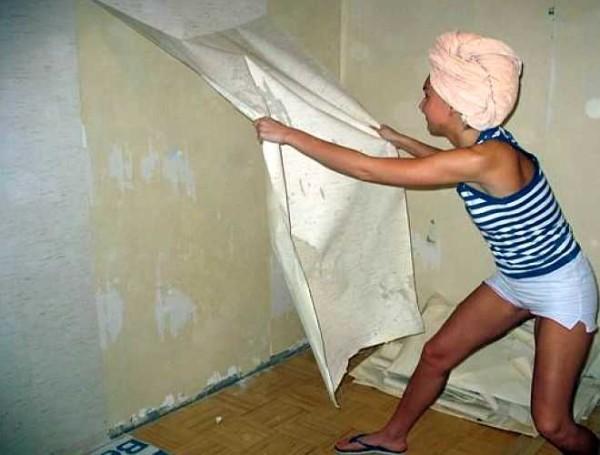
Staccare la vecchia carta da parati
Se le pareti sono incollate con carta da parati, in un punto arbitrario vengono raccolte con un angolo della spatola, quindi si tira l'angolo piegato, strappando. Se si è fortunati, si strappano intere strisce, a volte diversi metri di un unico tessuto. Ma più spesso si tratta di piccoli frammenti. All'inizio si rimuove tutto ciò che risulterà "secco". Se è molto difficile e le parti sono piccole, prendete una bacinella d'acqua e un rullo, immergete le pareti in questo modo. Per togliere più facilmente, si può aggiungere all'acqua del detersivo per piatti.
Se la carta da parati è di carta, l'acqua viene applicata semplicemente sulla superficie. Se sono in vinile o con un'altra pellicola resistente, prima si strappa la pellicola. È possibile farlo con un rullo appuntito o con una spazzola con setole metalliche. L'importante è rompere la pellicola in modo che l'acqua possa penetrare nella base - carta o tessuto - e assorbire la colla. A volte è necessario bagnare la carta da parati più volte per farla staccare più facilmente.
Le azioni successive sono le stesse della carta da parati: raccogliere con una spatola e strappare. A volte questa tecnica - strappare i pezzi - è inefficace. È più rapido staccare la finitura impregnata con una spatola. Poi si raschia con un angolo acuto con una lama sulla parete. In generale, non importa come, ma la vecchia carta da parati deve essere rimossa completamente.
Rimozione di vernice e imbiancatura
Bisogna anche lavorare con una cazzuola, strofinando centimetro per centimetro. Il lavoro è monotono e piuttosto noioso, oltre che sporco. Esistono diversi modi per accelerare i tempi.
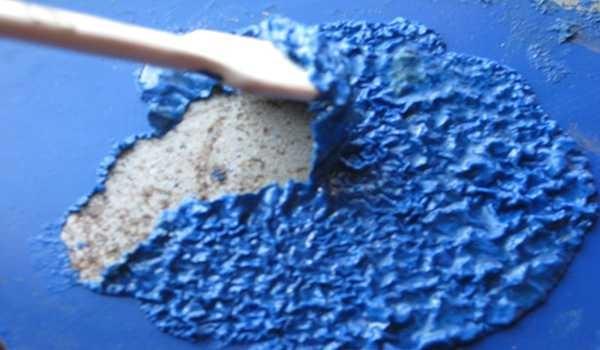
Pittura a olio su cemento
L'opzione, in realtà, è duplice: chimica e meccanica. Chimico: si tratta di sciacquoni speciali per la vernice. La composizione ha spesso l'aspetto di un gel. Si applica sulla superficie e, dopo un certo tempo (indicato sulla confezione), si solleva in bolle o inizia a ritirarsi. La vernice si è ammorbidita e può essere rimossa con qualsiasi spatola.
Tutto avviene in modo semplice, ma ci sono due "ma". Il primo: il prezzo dello sciacquone non è piccolo. Il secondo - i vapori non sono chiaramente utili. È necessario lavorare in una stanza ventilata, ma non asciugare il risciacquo, o l'effetto non sarà. E comunque, anche con la ventilazione a volte viene il mal di testa. Quindi un respiratore non farà male, e anche necessariamente dei guanti.
Il metodo meccanico non è una semplice spatola. Dovrete quindi strofinare a lungo. Utilizzate un bolgarka o un perforatore. Sul bolgarka ci sono spazzole fatte di filo metallico. Potete provare a rimuoverlo in questo modo. Il metodo funziona, ma non sempre, oppure risulta troppo lento. Allora si può prendere un perforatore e uno scalpello e, tenendo lo scalpello perpendicolare alla superficie, guidarlo lungo la parete, senza approfondire. La vernice rimbalza bruscamente. Dopo questa lavorazione "d'urto" resta da ripulire i resti con una spatola.
Emulsione acquosa, imbiancatura o pittura su intonaco di gesso
Rimuovere questo tipo di vernice sulle pareti non è affatto semplice. La raschiatura si ottiene, solo molto, molto lentamente. La via d'uscita è molto semplice: ancora acqua e un raschietto speciale per la vernice. Si può acquistare in un negozio di edilizia. Prendete subito qualche lama di ricambio: in cucina, ad esempio, ne servono tre o quattro.
La parete è ben lubrificata con acqua. A pennello o a rullo, si può fare più volte. Poi si lascia in ammollo. E poi si raschia via con un raschietto. La vernice rimbalza via subito. È importante solo che la parete sia ben bagnata.
Come scegliere la carta da parati per il corridoio e il disimpegno leggi qui.
Irregolarità del calafataggio
Per prima cosa è necessario valutare le condizioni delle pareti. Per cominciare, è necessario estrarre tutti i chiodi e le viti, rimuovere le schegge e allargare le crepe. Quindi ispezionare i risultati. Se le pareti sono più o meno uniformi, se ci sono solo piccoli difetti, si può procedere con una livellatura occasionale. Stuccare solo le crepe, le ammaccature, le scheggiature. Possono essere stuccate con stucco di finitura. Solo prima del livellamento, la parete viene infine pulita dalla polvere e dai pezzi di carta da parati, e quindi ricoperta con il primer (rullo da muro e pennello negli angoli).
Se la parete dopo la "lavorazione" con un perforatore, senza una stuccatura completa dell'intera parete non si può fare a meno. Oggi si usa soprattutto lo stucco di gesso. Per prima cosa si stende uno strato di gesso primario o starter. È a grana più grossa e lo strato può raggiungere i 3-5 mm. Questa composizione viene utilizzata per livellare le principali irregolarità, cercando di ottenere una superficie uniforme. Dopo l'asciugatura, si passa una griglia speciale, rimuovendo le irregolarità e le spugne eventualmente presenti.
Dopo la finitura si utilizza lo stucco. È molto plastico e viene applicato in uno strato sottile, fino a 1-2 mm. Dopo di esso, la parete diventa liscia (dopo che le irregolarità sono state levigate con una rete, solo con una rete più fine).
Imprimitura delle pareti
Il secondo strato di primer viene applicato dopo la stuccatura. Forma una pellicola sulla superficie che riduce l'assorbimento della colla e migliora l'adesione. Nel caso della carta da parati, come primer si può usare una colla per carta da parati più liquida. Su ogni confezione è riportata una tabella che indica la quantità di acqua per la carta da parati e il primer. Si diluisce la colla nella proporzione richiesta, si attende che sia pronta (sempre sulla confezione) e si ricoprono le pareti con la composizione. La tecnica di applicazione del primer è la stessa: prima si passano gli angoli con un pennello, poi si rullano le superfici uniformi.
Nel video, l'uso dello stucco primario per qualche motivo viene chiamato gesso, ma per il resto la sequenza di azioni è presentata correttamente.
Le regole e le modalità di combinazione della carta da parati sono descritte in questo articolo.
Regole di incollaggio
Quando si applica la carta da parati, ci sono diverse regole da rispettare. La tecnica varia a seconda del tipo di carta da parati e della colla necessaria per ottenere un risultato di qualità. La differenza sta soprattutto nel momento e nel punto in cui applicare la colla. Non è necessario tirare a indovinare. Tutto è riportato sull'inserto, disponibile su ogni rotolo di carta da parati. In esso è indicato graficamente, e in alcuni casi è scritto, quale delle parti deve essere spalmata di colla: solo la parete o solo la carta da parati, o magari entrambe contemporaneamente.

Ma alcune cose rimangono invariate. Ad esempio, l'applicazione della striscia iniziale.
Da dove iniziare
In realtà, il punto di partenza non è così importante. È importante che la prima striscia sia incollata rigorosamente in verticale. Pertanto, la scelta spetta a voi.
Se nella stanza c'è un angolo perfettamente esposto: piatto ed esattamente verticale, si può partire da esso. Si può partire dalla porta con uno stipite perfettamente allineato. Se non c'è nulla di simile, disegnate voi stessi un punto di riferimento. Prendete una livella, segnate un punto sulla parete e tracciate una linea verticale attraverso di essa. Le livelle economiche di classe domestica, che di solito usiamo per le riparazioni, a volte danno un errore solido. E poiché è importante incollare la prima striscia in modo rigorosamente verticale, controllate la precisione della linea con un filo a piombo. Qui non mente mai, mostrandosi esattamente verso il basso. Se tutto è normale, allineerete il bordo della striscia su questa linea.
Se non avete ancora deciso da dove iniziare a incollare la carta da parati e questa è la vostra prima esperienza in questo campo, iniziate dalla parete meno visibile delle altre. Ad esempio, quella con l'armadio lungo la parete. Un paio delle prime strisce saranno difficili, poi capirete meglio cosa fare e gli errori saranno minori.
Come incollare la carta da parati alla parete
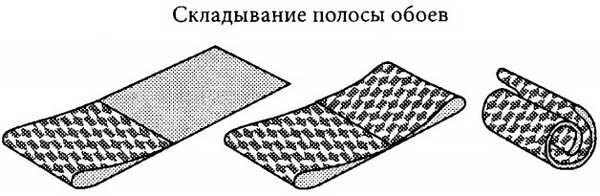
Se la colla è richiesta dai produttori, applicata al frammento tagliato, la striscia spalmata viene piegata in modo che il lato spalmato sia all'interno. Per fare ciò, avvolgere i bordi fino al centro, quindi piegare ancora un paio di volte. Non premere i punti delle pieghe. Lasciare che rimangano arrotondati. Questo è necessario affinché tutti gli strati siano impregnati e il panno si appoggi bene alla parete, oltre a essere incollato senza bolle.
Se è necessario applicare la colla alla parete, si spalma l'area un po' più della larghezza della carta da parati. L'area sotto il soffitto, nell'angolo e vicino al pavimento viene spalmata con un pennello. Poi le regole sono generali.
Prendere la striscia tagliata, salire sulla scaletta. Il bordo superiore di qualche centimetro porta al soffitto, quindi allineare uno dei bordi sulla linea tracciata "inizio". Poiché oggi la carta da parati è incollata di testa, quale sia il bordo non ha importanza.
Applicando rigorosamente il bordo laterale alla linea, i movimenti da questa linea all'altro bordo, incollare la carta da parati nella zona del soffitto. Poi, scendendo gradualmente, scendete un po' più in basso.
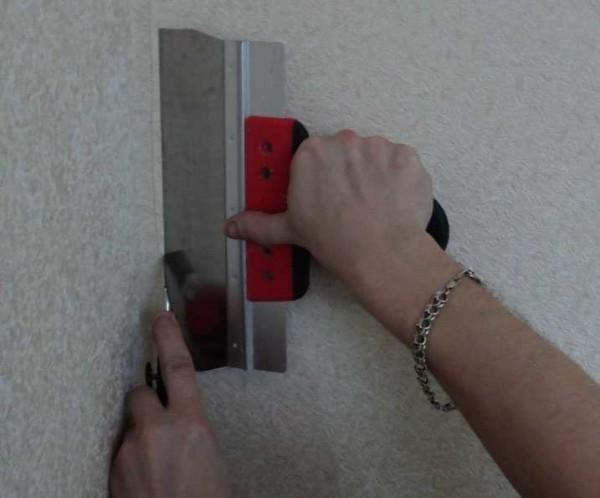
I centimetri in eccesso sul soffitto vengono tagliati. È più comodo farlo con un coltello da carta e una spatola grande. Premere bene la carta sull'angolo, tenendola con la mano. Poi mettete la spatola. Sul suo bordo, far passare la lama del coltello.
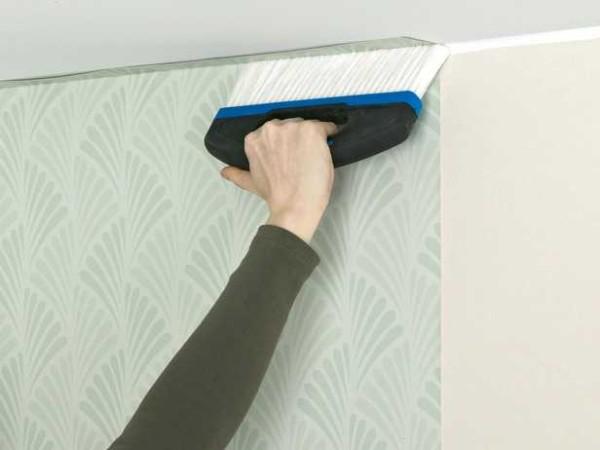
Incollando il panno, si compiono movimenti dal centro della striscia verso i lati e leggermente verso il basso, facendo uscire l'aria intrappolata verso i bordi. In precedenza, questa operazione veniva eseguita con uno straccio, ma è meglio e più veloce procurarsi un rullo con un beccuccio elastico (di solito è di colore giallo). Lavorando con questo rullo, non si formano praticamente bolle. Ma se la carta da parati è strutturale, con un motivo estruso, il rullo può accartocciarle. Poi prendete un pennello per carta da parati. È largo e piatto, con un pelo rigido.
Una volta arrivati al punto in cui la striscia non è ancora incollata, si dispiega il resto della densità e si procede secondo lo stesso schema. Prima si espone il bordo, poi con un rullo o uno straccio si espelle l'aria, ottenendo una superficie uniforme.
La seconda striscia viene incollata allo stesso modo, con l'unica differenza che il punto di riferimento per l'incollaggio del bordo sarà la tela esistente sulla parete. Per questo è importante incollarla in modo uniforme, altrimenti anche tutte le altre si taglieranno.
Le caratteristiche della scelta della carta da parati per la camera da letto sono considerate qui.
I segreti dell'incollaggio degli angoli
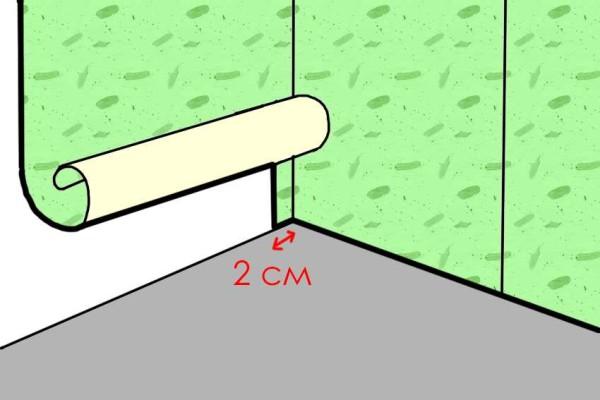
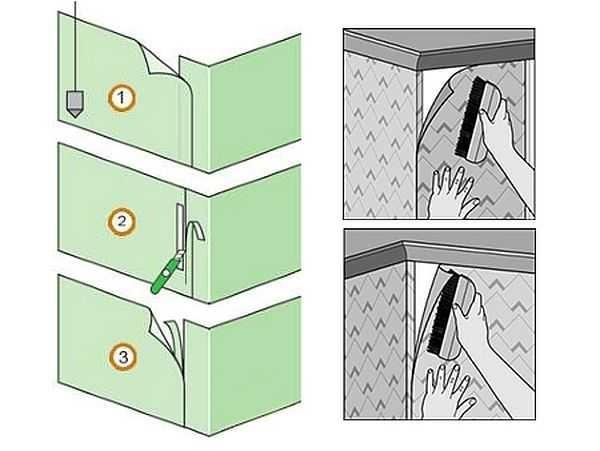
È molto difficile incollare correttamente la carta da parati negli angoli. Ma questo è possibile solo finché non si conosce il segreto. All'inizio si può provare a fare le cose in modo semplice. Uno dei pezzi viene avvolto sulla parete adiacente per 1-2 cm e il secondo viene tagliato sull'angolo.
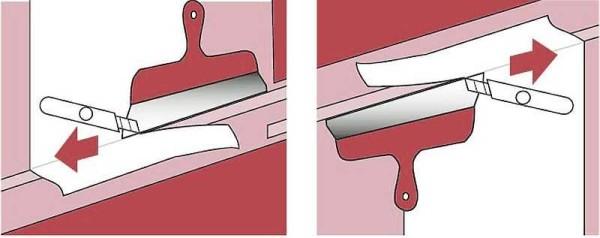
Non è difficile da fare, questo metodo ha un bell'aspetto. Ma su alcune carte da parati questa striscia è molto visibile. In questo caso, c'è un altro modo. Incollare i teli su entrambi i lati dell'angolo in modo che siano almeno leggermente avvolti dall'altro lato (2-3 cm sono sufficienti). Premere bene, in modo che aderiscano con precisione alle pareti e all'angolo.
Poi prendete una taglierina speciale o una spatola grande. Premete nell'angolo, lungo il bordo tagliate la carta da parati con un coltello affilato. È necessario tagliare contemporaneamente entrambi i teli, per cui lo sforzo può richiedere una notevole quantità di forza. Per rendere il taglio continuo, non strappare il coltello. Dopo essersi fermati, spostare la spatola, che si appoggia alla lama, e poi continuare il taglio.
Dopo aver tagliato tutto, rimuovete entrambe le strisce tagliate e i teli rimanenti si agganciano all'angolo. Se la carta da parati prima del taglio era ben pressata, l'abbinamento è perfetto, senza alcuna discrepanza.
Come incollare la carta da parati sugli angoli esterni? Quasi allo stesso modo. Nel primo caso, una delle strisce viene avvolta intorno all'angolo per uno o due centimetri (per la carta da parati più spessa è meglio 2 cm, per quella sottile è sufficiente 1 cm). La seconda striscia viene incollata rigorosamente lungo l'angolo. Se questa sovrapposizione è visibile (di solito per la carta da parati su base fleezelin), sarà necessario tagliare lungo l'intera striscia. In questo caso, avvolgere di più e tagliare verticalmente con la stessa spatola e lo stesso coltello. Il taglio viene rimosso e la giunzione è incollata.
La carta da parati per metro negli angoli si incolla allo stesso modo di quella più stretta. Capita che nell'angolo sia necessaria una striscia stretta e che il resto venga tagliato. Se la carta da parati è senza motivo, sarà possibile utilizzarla da qualche parte, almeno in un altro angolo. Con le stoffe a fantasia, a volte si riesce anche ad attaccarle da qualche parte, ma è più difficile farlo. Per questo motivo, è bene prendere una carta da parati con una discreta riserva: solo per questi casi.
Come incollare la carta da parati vinilica su una base di carta, come eliminare gli angoli non ideali in questo video.
Quale carta da parati è meglio usare in cucina leggi qui.
Come incollare la carta da parati vicino alla porta e alla finestra
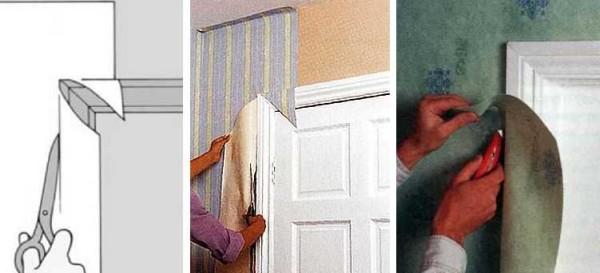
Se la porta o la finestra si trova allo stesso livello del piano della parete, di solito non ci sono problemi. La carta da parati viene tagliata lungo il telaio della porta o lungo il bordo del listello. Il tessuto viene tagliato con un angolo di circa 45° fino all'angolo della cornice o del telaio. Le parti tagliate vengono avvolte lungo l'apertura, piegate e poi tagliate con le forbici o con un coltello. Con coltello e cazzuola si ottiene un risultato più liscio e veloce.
Maggiori difficoltà sono causate dall'opzione in cui è necessario incollare e dalla pendenza della porta o della finestra. Quando si utilizza la carta da parati, il principio è ancora una volta semplice: incollare una striscia sulla pendenza, portandola a 1 cm dalla parete. Sopra di essa incollare un pezzo di carta esattamente sul taglio dell'apertura della finestra.
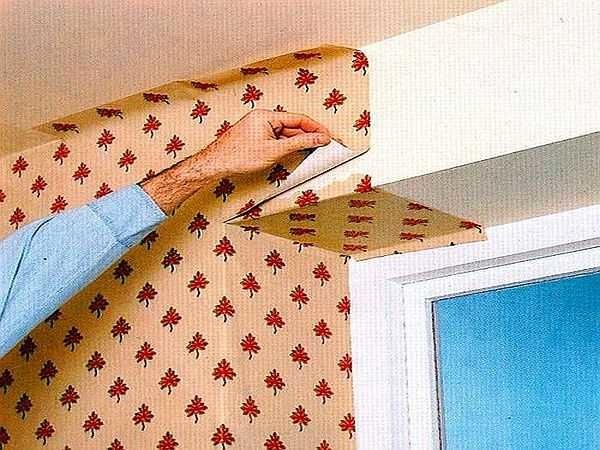
Ma con la carta da parati su tessuto, questo metodo non passa: le "sovrapposizioni" sono troppo visibili. In questo caso, la striscia viene tagliata lungo l'apertura della finestra con un piccolo margine. Sopra la sovrapposizione si incolla un altro pezzo, tagliandolo esattamente lungo il taglio dell'apertura della finestra. Il pezzo incollato viene avvolto all'interno, sulla pendenza. Le ulteriori giunzioni vengono eseguite come in precedenza.
È difficile da spiegare a parole. È più accessibile nel video. Tra l'altro, nel video e nel design delle arcate della carta da parati c'è una storia.
Come rendere invisibili le giunzioni
Affinché le giunture dei tessuti siano invisibili, è necessario fare attenzione durante l'incollaggio. È necessario collegare le stoffe in modo che non ci siano spazi vuoti tra di loro, ma anche che non vadano una sopra l'altra, nemmeno di un millimetro. È necessario ottenere un abbinamento perfetto.
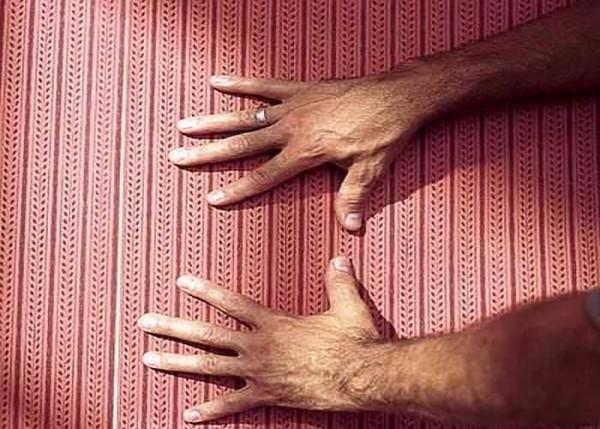
Poiché le pareti perfettamente piane si incontrano, ahimè, non spesso, si scopre che la cucitura striscia un po', poi diverge. Il vostro compito è quello di spostare le strisce in modo che diventi perfetta e invisibile. Potete muovere i tessuti con le mani, allungandoli e comprimendoli leggermente. In questo modo si ottiene l'allineamento desiderato. Se il difetto risultante è troppo grande e i turni non riescono a ottenere nulla, la striscia viene staccata in questo punto e, dopo averla corretta come necessario, incollata di nuovo. A volte, se la cucitura sporge un po', può essere utile la laminazione con uno speciale rullo conico.
Con questa tecnica, si scopre che prima si incolla il bordo, che si unisce, e poi, da esso, si inizia a lisciare il resto della superficie del tessuto. Se avete esaminato la cucitura e siete soddisfatti del risultato, prendete un panno pulito e pulitelo dall'eccesso di colla che potrebbe essere spuntato durante tutte queste azioni.
Per sapere come incollare la carta da parati in vinile per metro su una base in fleezelin e come rendere invisibile la giunzione, vedere il video.
Eliminazione delle imperfezioni
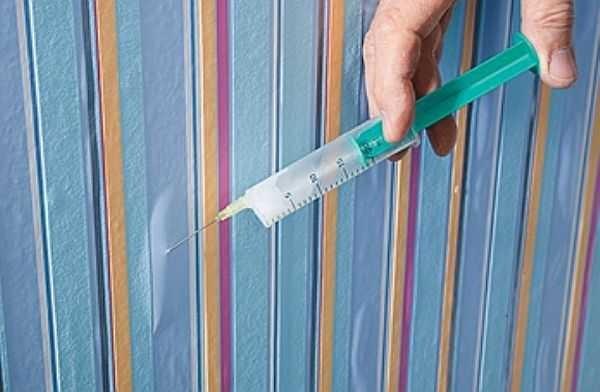
In mancanza di esperienza, può accadere che dopo o durante l'asciugatura sulle pareti si formino delle bolle. È possibile rimuoverle con semplici azioni. Prendete una siringa grande, riempitela di colla, bucate la bolla e iniettatevi dentro un po' di colla. Carta da parati vinilica, acrilica, di carta: in questo caso il supporto è indifferente. Le azioni cambiano a seconda della base. Se la carta da parati è a base di carta, bisogna aspettare da cinque a sette minuti, se su veli - agire immediatamente.
Successivamente, è necessario utilizzare un rullo, una spatola o uno straccio per espellere l'aria dalla bolla. All'inizio, fate uscire la colla all'interno, poi dai bordi verso la perforazione spostate l'aria e la colla in eccesso. Asciugare con uno straccio pulito.
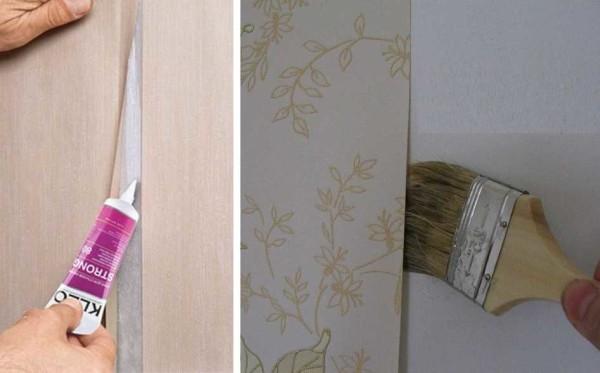
Spesso le cuciture divergono. La carta da parati può rimanere indietro lungo il flusso o il battiscopa. Ci sono due modi per incollarle. Usare un pennello e i resti di colla o acquistare una colla speciale per le cuciture. È in tubetto e si applica punto per punto. Anche in questo caso, l'ordine delle azioni dipende dalla base: dopo aver bagnato la carta, si aspetta un po', quindi si incolla, facendo attenzione alla corrispondenza dei bordi.


Oh mio Dio, ho appena provato a tappezzare la mia stanza lo scorso fine settimana! All'inizio è stato un po' complicato, ma una volta che ci ho preso la mano è stato divertentissimo! Ricordatevi di eliminare le bolle e di usare una buona colla. Il risultato è stato fantastico! Non vedo l'ora di mostrarla!
I remember struggling with wallpaper once, but following some tips totally saved me! Make sure to prep your walls and use quality paste. It really makes a difference! Trust me, take your time and you’ll nail it. Happy decorating!