

The quality of the ceiling finish greatly affects the appearance of the room. That is why they try to make everything perfect, or very close to it. The finishing touch is the ceiling skirting board. They give the finish a finished and complete look. The strips themselves on flat surfaces are mounted simply: on a special glue of white color, but with the design of corners there are problems. Without knowing how to make the corner of the ceiling skirting board correctly, a lot of material is spoiled. About how and what to cut it in the corners and we will tell you.
Contenuto dell'articolo
What they are made of and what they are called
The very first ceiling skirting boards were made of plaster. They were cast in special molds, then the mortar was installed on the ceiling. Called such figurative decorations galleteli. Today you can see them infrequently: they cost a lot, and look almost nothing different from cheaper options. And the name is almost lost.
The most popular today are ceiling skirting boards made of polyurethane or polystyrene. They are inexpensive, look great, easy to install, have a wide range of profiles and patterns. Width can be from 5 mm to 250 mm. They are used in almost any room decorated in any style. The exception – wooden houses with a corresponding interior. Here wooden products are most often used – the style dictates its own conditions.

There is also a similar finish made of plastic. It is mainly installed in bathrooms. But in humid rooms you can mount polyurethane strips without fear – they are not afraid of humidity.
Cut the ceiling skirting board in the corners of any material should be one of the methods described below. The only exception is plastic skirting boards: such a corner can only be designed with the use of ready-made corners.
How and how to cut
Working with skirting boards of different materials implies the use of different tools for cutting. When working with ceiling skirting boards made of wood, it is more convenient to work with a wood saw. All others, including plastic, foam and other polymers, are better cut with a metal blade. You get a more even cut, less burrs. Saws are usually used when working with a chisel.
When working with skirting boards made of foam plastic without special devices cut them with a good stationery knife. Its blade is thin enough and even, the cut is smooth, not jammed. If you work with polyurethane or polystyrene with a saw, do not press hard: you can crumple.
In general, to get a little accustomed to the tool and material, take some piece and practice on it: cut, saw, trim. This way there will be fewer problems when working.
You can read about ceiling design in this article.
How to get the right angle
Most of all problems when working with ceiling skirting boards arise when decorating corners. Since the surface of the products is complex, just cut at the right angle will not work: it is still necessary to trim so that they docked and preferably – without large gaps. In fact, there are several ways to make the angle of the ceiling skirting board perfect (or almost).
Using a mortise and tenon
If the corners and walls in the room are even, you can use a special carpentry tool – a chisel. This is a chute in the form of an inverted letter “P”, in which the lines for cutting at an angle of 90 ° and 45 ° are marked. Inside is placed the part in which you need to make a cut, the saw is inserted into the guides. The part is held in place and cut at the required angle.
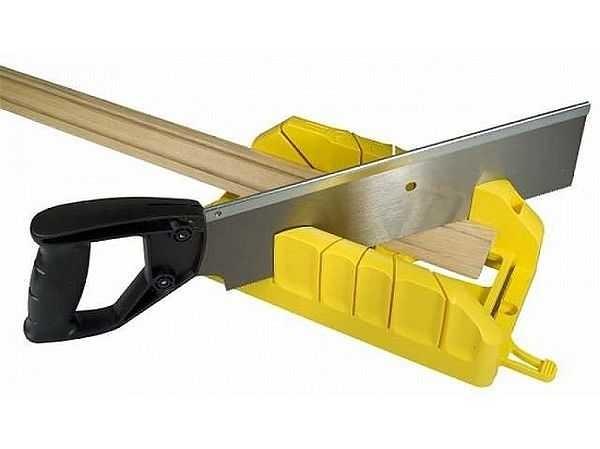
In the case of skirting boards, not everything is so simple: they must simultaneously adhere to two surfaces, so they need to be pressed against one or the other wall of the mortise. When working with the ceiling, they are pressed in the side closest to you.
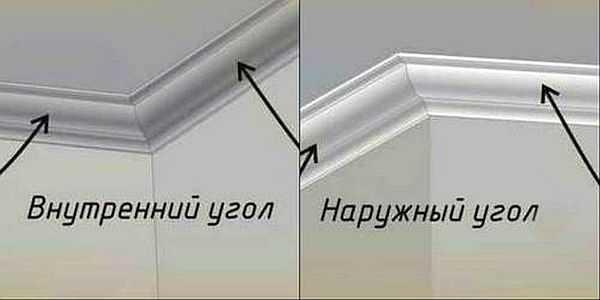
Sequence of actions when finishing the outer corner you need to make a cut at an angle of 45 degrees. Put the chair in front of you. Try on how the skirting board will be located, determining which part of it will be attached to the ceiling. In order not to get confused and cut the ceiling skirting board correctly, the bar that will be located on the right, you lay on the right, the one on the left – on the left.
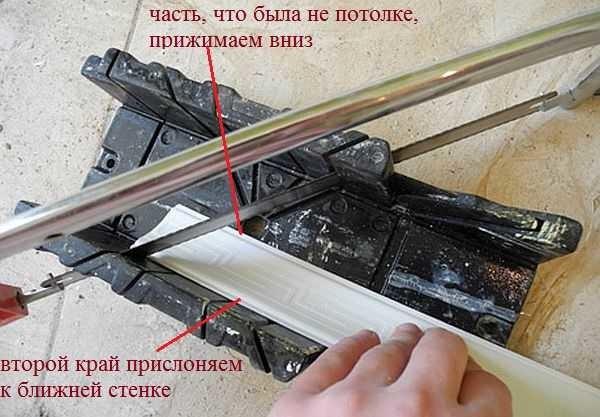
Press the part that is on the ceiling against the bottom of the plinth. The second side is closer to you and is raised. It rests on the wall of the device, so that it does not wobble during sawing. That is, the front part of the skirting board is turned away from you. You make the direction of the cut as shown in the photo below. Putting the two cut off parts together, you get a protruding – the outer or external corner.
Sawed off parts first put in place “dry”, without glue. If the geometry of the corner was not so ideal, you can slightly adjust with a knife. Small errors are easier to putty with special putty.
With the inner corner of the ceiling skirting board, the situation is very similar. First try on which side will be on the ceiling, this part is pressed to the bottom of the mortise, the second part rests on the wall closest to you and makes the zapils as shown in the photo below.
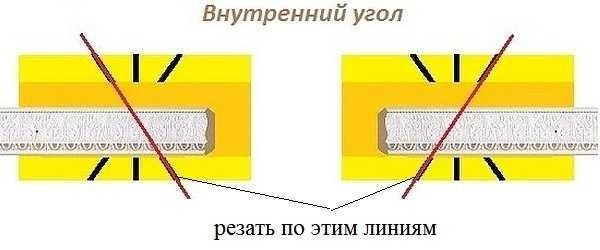
And again first try on without applying glue, if necessary, slightly correct. Then apply a thin strip of glue to both surfaces that will be glued to the wall or ceiling.
Your own version of how to properly use the mortise is shown in the video.
How to make the corner of the ceiling baseboard without a chisel
Few apartments or houses have corners exactly at 90 °. Small deviations are easily corrected after fitting. But not always. Then you have to mark everything “on the spot” – under the ceiling.
You will need a thinly outlined pencil (hard – it is not so visible on the ceiling, but in the vicinity leaves quite clear marks), a small piece of skirting board, a ruler and a good office knife if you will work with baguettes from polyurethane (polystyrene) or a metal saw to work with other materials.
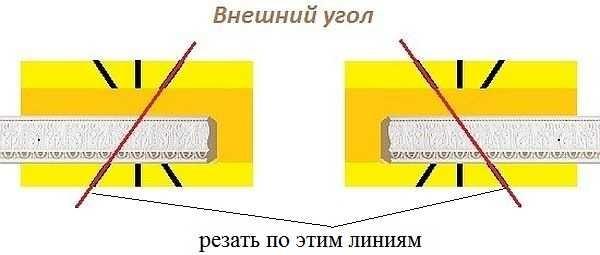
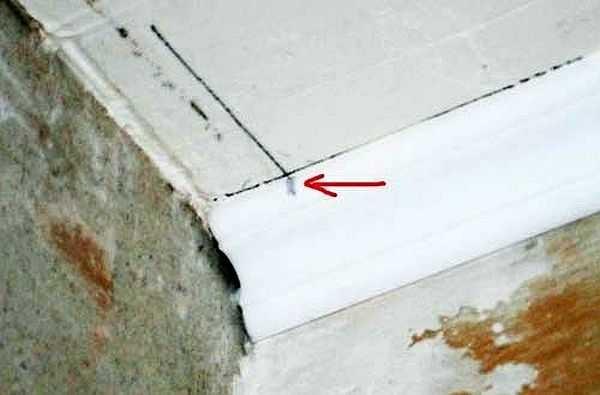
Put the skirting board to the corner, draw along the outer edge with a pencil. Apply to the other side of the corner, also mark. You got a cross on the ceiling, the center of which marks the place where the ceiling skirting boards should converge (look at the photo). Having installed a piece of skirting board in the corner, which will be glued there and having set its end into the wall, transfer the mark to it.
Now take a ruler and connect the edge of the baseboard with the mark. If you just put the skirting board on the table and cut along the line, the two parts in the corner will still not add up: the inner part will interfere. It can be trimmed later, trying it on the ceiling. The second method is to place the piece to be trimmed on the table with the part that will be on the ceiling. And cut along the line, but holding the knife at an angle of about 45°. Correction will still be necessary, but much less (and less chance of error).
Repeat the same operation with the second strip. Set up to the desired wall, rest the end in the adjacent wall, mark the place where the cross is drawn, draw a line and then cut. Correcting It is carried out “on dry” without applying glue.
Exactly the same actions you repeat for the outer (protruding) corner. Now you know another way of how to make the corner of the ceiling plinth, and without strusl or other special devices.
How to install sliding interior doors read here.
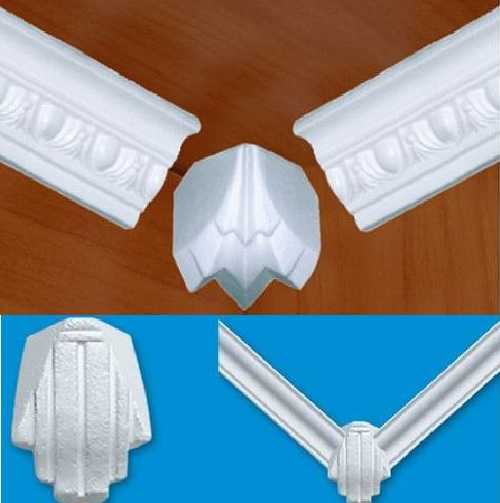
With the help of decorative corners
There is another, the easiest way. For skirting boards made of polyurethane or polystyrene, use ready-made, factory decorative corners. They are installed in the corner, and the strips are glued closely to them. Trim them if necessary is very simple: a few millimeters with an ordinary office knife.
How to join in the corners
If the installation of the first corner is passed, you can consider that you have almost learned to do everything. “Almost” because you still need to learn how to join the corners and trim the strips to length. When some part is glued and there is a small distance to the corner, how not to make a mistake with the length? The answer is simple: leave a reserve.
At first you can cut a piece longer by 10-15 cm: it will be possible to redo it several times if something does not work out at once. Then you make the corner in the way described above, try it on dry, adjust everything so that the result is satisfactory to you. Only after that you can put the already cut lath in the corner and mark the place to which it can be shortened. The cut should be exactly at 90°. You don’t have to use a chisel. Just try to place the knife (hacksaw) perpendicular to the surface.


