

È raro che la messa in funzione o la ricostruzione dell'impianto elettrico di una casa o di un appartamento avvenga senza l'installazione o la sostituzione di un contatore elettrico. Secondo le normative, il lavoro può essere eseguito solo da persone appositamente formate e autorizzate a lavorare su reti con tensione fino a 1000 V. Tuttavia, è possibile installare tutti gli elementi, collegare il contatore al carico (elettrodomestici), senza collegare l'alimentazione elettrica da soli. Dopodiché è necessario chiamare un rappresentante dell'organizzazione fornitrice di energia per il collaudo, la sigillatura e la messa in funzione del sistema.
Collegamento del contatore: regole e requisiti di base
Tutti i requisiti sono esattamente specificati nel PUE e le regole di base sono le seguenti:
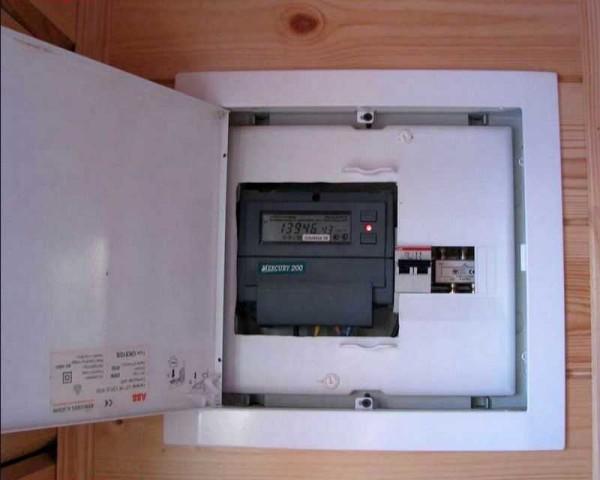
- Deve essere installato con protezione dagli effetti degli agenti atmosferici. Tradizionalmente vengono montati in apposite scatole (box) di plastica incombustibile. Per l'installazione all'esterno, le scatole devono essere a tenuta d'aria e devono prevedere la possibilità di controllare le letture (avere un vetro di fronte al tabellone).
- È fissato a un'altezza di 0,8-1,7 metri.
- Il collegamento del contatore avviene tramite fili di rame con la sezione corrispondente al carico massimo di corrente (è indicato nelle condizioni tecniche). La sezione minima per il collegamento del contatore elettrico dell'appartamento è 2,5 mm2( per una rete monofase è una corrente di 25 A, che oggi è molto ridotta).
- I conduttori vengono utilizzati isolati, senza torsioni e diramazioni.
- Per la rete monofase la data di verifica dello stato del contatore non è più vecchia di 2 anni, per la rete trifase di un anno.
Il luogo di installazione del contatore nei condomini è regolato dal progetto. Il contatore può essere installato sul pianerottolo delle scale o nell'appartamento - nel quadro elettrico. Se viene installato nell'appartamento, di solito non è lontano dalla porta.
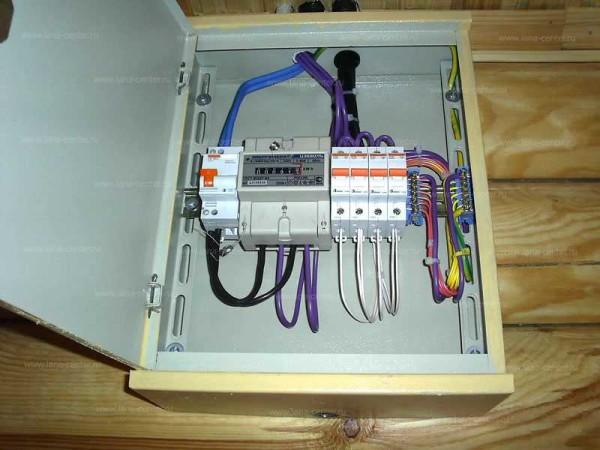
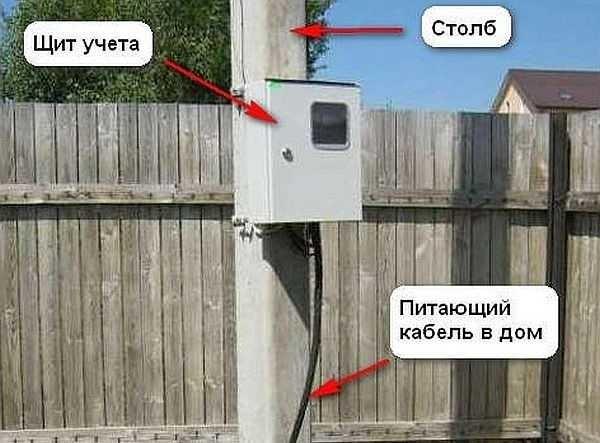
Anche in una casa privata ci sono diverse opzioni. Se il palo si trova in cortile, si può posizionare il contatore sul palo, ma meglio ancora nella stanza. Se, in base ai requisiti dell'ente erogatore di energia, deve trovarsi sulla strada, collocatelo sul lato anteriore della casa in una scatola sigillata. Gli automatismi che vanno ai gruppi di consumatori (dispositivi vari) sono montati in un'altra scatola nella stanza. Uno dei requisiti per l'installazione dell'impianto elettrico in una casa privata è che i cavi devono essere visibili.
Per poter intervenire sul contatore elettrico, viene installato un interruttore di ingresso o una macchina automatica davanti ad esso. Anch'esso è sigillato e non è possibile apporre un sigillo sul dispositivo stesso, come sul contatore. È necessario prevedere la possibilità di sigillare separatamente questo dispositivo: acquistare una piccola scatola e montarla all'interno del quadro dell'appartamento o collocarla separatamente sul pianerottolo delle scale. Quando si collega il contatore in una casa privata, le opzioni sono le stesse: nella stessa scatola del contatore sulla strada (l'intera scatola è sigillata), in una scatola separata accanto ad esso.
Come condurre l'elettricità dal palo alla casa leggi qui.
Qui vengono descritti i contatori a due tariffe e il calcolo della loro efficienza.
Schema di collegamento di un contatore elettrico monofase
I contatori per la rete a 220 V possono essere meccanici ed elettronici. Si dividono inoltre in mono-tariffa e bi-tariffa. Diciamo subito che l'allacciamento di qualsiasi tipo di contatore, compresi quelli a doppia tariffa, avviene secondo lo stesso schema. La differenza sta nel "ripieno", che non è a disposizione del consumatore.
Se si raggiunge la morsettiera di un qualsiasi contatore monofase, si vedranno quattro contatti. Lo schema di collegamento è indicato sul retro del coperchio della morsettiera, e nella rappresentazione grafica tutto appare come nella foto qui sotto.
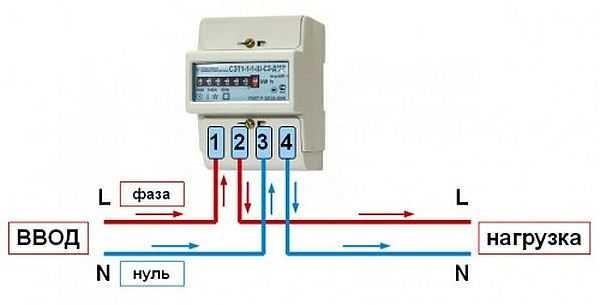
Se si decifra lo schema, si ottiene il seguente ordine di connessione:
- I morsetti 1 e 2 sono collegati ai fili di fase. Al terminale 1 viene collegata la fase del cavo di ingresso, al secondo la fase dell'utenza. Quando si installa il primo, si collega la fase di carico, dopo che è stato fissato - la fase di ingresso.
- Ai morsetti 3 e 4 il filo neutro (neutro) è collegato secondo lo stesso principio. Al terzo contatto il neutro proviene dall'ingresso, al quarto dall'utenza (macchine automatiche). L'ordine di collegamento dei contatti è simile: prima 4, poi 3.

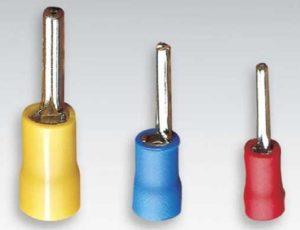
Il misuratore è collegato con fili spellati di 1,7-2 cm. La cifra specifica è specificata nel documento di accompagnamento. Se il filo è a trefoli, alle sue estremità vengono installati dei capicorda, selezionati in base allo spessore e alla corrente nominale. Vengono premuti con una pinza (possono essere serrati con una pinza).
Quando si effettua il collegamento, il conduttore nudo viene inserito fino all'arresto nella presa situata sotto la piastrina di contatto. È necessario assicurarsi che l'isolamento non finisca sotto il morsetto e che il filo spelato non fuoriesca dall'alloggiamento. In altre parole, la lunghezza del conduttore spellato deve essere mantenuta con precisione.
Il filo è fissato con una vite nei vecchi modelli e con due viti nei nuovi modelli. Se ci sono due viti di fissaggio, si avvita prima quella più lontana. Se si muove leggermente il filo, ci si assicura che sia fissato, quindi si stringe la seconda vite. Dopo 10-15 minuti, il contatto è serrato: il rame è un metallo morbido e un po' sgualcito.
Come realizzare il cablaggio della casa leggi qui. Le caratteristiche del cablaggio di una casa in legno sono descritte qui.
Questo è ciò che riguarda il collegamento dei fili a un contatore monofase. Ora parliamo dello schema di collegamento. Come già detto, prima del contatore elettrico viene posto un interruttore automatico in ingresso. Il suo valore nominale è pari alla corrente massima di carico e si attiva quando viene superato, escludendo danni all'apparecchiatura. Dopo si colloca l'interruttore differenziale, che si attiva in caso di rottura dell'isolamento o se qualcuno tocca i fili percorsi dalla corrente. Lo schema è presentato nella foto qui sotto.
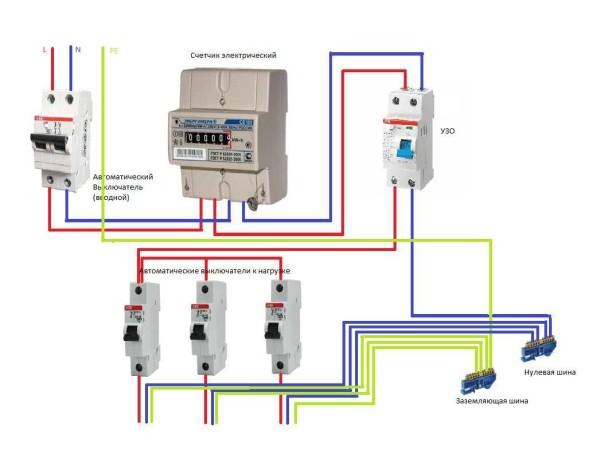
Lo schema di comprensione è semplice: dall'ingresso lo zero e la fase arrivano all'ingresso della macchina automatica di protezione. Dalla sua uscita cadono sul contatore e, dai terminali di uscita corrispondenti (2 e 4), vanno all'interruttore differenziale, dalla cui uscita la fase viene alimentata agli interruttori di carico e lo zero (neutro) va al bus di zero.
Si noti che l'interruttore di ingresso e l'RCD di ingresso sono bipolari (vi entrano due fili) per aprire entrambi i circuiti: fase e zero (neutro). Se si osserva lo schema, si noterà che gli interruttori di carico sono unipolari (vi entra un solo filo) e il neutro è alimentato direttamente dalla sbarra.
Vedere il collegamento del contatore nel formato video. Il modello è meccanico, ma il processo di collegamento dei fili non è diverso.
Il montaggio indipendente del quadro elettrico è descritto in questo articolo.
Come collegare un contatore trifase
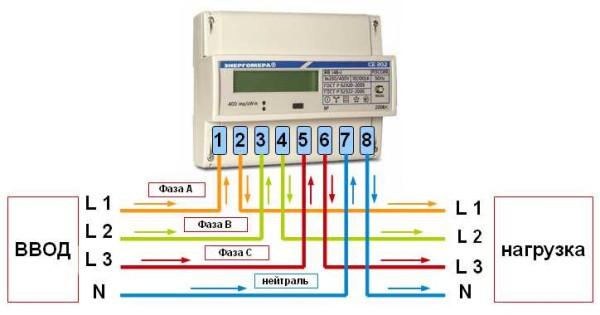
Nella rete a 380 V ci sono tre fasi e i contatori elettrici di questo tipo si differenziano solo per l'elevato numero di contatti. Gli ingressi e le uscite di ciascuna fase e del neutro sono situati a coppie (vedere il diagramma). La fase A entra sul primo contatto, la sua uscita sul secondo, la fase B - ingresso sul terzo, uscita sul quarto, ecc.
Le regole e l'ordine di funzionamento sono gli stessi, solo che il numero di fili è maggiore. Prima si spela, si allinea, si inserisce nel connettore di contatto e si stringe.
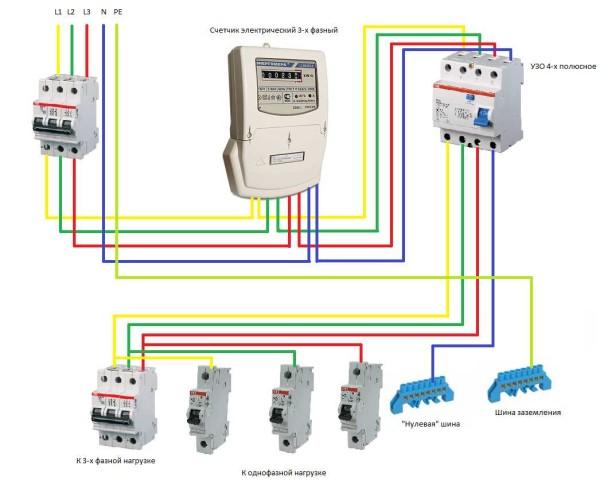
Lo schema per il collegamento di un contatore trifase con un assorbimento di corrente fino a 100 A è quasi lo stesso: interruttore di ingresso-contatore RCD. L'unica differenza è la distribuzione delle fasi alle utenze: ci sono rami monofase e trifase.

")


Una volta ho provato a collegare un contatore monofase da solo ed è stato un po' complicato. Ho dovuto guardare un sacco di tutorial. Una volta che ci ho preso la mano, però, è stato super gratificante. Assicuratevi di ricontrollare tutto per sicurezza!
I remember when I tried to connect my new three-phase meter. It felt overwhelming at first, but I watched some DIY videos, and it all clicked! Taking it step by step really helped. Just make sure to double-check everything before turning it on. Safety first!