

In order to have fresh and clean air in the apartment or house, the kitchen must be very well ventilated. With the task of timely removal of odors during cooking, natural ventilation can not cope, so over the stove hang a special device of forced ventilation – a kitchen hood. How to install the hood correctly, how to fix it and lead it into the ventilation system – about it further.
Cikk tartalma
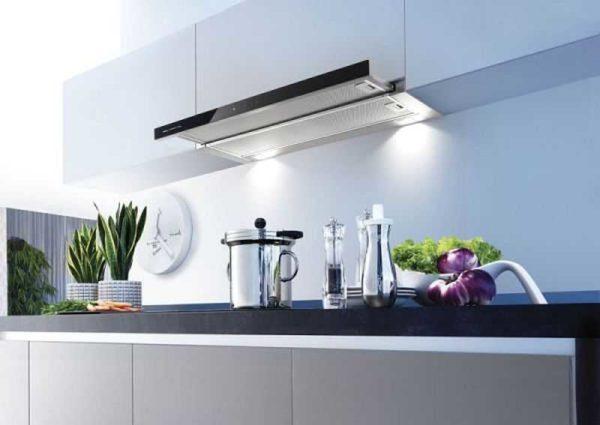
How to hang a hood over the stove
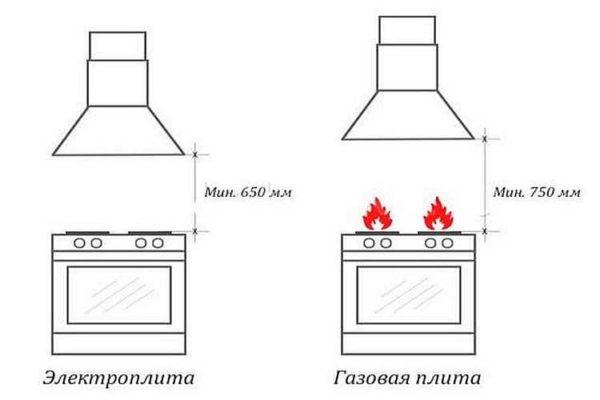
When properly sized, it is equal to or even slightly larger than the width of the stove. In order to install the hood correctly, it must be properly positioned and secured. The cooker hood is positioned exactly above the hob. The height of installation depends on the type of cooking surface:
- Above the gas stove, the minimum permissible height of hanging the hood is 75 cm.
- Above an electric one, the value is slightly lower – 65 cm minimum.
You can determine the exact height yourself – according to the height of the hostess who will be cooking. The lower edge of the hood should be just above her head. Below the minimum distance should not be hung, but higher is possible. But if you need to hang the equipment higher than 90 cm from the level of the stove, you need a unit with increased power – so that the polluted air is removed effectively.
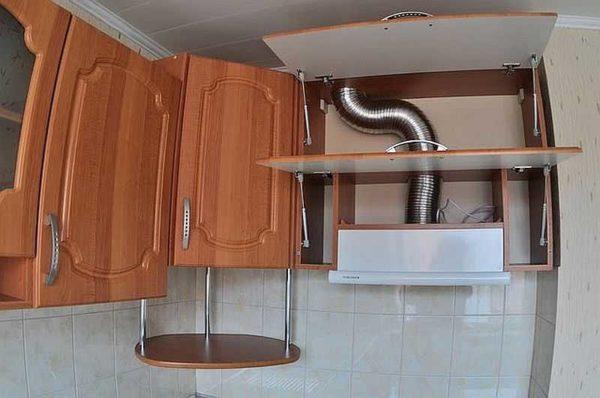
Depending on the type of cooker hood, it is mounted. Built-in – to a specially dimensioned cupboard. Hanging (flat) and dome (fireplace) – to the wall. Fireplace hoods themselves can consist of two parts – a unit with a motor and filters and a dome. Both parts are mounted independently of each other, but so that their outputs coincide.
Separately, it is worth mentioning island hoods. They are attached to the ceiling. The kit comes with a suspension system and clear recommendations on what and how to do.
Stages of installation
The entire process of installation and connection can be broken down into several stages:
If there is an outlet nearby, there are no problems with connecting to electricity. Other stages are also not very complicated, but let’s consider them in more detail.
Mounting to the wall of a hinged or dome model
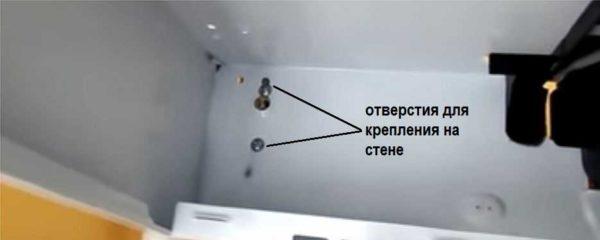
Although externally these two models are different, they are attached to the wall. On the back wall of the case they have four holes – two on the left, two on the right. Many manufacturers provide their products with a mounting template, on which the locations of the fasteners are marked. All that is necessary is to lean the template against the wall, transfer the marks. If there is no template, measure the distance between the holes, transfer to the wall. If you have a helper, you can ask him to hold it at the chosen height, and make the marks yourself.
Then everything is simple: use a drill to make holes of suitable size, insert plastic plugs, then hang the hood on the dowel nails. Naturally, we check the horizontality of the installed equipment.
This method is good if the wall is flat and there is nothing in the way. Often there is a gas pipe next to the stove, which does not allow you to hang the hood close to the wall. In this case, you can nail wooden bars to the wall and attach the hood to the bars. This is a simple option, but not very good – the bars are covered with soot and it is difficult to clean them.
The second option to install the hood behind the pipes is to use a screw-pin (second name plumbing stud). They have a thread for screwing into the wall, a smooth part that allows you to take the hood some distance from the wall and a smaller thread with two nuts, which will fix the body. There are these studs of different sizes, choose what you need, but all the nuts are made under a bit or octagonal wrench.
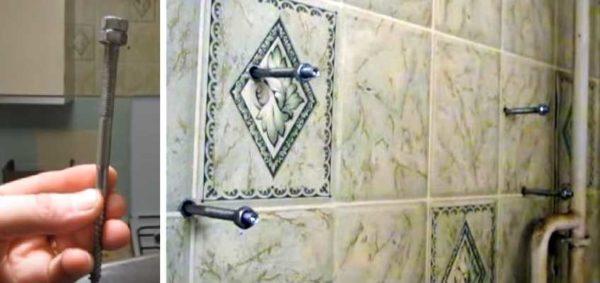
This option of fixing the hood is universal, simple in execution, reliable. It is also more convenient in maintenance – the metal is usually stainless steel, it is not difficult to wash it from deposits.
Installing a built-in hood in the cabinet
The built-in hood is almost completely hidden in the cabinet made for it. It is mounted in the same way as described above – on screws, but they are screwed into the walls. Only beforehand in the shelves above, it is necessary to make holes for the air duct. This is done after the hood is bought, as the location of the air outlet depends on the company and model.
If the cabinet is hanging, it is better to remove it. In the removed cabinet, put the hood in place, mark the location of the air outlet on the bottom shelf, cut it out. For this, it is easier to use an electric jigsaw and a saw with fine teeth. Almost does not leave chips saw for laminate. If desired, you can seal the place of the cut with a plastic C-shaped furniture profile. They are rigid and flexible. Flexible is easy to use – it bends at any angle, rigid before installation will have to be heated with a construction hair dryer. These profiles “sit” on the glue, most often use “liquid nails”. After installation in place, remove the glue residue (with a damp clean cloth), fix with painter’s tape to the shelf. Excess profile is cut with a fine-toothed saw, the cut is cleaned with sandpaper with a fine grain.
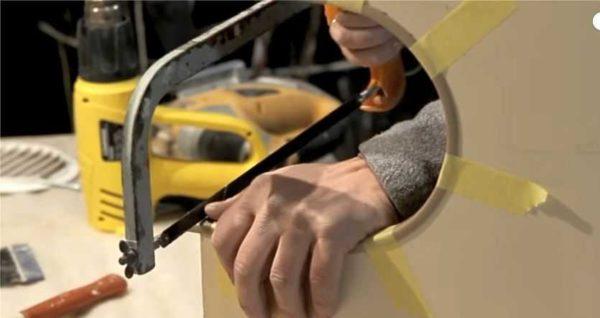
In the same way we make holes in the other shelves. They, by the way, can already be not round, but rectangular – it depends on the cross-section of the duct you have chosen.
After that, all the shelves are put in place, the cabinet is hanged and fastened. The built-in hood is attached to it with screws through the holes in the cabinet. Next – the process of connecting the air duct.
How to connect the hood to electricity
Since the consumed power of kitchen hoods rarely exceeds 1 kW, they can be connected to ordinary sockets. It is desirable that they are grounded. This requirement must be fulfilled if you want the warranty to be valid.
If the wiring in the apartment is old, you can throw the grounding or neutralizing wire yourself. Just do not attach it to water pipes or heating pipes. This threatens the possibility of electrical injury or even fatal outcome for you, members of your sections or neighbors.
To reach the ground wire, on the panelboard, find a bus bar with wires attached to it or a pipe to which a stranded wire is welded/screwed. You can also connect your own stranded wire to these devices (without tucking away the ones you already have). In order for it to work properly, the cross-section should be 2.5 mm, the conductor – stranded copper, it is desirable non-combustible sheath.
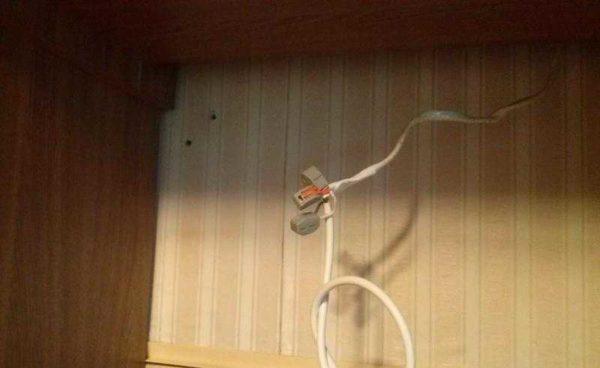
Part of the hoods comes with a plug at the end. With the connection of such models there are no questions – into the socket and that’s it. But there are models in which the cord ends with wires. This is not from the greed of the manufacturer, but in order for the consumer to decide for himself how to better connect the equipment. If you want – you can connect a plug. If this option is not suitable – take a terminal block and connect through it. Another option is Wago terminal blocks. They need to take three pieces – the number of wires. In one terminal block connect the same wires from the hood and from the panel – phase with phase (here the colors can be different), zero (blue or blue) with zero, ground (yellow-green) with ground.
Ducting for the kitchen hood
One of the stages of the hood installation is the selection and installation of ducting. Room temperature air is extracted from the kitchen, so there are no special requirements for the ducts and you can use any. Usually three types are used:
There is also a difference between plastic and corrugated duct – the price. Polymeric are more expensive. Despite this, if you have the opportunity to install a hood using PVC, put them. With an equal cross-section, they provide more efficient air removal, and also make less noise.
The cross-section of the pipes for the ductwork is determined by the size of the outlet on the hood. In the case of rectangular pipes, an adapter is used.
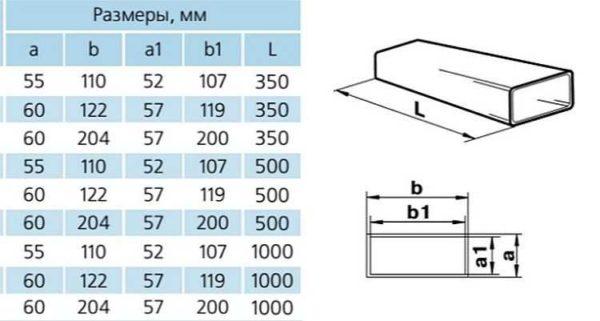
Duct sizes for hoods
Round ducts there are three sizes: 100 mm, 125 mm and 150 mm. This is the diameter of plastic pipes and corrugated sleeves. Cross-sections of flat ducts are more and they are presented in the table.
How to choose the size? In the case of round pipes, their diameter should coincide with the diameter of the hood outlet. It is very undesirable to put an adapter on the outlet, and then use a duct of a smaller diameter – this will reduce the speed of air purification. And even if the hood will be very powerful, it will not cope with air purification.
With the choice of cross-section of the rectangular duct – the area of its cross-section should not be less than the area of the cross-section of the outlet pipe. And the connection is made through a suitable adapter.
How to attach the corrugation to the hood and ventilation
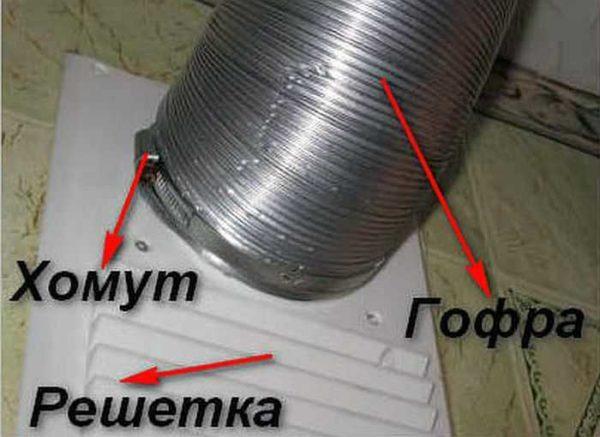
If you decide to install a hood and use an aluminum corrugation for the duct, you will need to think about how to attach it to the body and to the ventilation. To do this, you will need clamps of the right size. They can be metal or plastic.
To connect the hood to the ventilation system, you will also need a special ventilation grille. It has a hole in the upper part for connecting the duct pipe. In the lower part there are holes for removing air from the kitchen by natural circulation when the hood is not working.
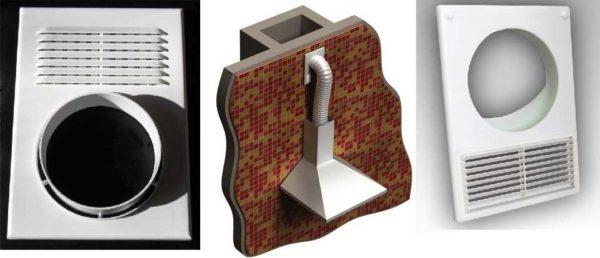
A grille with a protrusion is suitable for fixing the corrugation – around the hole there is a border of a few centimeters, on which the corrugation is put, after which it is fixed with a clamp of suitable size.
On the same principle, the corrugated duct is attached to the hood. There is a protrusion on it, on which the corrugation is put on. The connection is tightened with a clamp.
How to attach the duct to the walls
For plastic air ducts there are special fasteners in the form of latches. They are first mounted on the wall using dowels. The step of installation depends on the curvature of the trace, but on average 1 fastener per 50-60 cm is enough. The pipes are inserted into these latches during installation with a little force.
If the duct is to be fixed on the ceiling, the same fasteners can be used. But if it is necessary to maintain a certain distance from the ceiling, this type of installation is not suitable. In such cases, take perforated hangers for drywall, fix them to the ceiling, then to them with small screws PVC duct for the hood.
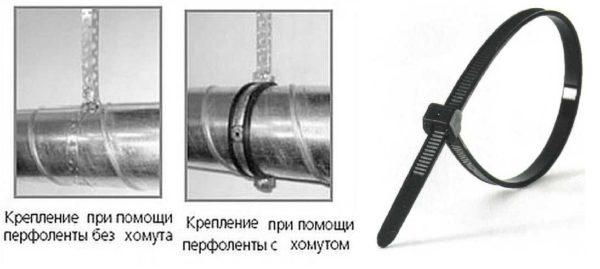
Corrugated ducts to the walls are attached to the walls with clamps or plastic puffs of large size. To the ceiling, if necessary, they are also mounted with perforated aluminum hangers.
Where and how to lead the air duct
Most often, the duct from the hood in the kitchen is connected to the ventilation hole, through which there is natural ventilation (due to the draught). This is wrong, because in this case, most of the grille is closed by the duct, and through the remaining available openings, air exchange will be clearly insufficient.
It is correct to connect the air duct in a separate ventilation duct. In this case, the same grille as in the photo above is installed on the opening.
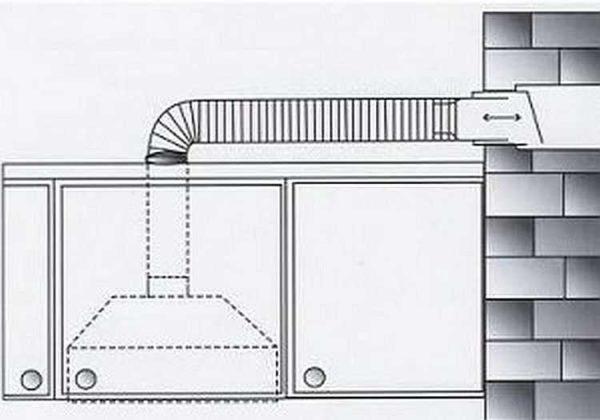
If there is no separate vent channel, but there is an external wall nearby, you can lead the pipe to the street, putting a grille on the outside. These are two ways to have normal ventilation and to ensure normal operation of the hood.
How to vent to the outside
To install the hood and lead the duct into the wall, you need to make a hole in it. And this is the only difficulty. Then the duct is inserted into this hole, sealed with mortar. From the outside, the hole is closed with a grate – to keep out debris, birds and small animals.
To prevent air from blowing into the room from the street, install a check valve (in the picture above, it is marked with an oblique line). It is desirable to put it, by the way, and when connecting the duct to the ventilation system – so that odors from the pipes do not get into the room.
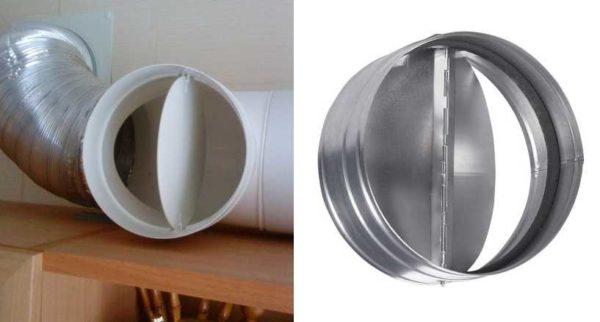
A check or anti-return air valve is a lightweight plastic or metal plate. It is movably attached in two places to the pipe – at the top and bottom, the lobes are supported by a weak spring. When the hood is not running, the valve blocks the air from outside. When the hood is on, the airflow bends the plate forward, pushing the spring back. As soon as the hood is turned off, the plate is pushed back into place by the springs. If the hood is installed without this damper, the kitchen may be too cold in winter – the outside air will enter the room without any problems.
So that the hood does not interfere with the natural ventilation in the kitchen
With the help of a tee and check valve, you can install the hood so that it does not interfere with the natural ventilation in the kitchen. You will need a special ventilation grille for connecting hoods, a check valve and a tee. A tee is attached to the vent grate, to its lower inlet the air duct from the hood is connected, and a non-return valve is put on the free outlet, but only so that the petals are locked when the air passes from the pipe (on the photo below).
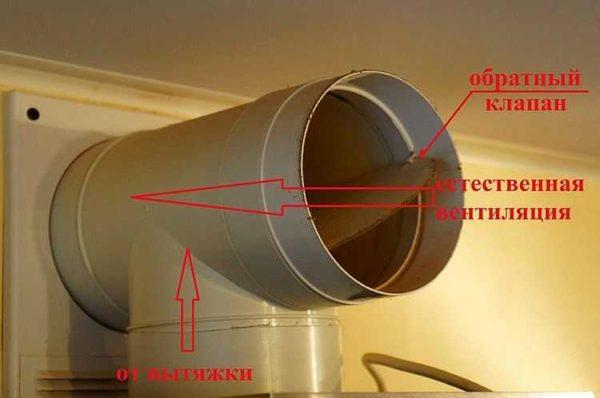
How does such a system work? When the hood is off, the petals of the check valve are bent, the air from the kitchen into the ventilation duct through the grille and the open outlet of the tee. When the hood is turned on, the airflow from the hood turns the damper plate around and the air flows into the ventilation system. When the hood is turned off, the springs reopen the air through the tee.
Externally, such a system does not look very attractive and it will have to be masked in some way. But it is the only way to connect the hood to the only existing ventilation outlet and not reduce air exchange.
")


