To cut an internal thread on a part, a hole must be pre-drilled. Its size is not equal to the thread diameter, but must be slightly smaller. Find the diameter of the drill bit for threads in a special table, but to do this, you must also know the type of thread.
Contenu de l'article
Basic parameters
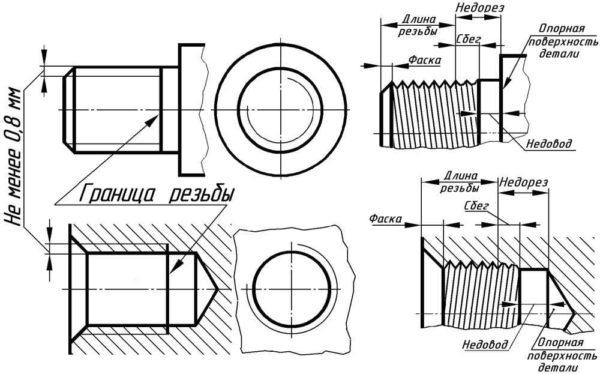
Any thread is characterized by two parameters:
- diameter (D);
- pitch (P) – the distance from one turn to another.
They are determined by GOST 1973257-73. A large pitch is considered normal, but it corresponds to several smaller ones. Small pitch is used when applying to thin-walled products (pipes with a thin wall). Also small pitch is used if the applied thread is a way to adjust any parameters. Also small spacing between turns is made to increase the tightness of the connection and to overcome the phenomenon of self-loosening of the part. In other cases, a standard (large) pitch is cut.
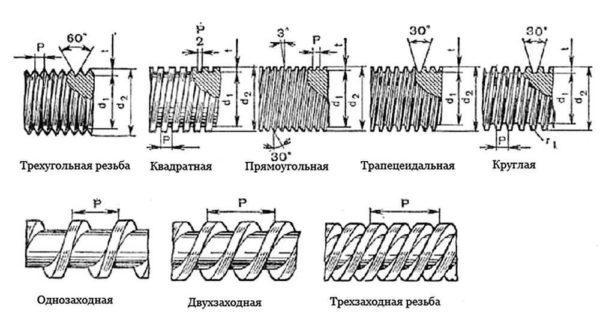
Types of threads are many, since each has its own features of formation, the diameter of the hole for the thread in each case is different. All of them are prescribed in GOSTs, but most often use triangular metric and tapered metric threads. Next we will talk about them.
Triangular thread we usually observe on bolts and other similar fasteners, conical – on most plumbing products that assume a detachable connection.
Devices
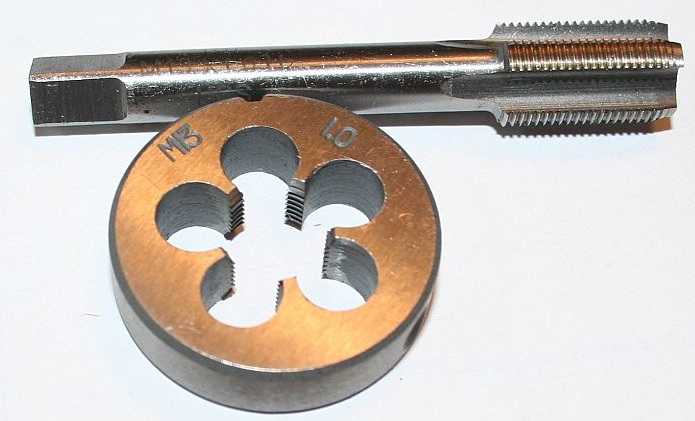
To apply threads with their own hands, small devices are used:
All these devices are made of alloys characterized by increased strength and resistance to abrasion. On their surface are applied grooves and grooves, with the help of which their mirror image on the workpiece is obtained.
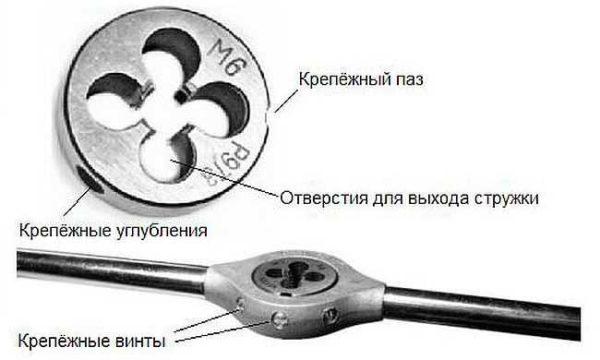
Any taps or dies are marked – they have an inscription indicating the type of thread that this device cuts – diameter and pitch. They are inserted into holders – spanners and dies – and fixed there with screws. Having clamped the thread cutting device in the holder, it is put on/inserted into the place where a split connection is to be made. The threads are formed by turning the device. How correctly the device is positioned at the beginning of work depends on whether the coils will lie down evenly. Therefore, make the first turns trying to hold the construction evenly, avoiding shifts and distortions. After you have made a few turns, the process will be easier.
You can cut small or medium diameter threads by hand. Complex types (two- and three-way) or work with large diameters by hand is impossible – too much effort is required. For these purposes, special mechanized equipment is used – on lathes with taps and dies attached to them.
How to thread correctly
Threading can be applied to almost any metal and their alloys – steel, copper, aluminum, cast iron, bronze, brass, etc. It is not recommended to make it on hardened iron – it is too rigid, it will crumble during work and quality turns will not be achieved, which means that the connection will be unreliable.
Preparation
It is necessary to work on clean metal – remove rust, sand and other contaminants. Then the place where the thread will be applied should be lubricated (except for cast iron and bronze – with them it is necessary to work “dry”). There is a special emulsion for lubrication, but if it is not available, you can use soaked soap. Other lubricants can also be used:
You often hear advice to use machine or mineral oil or even lard when threading. They work well, but experts say that it is better not to do this – chips will stick to the viscous substance, which will lead to rapid wear of the tap or die.
The process of threading
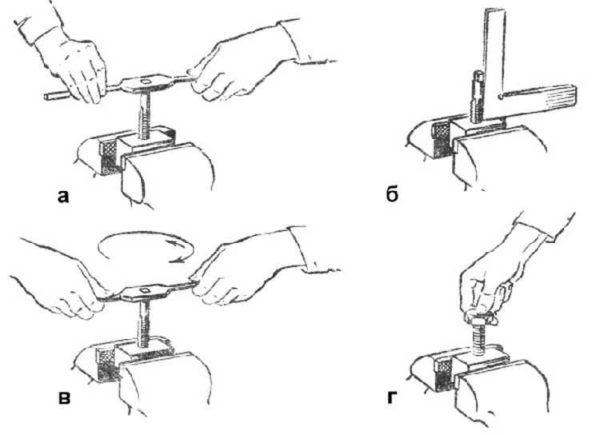
When cutting external threads, the die is placed strictly perpendicular to the surface of the pipe or bar. When working, it should not wiggle, otherwise the turns will be uneven and the connection will be unsightly and unreliable. Especially important are the first turns. How they “lie down” depends on whether the connection will not then be skewed.
When applying the internal thread, the piece is fixed stationary. If it is a small piece, it can be clamped in a vise. If it is a large plate – ensure its immobility by available methods, for example, fixing it with bars. М
The tap is inserted into the hole so that its axis is parallel to the axis of the hole. With a little effort, little by little, begin to twist in a given direction. As soon as you feel that the resistance has increased, unscrew the tap back and clean it from chips. After cleaning the process continues.
When threading in a blind hole, its depth should be a little more than required – the tip of the tap should fit into this excess. If this is structurally impossible, the tip of the tap is cut off. In this case, it is not suitable for further use, but there is no other way out.
In order to get quality turns, two taps or dies are used – rough and finish. The first pass is made roughing, the second – finishing. There are also combined devices for threading. They allow you to do everything in one pass.
Another practical tip: to keep chips out of the working area, when cutting, make one full turn clockwise, then half a turn counterclockwise. Then return the tool to where you left off and make one turn again. This continues until the desired length is reached.
Tables for selecting the diameter of the drill bit for threading
When making internal threads, a hole is pre-drilled for it. It is not equal to the diameter of the thread, because when cutting, part of the material is not removed in the form of chips, but extruded, increasing the size of the protrusions. Therefore, it is necessary to select the diameter of the drill bit for the thread before application. This can be done using tables. They are for each type of thread, but we will cite the most popular – metric, inch, pipe.
| Metric thread | Inch thread | Pipe thread | |||||
|---|---|---|---|---|---|---|---|
| Thread diameter, inches | Thread pitch, mm | Drill diameter, mm | Thread diameter, inches | Thread pitch, mm | Drill diameter, mm | Thread diameter, inches | Thread hole diameter, mm |
| M1 | 0.25 | 0,75 | 3/16 | 1.058 | 3.6 | 1/8 | 8,8 |
| M1,4 | 0,3 | 1,1 | 1/4 | 1.270 | 5.0 | 1/4 | 11,7 |
| M1.7 | 0,35 | 1,3 | 5/16 | 1.411 | 6.4 | 3/8 | 15,2 |
| M2 | 0,4 | 1,6 | 3/8 | 1.588 | 7.8 | 1/2 | 18,6 |
| M2.6 | 0,4 | 2,2 | 7/16 | 1.814 | 9.2 | 3/4 | 24,3 |
| M3 | 0,5 | 2,5 | 1/2 | 2,117 | 10,4 | 1 | 30,5 |
| M3,5 | 0,6 | 2,8 | 9/16 | 2,117 | 11,8 | – | – |
| M4 | 0,7 | 3,3 | 5/8 | 2,309 | 13,3 | 11/4 | 39,2 |
| M5 | 0,8 | 4,2 | 3/4 | 2,540 | 16,3 | 13/8 | 41,6 |
| M6 | 1,0 | 5,0 | 7/8 | 2,822 | 19,1 | 11/2 | 45,1 |
| M8 | 1,25 | 6,75 | 1 | 3,175 | 21,3 | – | – |
| M10 | 1,5 | 8,5 | 11/8 | 3,629 | 24,6 | – | – |
| M12 | 1,75 | 10,25 | 11/4 | 3,629 | 27,6 | – | – |
| M14 | 2,0 | 11,5 | 13/8 | 4,233 | 30,1 | – | – |
| M16 | 2,0 | 13,5 | – | – | – | – | – |
| M18 | 2,5 | 15,25 | 11/2 | 4,33 | 33,2 | – | – |
| M20 | 2,5 | 17,25 | 15/8 | 6,080 | 35,2 | – | – |
| M22 | 2,6 | 19 | 13/4 | 5,080 | 34,0 | – | – |
| M24 | 3,0 | 20,5 | 17/8 | 5,644 | 41,1 | – | – |
Please note once again that the diameter of the thread drill bit is given for coarse (standard threads).
Table of rod diameters for external threads
When working in external threads, the situation is very similar – a part of the metal is squeezed out, not cut. Therefore, the diameter of the rod or pipe on which the thread is applied should be slightly smaller. To find out exactly how much – see the table below.
| Thread diameter, mm | 5,0 | 6 | 8 | 10 | 12 | 16 | 20 | 24 |
|---|---|---|---|---|---|---|---|---|
| Rod diameter, mm | 4,92 | 5,92 | 7,9 | 9,9 | 11,88 | 15,88 | 19,86 | 23,86 |




I totally get how important thread hole dimensions are! I remember when I was working on a DIY project and messed up the sizing. Had to redo a bunch of pieces. That article clears up so much! Super helpful tips on tools and the threading process, thanks a ton!
Totally feel you! I had a similar hiccup when building a shelf. My measurements were off, and I had to scrap a whole board. That article really helped me nail down the right specs and avoid that mess again. Glad it was useful for you too!
Oh man, I feel you! I once drilled holes way too big for a shelf, had to patch them up and start over. Such a pain! Glad the article helped you out though. Keep those tools handy; they can save you a lot of headaches!
Totally get that! I once messed up a wall mount for my TV—had to redo it twice! What a hassle. But yeah, having the right tools on hand really makes a difference. Lesson learned: measure twice, drill once! Stay sharp with those DIY projects!
Totally get that! I once put a shelf up and ended up with uneven screws everywhere. Had to redo it all, super annoying. But hey, now I double-check before I drill. Tools are lifesavers for sure! Appreciate the encouragement; I’ll keep them handy!
Hey! I’ve been there too! I once miscalculated thread hole sizes for a shelf and ended up with wobbly legs. Had to start from scratch! Glad the tips helped you out. Definitely saves a ton of time and hassle! Happy DIYing!
I feel you! I once tried to fit a new lamp shade and misjudged the hole size. Had to go back and cut some wood down. What a hassle! Glad the article helped you out. Those sizing details definitely save time and headaches in DIY projects!