

In a private house, at the cottage, in the garage and even in the apartment – everywhere there is a lot of work that requires welding metal. This need is especially acute during construction. Here especially often require something to weld or cut off. And if the construction is carried out with their own hands, then the welding work can be done independently. Especially in those places where the beauty of the seam is not required. About how to properly weld with welding, we will tell you in this article.
Contenu de l'article
The basics of electric welding
Welded metal connection today – the most reliable: pieces or parts are fused into a single whole. This happens as a result of exposure to high temperatures. Most modern welding machines use an electric arc to melt the metal. It heats up the metal in the zone of exposure to the melting point, and it happens in a small area. Since an electric arc is used, the welding is called electric arc welding.

Types of electric welding
The electric arc can be formed by both direct and alternating current. Alternating current is welded by welding transformers, direct current – inverters.
Working with a transformer is more complicated: the current is alternating, so the welding arc “jumps”, the device itself is heavy and bulky. There is also a lot of stressful noise that emits when working and the arc and the transformer itself. There is one more unpleasantness: the transformer strongly “sads” the network. And there are significant voltage spikes. This circumstance is not very happy neighbors, and your household appliances can suffer.
Inverters mainly work from the 220 V network. In this case, they have small size and weight (3-8 kilograms), work quietly, almost do not affect the voltage. Neighbors and neighbors will not know that you have started to use a welding machine, unless they see. Plus, since the arc is caused by a constant current, it doesn’t jump, it’s easier to stir and control. So if you’ve decided to learn how to weld metal, start with an inverter welder. About choosing an inverter welding machine, read here.
Technology of welding works
For the occurrence of an electric arc, two conductive elements with opposite charges are needed. One is a metal part, and the second is an electrode.
Electrodes, which are used for manual electric arc welding, is a core of metal, coated with a special protective composition. There are also graphite and carbon non-metallic welding electrodes, but they are used in special works and a novice welder is unlikely to be useful.
When touching the electrode and the metal, having different polarity, there is an electric arc. After its appearance, in the place where it is directed, the metal of the part begins to melt. At the same time, the metal of the electrode rod melts, being transferred with the electric arc to the fusion zone: the weld pool.
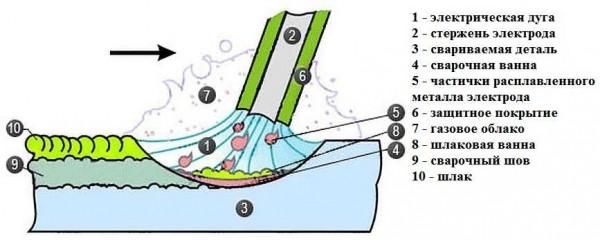
The process also burns the protective coating, partly melting, partly vaporizing and releasing some red-hot gases. The gases surround the weld pool, protecting the metal from interaction with oxygen. Their composition depends on the type of protective coating. Molten slag also covers the metal, helping to maintain its temperature. To weld properly, you need to make sure that the slag covers the weld pool.
The weld is produced when the weld pool moves. And it moves when the electrode moves. This is the secret of welding: the electrode must be moved at a certain speed. It is also important, depending on the required type of connection, to correctly select its angle of inclination and current parameters.
As the metal cools down, a slag crust forms on it – the result of the burning of shielding gases. It also protects the metal from contact with oxygen in the air. After it cools down, it is pounded with a hammer. In this case, hot splinters fly, so eye protection is mandatory (wear special glasses).
On how to make a brazier from a cylinder or barrel you can read here. Just practice.
How to learn to weld with welding
Everything starts with the preparation of the workplace. Safety when working with electric welding must pay increased attention: there is a possibility of injury from electricity and high temperatures. Therefore, take the preparation seriously.
Learn to weld with electric welding is more convenient on a thick piece of metal: it is better to practice on it. In addition to it and welding machine, you will need crags (thick gloves) and a welder’s mask. You also need dense clothing that protects the whole body, sturdy shoes of thick leather. They must be able to withstand sparks and scale. You will also need a hammer and a metal brush to knock off the slag. Goggles will be needed to protect your eyes.
How to connect the electrode
Welding work for beginners will be easier to carry out if you take a universal electrode with a diameter of 3 mm (3.2 mm, to be exact). They cost more expensive, but it is easier to work with them. After you learn how to weld metal, you can try to use cheaper ones, but it is better to start with these.
The electrode is inserted into a holder attached to one of the welding cables. There are two types of holders – spring and screw. If the electrode holder is spring-loaded, you press the key on the handle and insert the electrode into the slot that appears. With screw clamping, the handle rotates. You unscrew it, insert the electrode and clamp it. In any case, it should not wobble. Having installed the electrode, you can connect the cables.
There are two outputs on the DC welder: positive and negative. There are also two welding cables:
- one ends in a metal clamp – connected to the workpiece;
- the other is an electrode holder.
What polarity to connect for welding depends on the type of work. If we talk about inverters, then more often the plus is connected to the part, and the minus is fed to the electrode. Such a variant of inclusion is called direct polarity. But there is a list of works in which reverse polarity is applied: minus – on the part, plus – on the electrode (for example, for welding stainless steel).
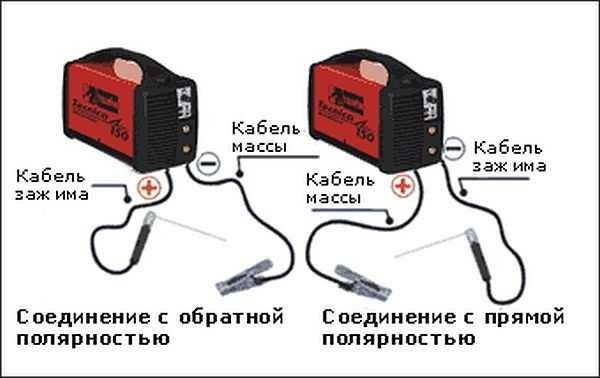
Direct polarity provides better heating of the metal, which is necessary for most of the connections. This is due to the fact that the electrons move from the negatively charged pole – in direct polarity it is the electrode – to the positive pole – the parts. In doing so, they additionally transfer their energy to the metal, raising its temperature.
Beginning of welding: igniting the arc
How to connect the electrode to the inverter is sorted out. Now about how to ignite the arc. It arises at direct contact between the electrode and the part. There are two ways:
- by tapping;
- tapping.
The name is clear: in one case, you need to run the electrode along the seam (so that no traces are left), in the second – a few times knock on the part with the tip of the electrode.
When the electrode is new, its tip is bare, ignition is easy. If it has already been in operation, a wall of several millimeters of protective coating has formed around the rod. This coating must be knocked off by tapping the tip several times on the part.
Both methods of ignition are used, here everyone chooses, to whom it is convenient. This skill is the first one that you will have to master if you want to learn how to use electric welding. So you take a few electrodes, a thick piece of metal and try to light an arc.
Once you have begun to succeed, you can proceed to the next stage of training. Electrode tilt. The basic position of the electrode is tilted slightly to itself – at an angle of 30° to 60° (see figure). The amount of tilt is selected depending on the required weld and the current setting. Orientation is based on the condition of the weld pool.
The first position is called “back angle”. In this case, the bath and molten slag move behind the electrode tip. Its angle of inclination and speed of movement should be such that the slag had time to cover the molten metal. In this position we get the heating of the metal to a greater. depth.
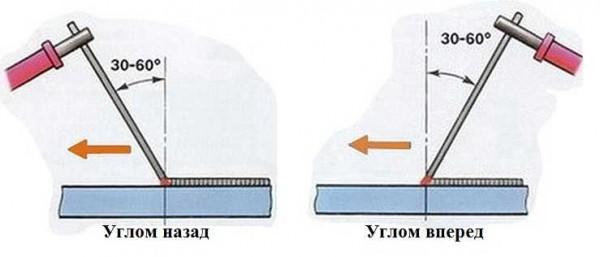
There are situations when the metal does not need to be heated much. Then the angle of inclination is reversed, the seam and the bath are “pulled” behind the electrode. In this case, the heating depth is minimized.
Electrode movements
Answering the question “how to properly weld with electric welding” is simple: you need to control the weld pool. To do this, you need to hold the electrode at a distance of 2-3 mm from the surface of the metal and control the state and size of the weld pool. This is where the skill of the welder lies.
The difficulty lies in the fact that you have to control several parameters at the same time:
- move the electrode along one of the trajectories shown in the photo,
- as it burns out, lower it a little lower, keeping a constant distance of 2-3 mm;
- monitor the size and condition of the weld pool, speeding up or slowing down the electrode movements;
- watch the direction of the weld.
The movements of the tip of the electrode are shown in the figure. Those wishing to learn electric welding for home use do not need to master all of them, but two or three movements you will need: for different situations, seams and metals.
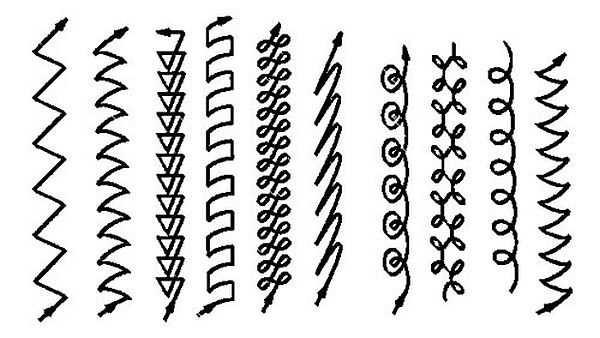
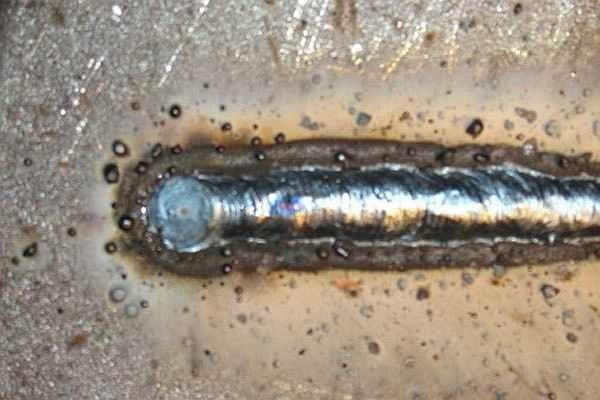
How to learn how to weld with electric welding? Practice the movements on a thick piece of metal. You get then not seams, but rolls. This stage – the initial. On it you will master the elementary skills of the welder: learn to control the distance from the tip of the electrode to the part and at the same time move it along a given trajectory, watch the welded bath and slag in it.
To do this, take a thick metal, chalk draw a line on it: it will be necessary to lay the roll. Ignite the arc and begin to master the movements, learning to control the bath at the same time. You will succeed not from the first and even not from the tenth time. Electrodes will be used up, probably a dozen. When the technique of manual arc welding will be worked out: the roll will be uniform, its width and height constant (or almost), you can try to connect the parts.
How to make a pergola on a metal frame read in this article, and here the construction of a shed on a metal frame is described.
How to properly weld metal
Learning to properly hold the electrode and move the bath for a good result is not enough. It is necessary to know some subtleties of the behavior of the metals being joined. And the peculiarity is that the seam “pulls” the parts, because of which they can be skewed. As a result, the shape of the product can be very different from the conceived.
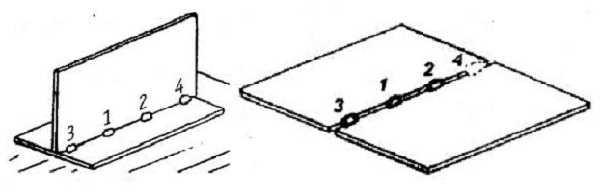
Therefore, before the work parts are fixed with clamps, ties and other devices. In addition, make tacking – short transverse seams, laid through a few tens of centimeters. They fasten the parts, giving the product shape. When welding joints, they are applied on both sides: so the resulting stresses are compensated. Only after these preparatory measures begin welding.
About the types of welds and joints (horizontal, vertical, ceiling ) and how to weld them correctly read here.
How to choose the current for welding
Learning to weld with electric welding is impossible if you do not know what to set the current. It depends on the thickness of the parts to be welded and the electrodes used. Their dependence is presented in the table.
But with manual electric arc welding, everything is interconnected. For example, the voltage in the network has fallen. To give the necessary current, the inverter simply can not. But even in these conditions, you can work: you can move the electrode more slowly, achieving a good heating. If this does not help, you change the type of electrode movement – several times passing over the same place. Another way – put a thinner electrode. Combining all these methods, you can achieve a good weld even in such conditions.
How to properly weld with welding, you now know. It remains to practice the skills. Choose a welding machine, buy electrodes and a welding mask and start practicing.
To consolidate the information and make fewer mistakes, watch a video lesson on welding.


