

Providing water for plants and plantings is one of the concerns of homeowners. Some people water vegetable beds, some water flower beds and lawns, and some need to water the garden. In any case, the procedure is quite time-consuming. But that’s not all: the usual method forms a crust on the surface, which prevents plants from developing, so you have to loosen the soil. All these problems are solved if you make drip irrigation of plants. You can buy ready-made sets, order the development and installation of “turnkey” and you can do everything with your own hands. Here’s how to make drip irrigation yourself and will be discussed in this article.
Artikkelin sisältö
Principle of operation and varieties
This technology was tested several decades ago. Its results were so impressive that the system became widespread. The basic idea is that water is supplied to the roots of plants. There are two ways of doing this:
- poured on the surface near the stem;
- it is delivered underground to the root formation zone.
The first method is easier to install, the second – more costly: you need a special hose or drip tape for underground installation, a decent amount of land work. For temperate climates there is no special difference – both methods work well. But in regions with very hot summers better showed itself underground laying: less water evaporates and more of it gets to the plants.
There are gravity systems – they require a water tank, installed at a height of at least 1.5 meters, there are systems with stable pressure. They have a pump and a control group – pressure gauges and valves that create the required force. There are fully automated drip irrigation systems. In the simplest version, it is a valve with a timer that opens the water supply for a specified period of time. More sophisticated systems can control separately the flow rate through each of the water lines, testing soil moisture and determining the weather. These systems operate under the guidance of processors, modes of operation can be set from the control panel or computer.
Hyödyt ja haitat
Drip irrigation has many advantages and all of them are significant:
- Labor intensity is significantly reduced. The system can be fully automated, but in the simplest version, irrigation requires literally a few minutes of your attention.
- Water consumption is reduced. This is due to the fact that moisture is supplied only under the roots, other areas are excluded.
- There is no need for frequent loosening. With metered water supply to a small zone, no soil crust is formed, so there is no need to break it up.
- Plants develop better and yields increase. Due to the fact that water is supplied to one zone, the root system develops in this place. It has a greater number of thin roots, becomes more lumpy, absorbs moisture faster. All this contributes to rapid growth and more abundant fruiting.
- It is possible to organize root feeding. And the consumption of fertilizers due to the point supply is also minimal.
Cost-effectiveness of drip irrigation systems has been proven many times, even on an industrial scale. In private greenhouses and vegetable gardens, the effect will be no less significant: the cost of creating a system can be reduced to a small amount, and all the advantages will remain.
Minuses are also there, but they are very few:
- For normal operation, water filtration is required, and this is an additional expense. The system can function without filters, but then it is necessary to think through a system of purging/flushing to eliminate clogs.
- Drip strips become clogged over time and need to be cleaned or replaced.
- If thin-walled belts are used, they can be damaged by birds, insects or rodents. Areas of unplanned water wastage occur.
- The device requires an investment of time and money.
- Periodic maintenance is required – blow out pipes or clean drip lines, check the fastening of hoses, change filters.
As you can see, the list of disadvantages is not small, but all of them are not very serious. This is a really useful thing in the vegetable garden, in the garden, on the lawn, flowerbed or in the greenhouse.
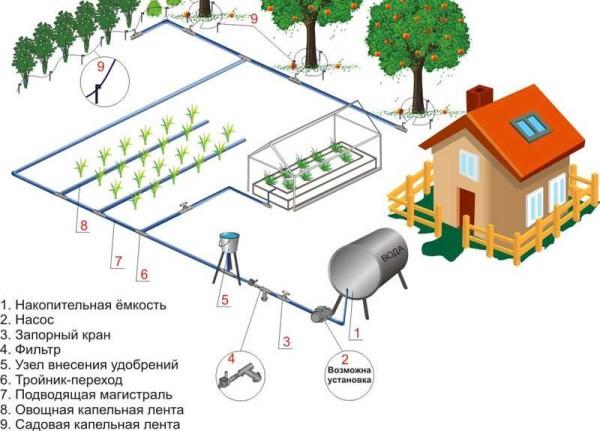
Components and layout options
Drip irrigation systems can be organized having any source of water. Suitable well, well, river, lake, centralized water supply, even rainwater in tanks. The main thing is to have enough water.
A main pipeline is connected to the source, which brings water to the place of irrigation. Further it goes along one of the sides of the irrigated area, at the end it is plugged.
Opposite the beds in the pipeline are inserted tees, to the lateral output of which attach drip hoses (pipes) or tapes. They have special droppers, through which water is supplied to the plants.
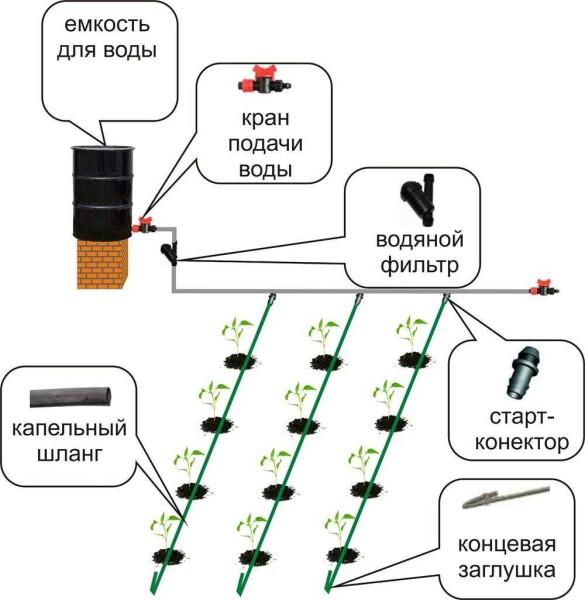
Between the outlet from the source and the first branch to the bed, it is desirable to install a filter or a system of filters. They are not needed if the system is powered from the home water supply. If you pump water from a lake, river, rainwater tank, filters are mandatory: there can be a lot of contaminants and the system will be clogged too often. Types of filters and their number are determined depending on the condition of the water.
How to purify water from the well and well is described here.
Drip hoses
Hoses for drip irrigation are sold in bays from 50 to 1000 meters. They already have water flow points built into them: mazes through which water flows before entering the outlet. These oozing hoses ensure the same amount of water throughout the line, regardless of the topography. Due to this maze, the flow rate at any point in the irrigation is virtually the same.
They differ in the following characteristics:
-
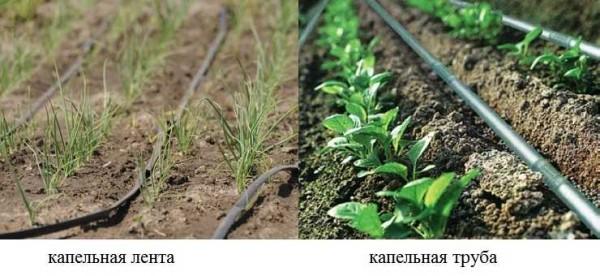
- Tubing stiffness. Drip hoses – there are hard, there are soft. Soft are called tapes, rigid – hoses. Rigid can be used up to 10 seasons, soft – up to 3-4. Ribbons are:
- Thin-walled – with a wall thickness of 0.1-0.3 mm. They are laid only on the surface, their service life is 1 season.
- Thick-walled tapes have a wall thickness of 0.31-0.81 mm, service life – up to 3-4 seasons, they are available for both above-ground and underground laying.
- Tubing stiffness. Drip hoses – there are hard, there are soft. Soft are called tapes, rigid – hoses. Rigid can be used up to 10 seasons, soft – up to 3-4. Ribbons are:
The maximum length of the irrigation line is determined so that the unevenness of the water outlet at the beginning and end of the tape does not exceed 10-15%. For hoses it can be 1500 meters, for ribbons – 600 meters. For private use, such values are not in demand, but it is useful to know)).
Drip tapes
Sometimes it is more convenient to use not tapes, but drippers. These are separate devices that are inserted into a hole in the hose and through which water is supplied under the root of the plant. They can be installed in arbitrary increments – put a few pieces in one place, and then a few in another. This is convenient when organizing drip irrigation of shrubs or trees.
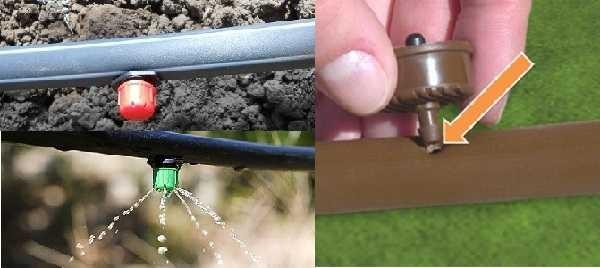
They are of two types – with normalized (constant) and adjustable water release. The body is usually plastic, on one side there is a socket, which is forcefully inserted into the hole made in the hose (sometimes rubber rings are used for sealing).
There are also differentiated drippers compensated – and uncompensated. When using compensated at any point of the irrigation line water release will be the same (approximately), regardless of the relief and location (at the beginning or end of the line).
There are also “spider” type devices. This is when several thin tubes are connected to one outlet. This makes it possible to simultaneously water several plants from one point of water outlet (reduces the number of drippers).
How to make a small greenhouse can be read here. And about how to make a vegetable garden beautiful is written here.
Trunk pipes and fittings
When creating a system for laying the main pipeline from the water source to the irrigation zone, plastic pipes and fittings made of:
- polypropylene (PPP);
- polyvinyl chloride (PVC);
- polyethylene:
- High pressure (HPP);
- low pressure (HDPE).
All these pipes well tolerate contact with water, do not corrode, chemically neutral and do not react to the application of fertilizers. For irrigation of a small greenhouse, vegetable garden, lawn, most often use a diameter of 32 mm.
In places where lines are diverted, tees are installed, to the side outlet of which a drip hose or tape is connected. Since they are smaller in diameter, you may need adapters, and their outer diameter should be equal to the inner diameter of the hose (or be slightly smaller). Tapes/hoses can be attached to the fittings using metal clamps.
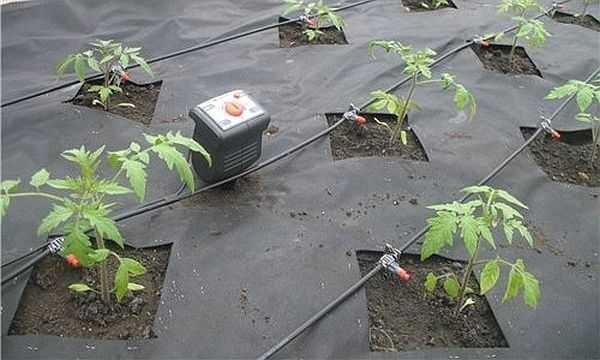
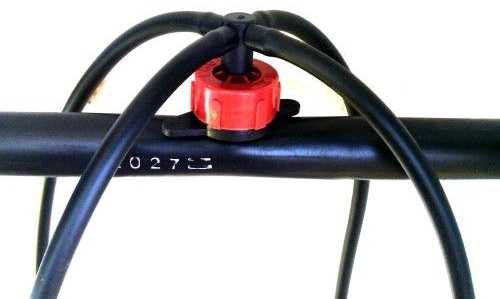
Also branches can be made through special fittings, which are installed in the hole made in the hose of the required diameter (as in the photo above).
Sometimes after the tee on each line of water distribution put a valve that allows you to disconnect the lines. This is convenient if drip irrigation is divorced to plants moisture-loving and those that do not like excess water.
If you are reluctant to choose the components and select the sizes, diameters of fittings, you can buy ready-made sets for drip irrigation from various manufacturers.
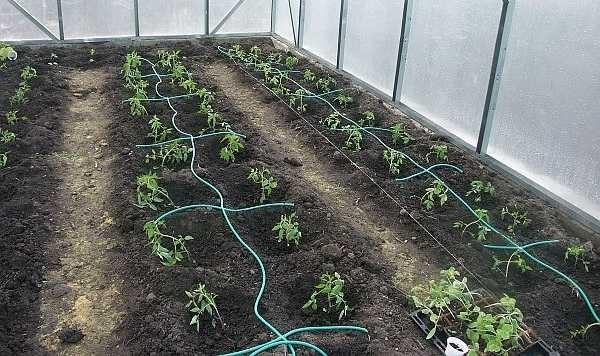
Drip irrigation with their own hands: examples of devices
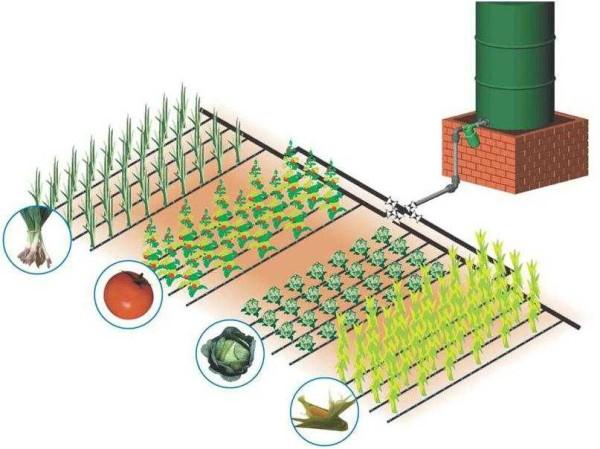
There are many variants of the device of the system – it can easily be adjusted to any conditions. Most often there is a question about how to organize irrigation independent of electricity. You can do this if you install a sufficiently large container for water at a height of at least 1.5 meters. This creates a minimum pressure of about 0.2 atm. It is enough to water a small area of the vegetable garden or garden.
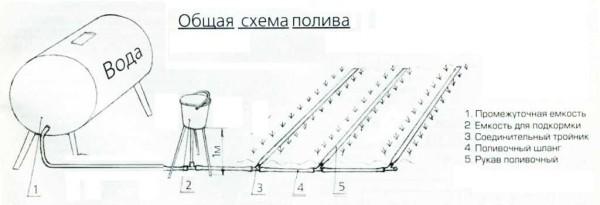
In the tank, water can be supplied from the water supply, pumped by a pump, drained from roofs, even poured in buckets. At the bottom of the tank make a tap, to which the main pipeline is connected. Then the system is standard: on the pipeline to the first branch to the irrigation line is installed filter (or a cascade of filters), and then goes the distribution on the beds.
For the convenience of introducing fertilizers on the main line can be provided for the installation of a special node. In the simplest case, as in the photo above, it can be a container on legs, in the bottom of which a hole is made and a hose is inserted. You also need a shut-off valve (faucet). This is cut into the pipeline through a tee.
If necessary, you can also water shrubs and fruit trees. The whole difference is that the tape or hose is laid around the trunk at some distance. For each tree, one line is taken away, bushes can be watered by several pieces on one line. Only in this case, it is necessary to use an ordinary hose, in which to insert drippers with the necessary water flow rate.
If the low pressure in the system does not suit you, you can install a pressure booster pump (see the photo below) or a full-fledged pumping station on the main water pipeline. They will provide water even far away plots.
Is it possible to supply water directly from the source? You can, but it is undesirable. And this is due not to technical difficulties – they are not so much, but to the fact that plants do not like cold water. That is why most drip irrigation systems of small scale – for greenhouses, vegetable gardens, orchards and vineyards – use storage tanks. In them, the water is heated, and then spread over the site.
About how to make high beds to increase yields, read here.
Drip irrigation: how to calculate the system
The tank from which water is supplied to the system can be one – a common one, as in the picture above, or a separate one for each plot. With a significant distance between the objects of irrigation, it can be more profitable than pulling the main pipeline.
The necessary volume is calculated depending on the number of plants and the volume of water for their normal development. How much water is needed to irrigate vegetables depends on the climate and soils. On average, you can take 1 liter per plant, 5 liters for bushes and 10 liters for trees. But this is the same as the “average temperature of the hospital”, although for approximate calculations will do. Count the number of plants, multiply by the consumption per day, all summarized. To the resulting figure add 20-25% of the reserve and the necessary volume of the tank you know.
With the calculation of the length of the trunk and drip hoses no problem. Trunk – the distance from the tap on the tank to the ground, then on the ground to the place of irrigation, and there on the end side of the beds. Adding up all these lengths, the necessary length of the main pipeline is obtained. The length of the tubes depends on the length of the beds and the fact that one or two rows with one tube will go water distribution (for example, with the help of drip spiders can divide water for two to four rows at the same time).
According to the number of tubes, the number of tees or fittings and taps (if you will put them) is determined. For each branch using tees, take three clamps: press the hose to the fitting.
The most difficult and expensive part – filters. If the water is pumped from an open source – a lake or a river – it is necessary to first filter coarse purification – gravel. Then there should be fine filters. Their type and number depend on the condition of the water. When using water from a well or a well, you can not put a coarse filter: the primary filtration occurs on the suction hose (if a pumping station is used). In general – how many cases, so many solutions, but filters are needed, otherwise quickly clog drip lines.
Homemade drip hoses and drippers
One of the most significant items of expenditure in the independent device of the system from ready-made components – drip hoses or drip tapes. They, of course, ensure the supply of the same amount of water throughout and the flow rate is stable, but on small areas it is not so necessary. It is possible to regulate the supply and flow rate by taps built into the beginning of the irrigation line. Because of this, there are many ideas to make water distribution under the plants with ordinary hoses. One of them see in the video.
This system is difficult to call drip irrigation. It is more like root irrigation: water trickles under the root, but it works, maybe only a little worse and is more suitable for plants with a root system developed deep. This method will be good for trees, fruit bushes, grapes. They need a significant amount of water, which should go deep into the depths for a decent distance and this homemade drip irrigation system can provide this.
In the second video is organized really drip irrigation. It is done with the help of medical drippers. If you have the opportunity to stock up on such material second-hand, it will turn out to be quite cheap.
The amount of water supplied is regulated by a wheel. From one hose you can supply water to three and four rows – if you take a sufficient diameter hose, you can connect to it not three devices, but more. The length of the tubes from the drippers quite allows you to water two rows on each side. So the costs will really be small.
Drip heads can be used almost without remodeling. This is in the case if the system was with a bag. An example – on the photo.
Almost in the same way you can make drip irrigation for house plants. It is suitable for those flowers that like constant moisturizing.

About how to make a pond in the dacha you can read here. Several types of beautiful and inexpensive paths can be found here (with recommendations for their manufacture)
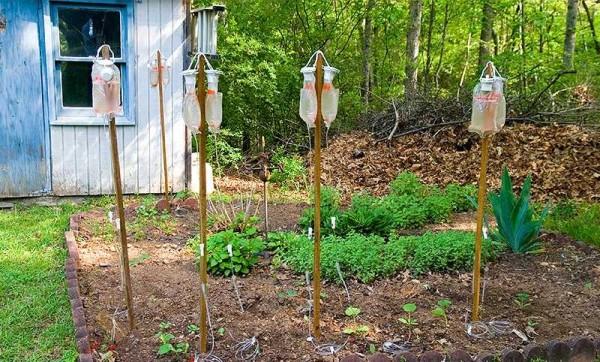
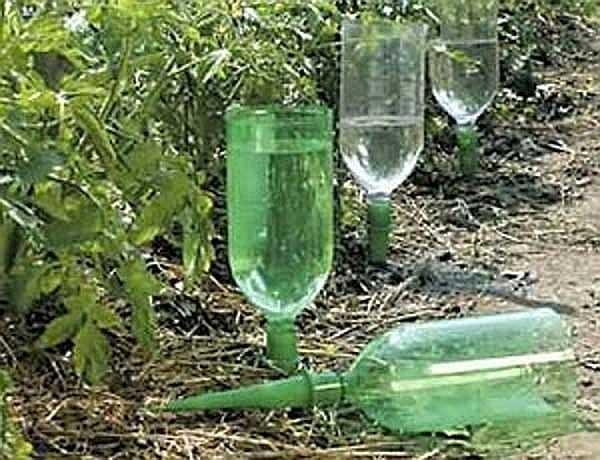
The cheapest drip irrigation: from plastic bottles
There is the cheapest and fastest way to organize water supply to plants without hoses and large containers. You will only need plastic bottles and a small length – 10-15 cm – thin tubes.
At the bottles partially cut off the bottom. So that it turns out of the bottom of the lid. So the water will not evaporate. But you can cut off the bottom completely. At a distance of 7-8 cm from the cap in the bottle you make a hole in which a thin tube is inserted at a slight angle. Bury the bottle with the cork down or wrap it to a peg, and stick the peg in the ground next to the plant, directing the tube to the root. If there is water in the bottle, it will run down the tube and drip under the plant.
The same design can be made by turning the bottle with the cap upside down. But this option is less convenient: it is more difficult to pour water, you will need a watering can. How it looks like, see the picture below.
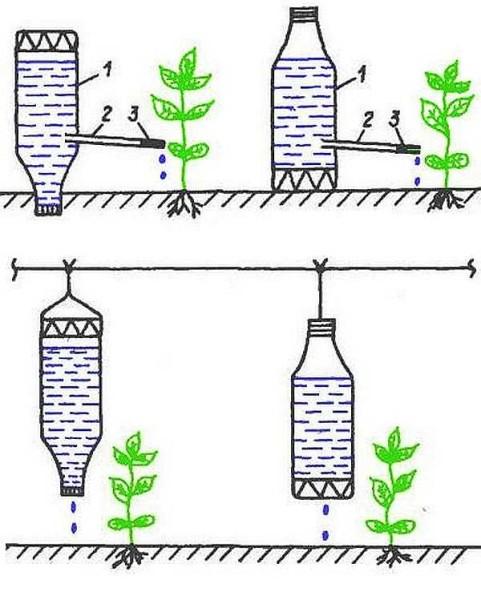
As you can see, there is a second option for drip irrigation from plastic bottles. A wire is stretched over the bed, and bottles are tied to it in the bottom or lid of which holes are made.
There is another photo-variant of the use of bottles, but with regular drippers for irrigation. They are fixed on the neck of the bottles and in this form are installed under the bush.
This option, of course, is not ideal, but will give the plants an opportunity to develop better, if at the dacha you can be rarely. And two liters from the bottle can be decisive in the battle for the harvest.


Last summer, I set up a drip irrigation system in my veggie garden. It was a game-changer! My plants thrived with less water waste. Super easy to DIY, just a few hoses and timers. If you’re into gardening, it’s a must-try! You’ll save time and get better yields.