

In some cases, the light bulb blinks when the light is switched off. This phenomenon is unpleasant for the eyes and also significantly reduces the life of the bulbs. Why this happens and how to deal with it, we will talk further.
Contents of the article
Reason #1 blinking LED and energy-saving lamps
If you have switches with LED or neon lighting, when you install economy lamps (they are also called energy-saving or compact fluorescent) when the light is turned off, they begin to blink. The same situation is observed with some (cheap Chinese) LED lamps. They turn on briefly – for a fraction of a second – and instantly turn off. This happens quite often – every couple or three seconds.
The reason is simple. Blinks LED or fluorescent light bulb when the light is off due to the presence of a power supply circuit LED backlight and the peculiarities of the device of these lamps. Unlike incandescent lamps, energy-saving and LED lamps operate from a direct current of 12 V. But they are connected to the network 220 V, and the conversion takes place in the lamp base, where a diode bridge and a capacitor are installed – a circuit that converts 220 V AC into 12 V DC.
When you turn the switch to the “off” state, there is still a circuit to power the LED/neon lamp, which is what causes them to glow. There are microcurrents flowing through this circuit – you don’t need any more for backlighting. They are small, but they are enough for the capacitor in the lamp to build up enough charge to start the lamp (which is installed in the lamp base). As a result, the lamp lights up. But, since the charge is still too low and there is no normal recharge, the lamp quickly goes out. This is the result of the blinking.
Sometimes – with some switches – the bulbs do not blink, but burn at half light. This happens because the resistance that stands in the power supply circuit of the backlight is small. As a result, there is enough current to maintain a small capacitor charge. That is why it turns out that the lamps are burning when the light is off. More often it suffers LED lamps (light-emitting diode). Methods of combating this phenomenon are the same as with blinking.
The position when the bulb blinks when the light is off is not only unpleasant for the eyes. There is another consequence: each bulb is designed for a certain number of on-off switching. When blinking, this cycle occurs in a fraction of a second. There can be 10 or more per minute. It is clear that very soon the lamp will fail. So to deal with the fact that the bulb blinks when the light is off, you need to immediately after detection.
Eliminate problem #1
Once you understand why the energy-saving bulb blinks when the switch is turned off, it’s easy to suggest a solution to the problem:
If it is a chandelier with multiple horns, there is another way – you can screw an incandescent bulb into one of the horns.
The method is quite simple, but it works. If single bulbs flicker, the phenomenon will have to be dealt with by other methods. With the replacement of switches and bulbs, probably, there will be no questions, but with other methods they may be.
Remove the backlight
In switches with built-in backlighting, there is a board on which there is an LED or a small neon lamp, a resistance and contacts (usually in the form of springs). This board is located under a small plastic cover on the back of the switch body. To get to it, you need to disassemble the switch.
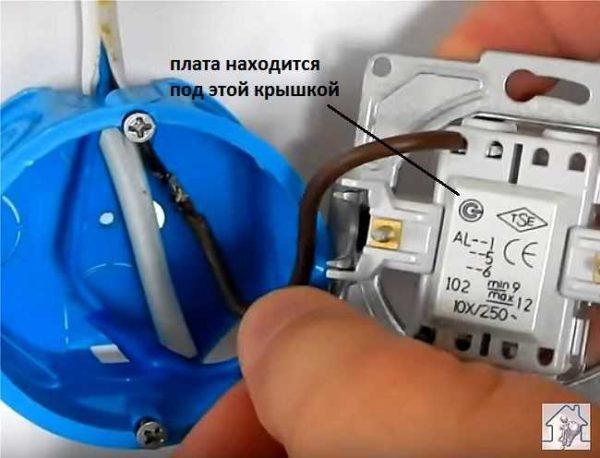
The cover can be pryed off with a fingernail or screwdriver. After removing it, we find the circuit board on the back side.

We take this board out. It is not attached to anything, just pry it up and remove it from the clips. Put the cover without the board in place, reassemble the switch and check the functionality. Everything should work, except for two things: the backlight does not light up when the light is off and the economy or LED lamps do not blink.
We leave the backlight on by changing the power circuit parameters
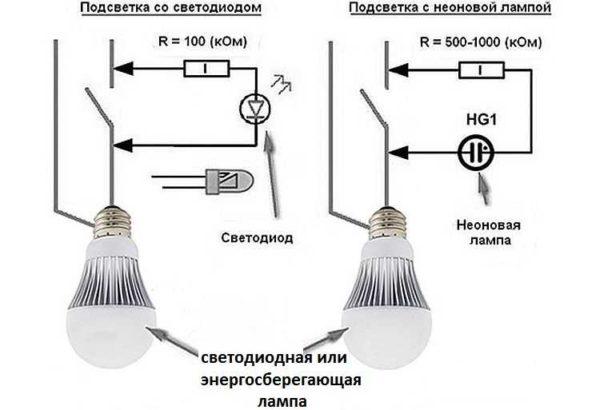
Not all backlit switches are made with the use of boards. More budget models are made simpler: a resistance is soldered to the diode and this circuit is installed in parallel with the keys of the switch (as in the photo below).
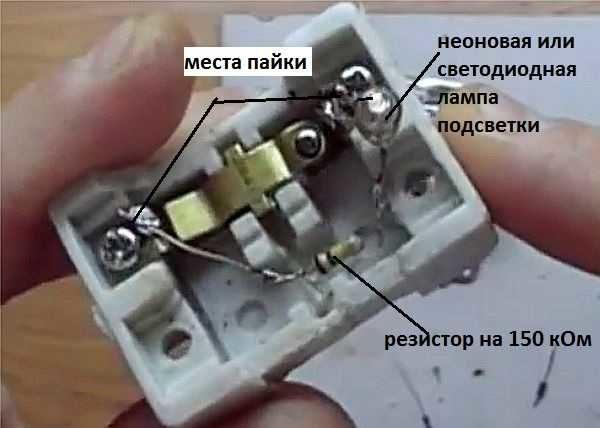
In this case, you can unsolder/solder out the LED and resistor and get a normal switch without backlighting. But you can change the parameters of this circuit so that the backlight will work, but the lamps will not blink or burn when the light is off. To do this, you will have to change the resistor – put a resistance:
- not less than 220 kOhm, if the backlight with a neon lamp;
- not less than 470 kOhm or 680 kOhm with LED backlighting (to be selected locally).
In addition? A diode 1N4007 is built into the circuit behind the resistor, cathode to the resistor. The second input of the diode is soldered to the backlight lamp. As a result, the power supply circuit will look like in the picture below.
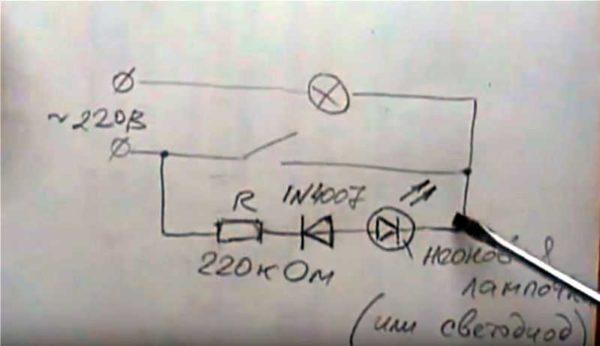
To eliminate the blinking of the lamps and keep the backlight on the switch, we unsolder the old resistor, put a new one together with the diode. Then the switch can be assembled and put in place.

In most cases, the problem disappears. If the lamp still blinks, you need to replace the resistance with a larger one. This is rare, but…
Create a circuit with a smaller resistance in parallel to the lamp
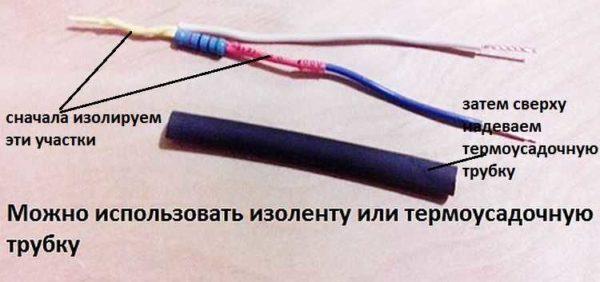
If you connect a resistor in parallel to the lamp, the current will go to heat it up, the lamp capacitor will remain uncharged and there will be no flashing. The resistor is usually taken at 50 kOhm and a power of 2 W, to it the wires are soldered, then insulated, leaving outside only two wires for connection. You can wrap it with duct tape or use heat shrink tubing.
First insulate the connection points of conductors and resistance legs, then put another layer of insulation, which covers the resistor as well. Currents are small, heating, if there will be, it will be quite insignificant, but with such a two-layer insulation this modification is safe.
There are two ways to install this resistor: in the junction box or directly on the luminaire. It is only important that it is connected in parallel to the lamp.
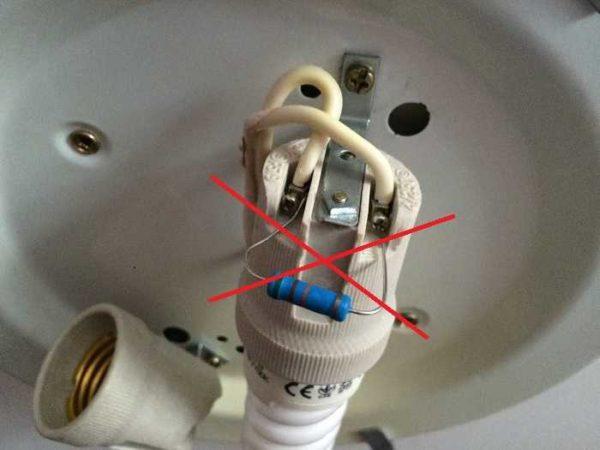
Connect the previously prepared isolated resistor to the same places – it is much safer. In the junction box, the connection is similar. You need to find two wires that go to the lamp, and in the same contacts connect additional conductors. After such a rework, the bulb will not blink. But if you are not strong in electricity, be very careful.
Once again, we remind you that all these works should be carried out with the power disconnected in the panel.
Cause No. 2 and its elimination
If you have a switch without illumination, and the LED or economy lamp flashes when the light is off, then there is an error in the connection. Most likely, it is not the phase that is broken on the switch, as it should be, but the zero. In addition to being very dangerous, it leads to this phenomenon – flashing of some lamps.
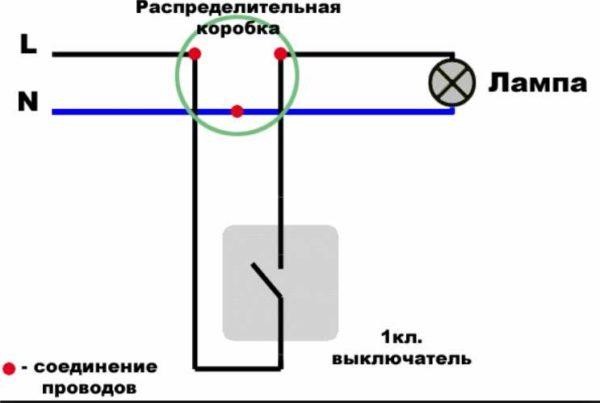
This is eliminated by correcting the error – it is necessary to check on which of the wires is the phase and correctly connect the switch. If on this line all the switches are connected incorrectly, you can flip the wires in the switchboard. If only part of it – you will have to do this on each incorrectly connected switch.
Reason #3: Why does the light bulb blink if everything is wired correctly?
Sometimes the switch is not illuminated, and the phase goes to it, but still blinks the light bulb when the light is off. Then the reason is bad wiring. It could be a contact issue, or it could be an insulation problem. If the contacts can be tightened, welded, resealed, insulation problems can only be solved by a complete replacement of the wiring.
One point: insulation problems mean high leakage current. If you have an RCD (residual current device) on your line, it will frequently trip the line. If there is no RCD and the wiring is old, you can’t tell. Or rather, it can be determined by using an ohmmeter and involving specialists. In case of significant damage, you can make sure of the presence of this problem using a multimeter and wires “to ground”. Well, and blinking light bulb – this is a particular manifestation of the fact that the insulation is damaged and there are significant leakage currents.

")


I’ve noticed that too! It’s like a little party happening in the bulb. I found out it’s just some leftover energy doing its thing. Last time I saw it, I thought the bulb was trying to send me a secret message. Pretty cool how things work, right?
Yeah, I’ve noticed that too! It’s weird when those energy-saving bulbs blink when they’re off. I think it has to do with the wiring, like a small amount of current still flowing. I remember one time, it freaked me out at night when the light flickered!