

To prevent the pump from being switched on every time the tap is opened, a water accumulator is installed in the system. It contains a certain volume of water, which is sufficient for a small flow rate. This makes it possible to practically get rid of the short-term switching on of the pump. Installing a hydroaccumulator procedure is not difficult, but you will need some more devices – at least – pressure switch, and it is desirable to have a pressure gauge and air vent.
Περιεχόμενα του άρθρου
Functions, purpose, types

In the water supply system of a private home without a hydroaccumulator pump is turned on whenever there is a flow of water somewhere. These frequent switching on leads to wear and tear of the equipment. And not only the pump, but the entire system as a whole. After all, each time there is a sudden increase in pressure, and this is a water hammer. To reduce the number of switching on the pump and smooth out the hydrostroke use a hydroaccumulator. The same device is called an expansion or diaphragm tank, hydraulic tank.
Appointment
One of the functions of hydroaccumulators – to smooth out hydrostrokes, we found out. But there are others:
It is not surprising that in most private water supply systems this device is present – there are many pluses from its use.
Τύποι
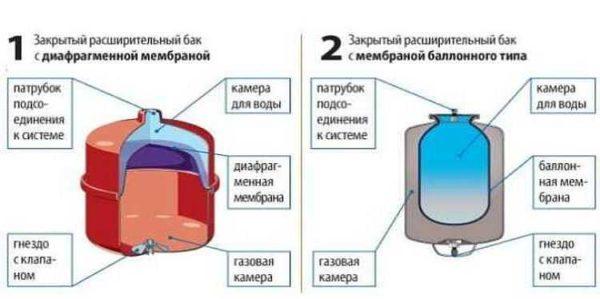
Hydroaccumulator is a tank made of sheet metal divided into two parts by an elastic membrane. The membrane is of two types – diaphragm and balloon (pear). The diaphragm is fixed across the tank, the balloon in the form of a pear is fixed at the inlet around the inlet pipe.
By purpose, they are of three types:
- For cold water;
- for hot water;
- for heating systems.
Hydro tanks for heating are painted in red color, tanks for water supply are painted in blue. Expansion tanks for heating are usually smaller in size and lower in price. This is due to the material of the membrane – for water supply it should be neutral, because the water in the pipeline is potable.
According to the type of location, hydroaccumulators are horizontal and vertical. Vertical ones are equipped with legs, some models have plates for hanging on the wall. It is stretched upward models are more often used in the independent creation of plumbing systems of a private house – they take up less space. Connection of a hydroaccumulator of this type is standard – through a lead of 1 inch.
Horizontal models are usually complete pumping stations with surface-type pumps. Then the pump is placed on top of the tank. It turns out compact.
Operating principle
Radial diaphragms (in the form of a plate) are used mainly in gyroaccumulators for heating systems. For water supply, a rubber pear is mainly installed inside. How does such a system work? While there is only air inside, the pressure inside is standard – the one that is set at the factory (1.5 atm) or that you set yourself. The pump turns on, starts pumping water into the tank, the pear starts to increase in size. The water gradually fills more and more volume, compressing more and more the air that is between the tank wall and the diaphragm. When a certain pressure is reached (usually for single-storey houses it is 2,8 – 3 atm), the pump is switched off, the pressure in the system stabilizes. When you open a faucet or other water flow, it comes from the hydroaccumulator. It flows until the pressure in the tank does not fall below a certain mark (usually about 1.6-1.8 atm). The pump is then switched on and the cycle repeats again.

If the flow rate is large and constant – you are filling a bathtub, for example – the pump pumps water in transit without pumping it into the tank. The tank starts to fill up after all taps are closed.
For switching on and off the pump at a certain pressure is responsible for the water pressure switch. In most schemes of strapping hydroaccumulator this device is present – such a system works in the optimal mode. Connection of the hydroaccumulator will be discussed below, and for now let’s talk about the tank itself and its parameters.
Large volume tanks
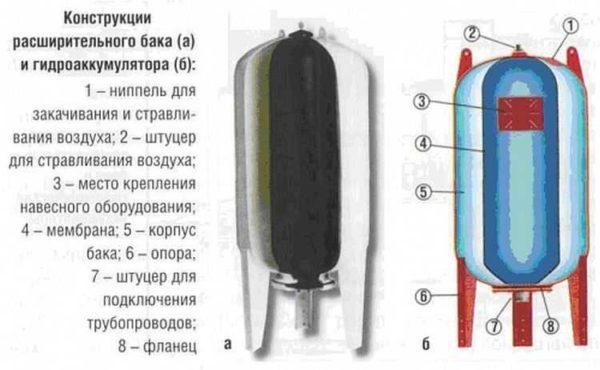
The internal structure of hydroaccumulators with a volume of 100 liters and above is slightly different. The pear is different – it is attached to the body both above and below. With this structure there is an opportunity to fight with air, which is present in the water. To do this, there is an outlet in the upper part, in which you can connect a valve for automatic air discharge.
How to choose the volume of the tank
You can choose the volume of the tank arbitrarily. There are no requirements or restrictions. The larger the volume of the tank, the more water you will have in case of an outage and the less often the pump will be turned on.
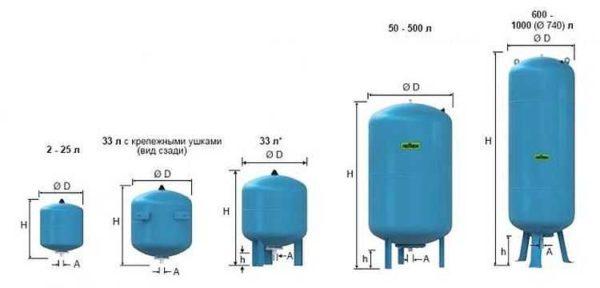
When choosing the volume, it is worth remembering that the volume stated in the data sheet is the size of the entire tank. There will be almost half as much water in it. The second thing to keep in mind is the overall dimensions of the tank. The tank for 100 liters is a decent barrel – about 850 mm in height and 450 mm in diameter. For it and strapping will have to find a place somewhere. Somewhere is in the room where the pipe from the pump comes. All equipment is usually installed there.
If to choose the volume of the hydroaccumulator you need at least some guidance, calculate the average flow rate from each point of water intake (there are special tables or you can look in the passport to household appliances). Summarize all these data. Get the possible flow rate in the event that all consumers will work at the same time. Then estimate how many and what devices can work at the same time, calculate how much water will be used per minute in this case. Most likely by this time you will have already come to a decision.
To be a little easier, say that the volume of the hydro tank in 25 liters is enough to meet the needs of two people. It will ensure the normal functioning of a very small system: faucet, toilet, sink and a small water heater. If there are other household appliances, the capacity should be increased. The good news is that if you decide that the existing tank is not enough for you, you can always install an additional one.
What should be the pressure in the water accumulator?
One part of the accumulator contains compressed air, while the second part is filled with water. The air in the tank is pressurized – the factory setting is 1.5 atm. This pressure does not depend on the volume – it is the same for a 24 liter tank and a 150 liter tank. More or less can be the maximum allowable maximum pressure, but it depends not on the volume, but on the membrane and is specified in the technical specifications.
Preliminary pressure check and correction
Before connecting the accumulator to the system, it is desirable to check the pressure in it. The settings of the pressure switch depend on this indicator, and during transportation and storage the pressure may have fallen, so control is very desirable. Control the pressure in the hydro tank can be by means of a pressure gauge connected to a special inlet in the upper part of the tank (capacity of 100 liters and more) or installed in its lower part as one of the parts of the strapping. Temporarily, for control purposes, you can connect an automobile pressure gauge. Its error is usually small and it is convenient to work with it. If you do not have one, you can use a standard one for water pipes, but they usually do not differ in accuracy.

If necessary, the pressure in the hydroaccumulator can be increased or decreased. For this purpose, there is a nipple in the upper part of the tank. A car or bicycle pump is connected through the nipple and the pressure is increased if necessary. If it needs to be depressurized, a thin object is used to bend the valve of the nipple to release the air.
What air pressure should be
So what should be the pressure in the hydroaccumulator? For normal operation of household appliances, a pressure of 1.4-2.8 atm is necessary. To prevent the diaphragm of the tank from rupturing, the pressure in the system should be slightly higher than the pressure of the tank – by 0,1-0,2 atm. If the tank pressure is 1.5 atm, the system pressure should not be lower than 1.6 atm. This value is set on the water pressure switch, which works in conjunction with the accumulator. These are the optimal settings for a small one-storey house.
If the house is two-storeyed, you will have to increase the pressure. There is a formula for calculating the pressure in the hydro tank:
Vatm =(Hmax+6)/10
Where Hmax is the height of the highest point of water intake. Most often it is a shower. Measure (calculate) at what height relative to the hydroaccumulator is its watering can, substitute into the formula, get the pressure that should be in the tank.
If a jacuzzi is installed in the house, everything is more complicated. You will have to pick up by experience – changing the settings of the relay and observing the work of water points and household appliances. But at the same time, the working pressure should not be greater than the maximum allowable for other household appliances and plumbing fixtures (indicated in the technical specifications).
Πώς να επιλέξετε
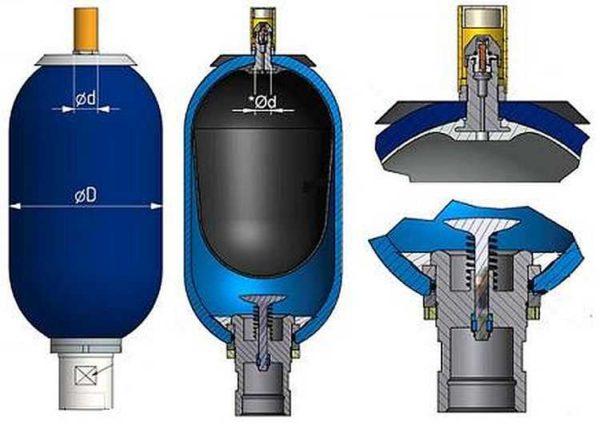
The main working organ of the hydro tank is the membrane. Its service life depends on the quality of the material. The best for today are membranes made of food rubber (vulcanized rubber plates). The material of the body only matters in membrane-type tanks. In those in which a “pear” is installed, the water is only in contact with the rubber and the material of the body is irrelevant.
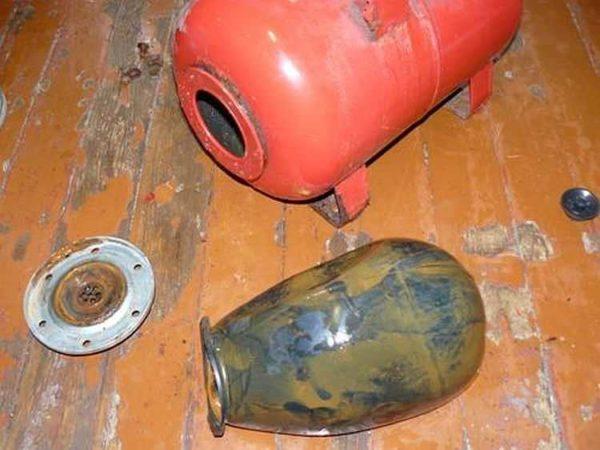
What is really important in tanks with “pears” is the flange. Usually it is made of galvanized metal. In this case, the thickness of the metal is important. If it is only 1 mm, after about a year and a half of operation in the metal flange will appear a hole, the tank loses tightness and the system stops working. And the warranty is only a year, although the stated service life – 10-15 years. The flange is rotten usually after the end of the warranty period. There is no possibility to weld it – very thin metal. You have to look for a new flange in service centers or buy a new tank.
So, if you want the hydroaccumulator to serve for a long time, look for a flange of thick galvanized or thin, but made of stainless steel.
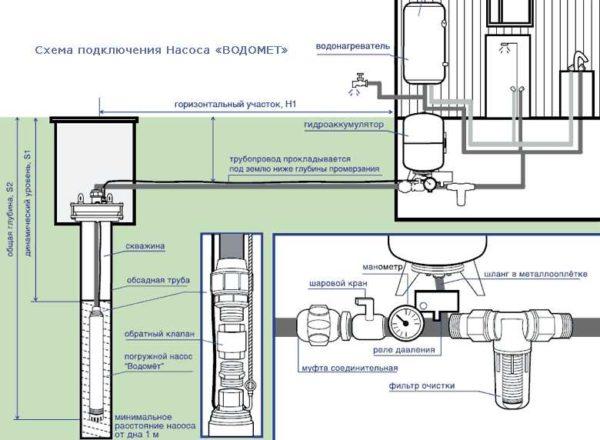
Connecting the accumulator to the system
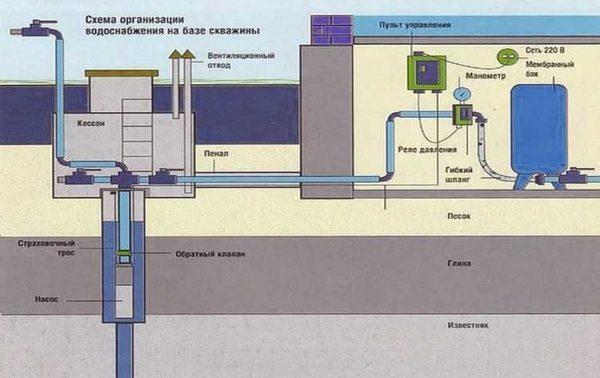
Usually the water supply system of a private house consists of:
In this scheme may still be present manometer – for operational control of pressure, but this device is not necessary. It can be periodically connected – for test measurements.
With or without a five-water connection
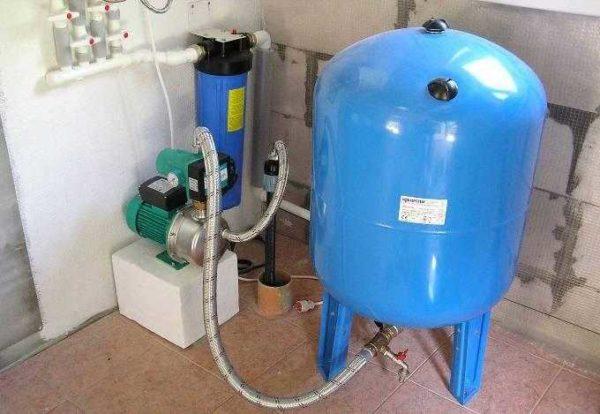
If the pump is of the surface type, the hydroaccumulator is usually placed near it. In this case, the check valve is placed on the suction pipe, and all other devices are installed in one bundle. They are usually connected by means of a five-wire connection.
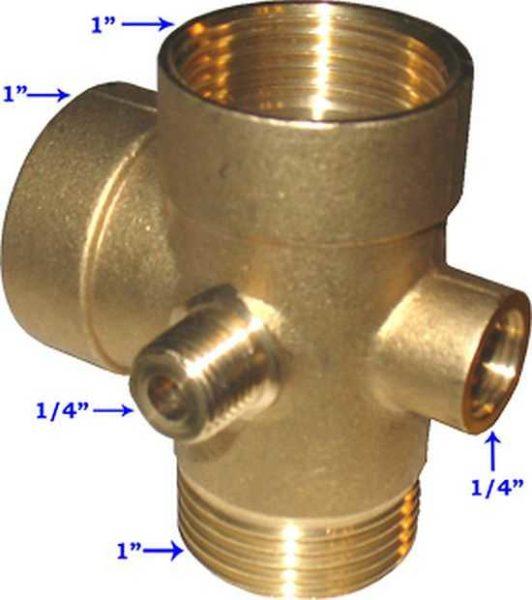
It has leads with different diameters, just under the devices used for strapping the hydroaccumulator. Therefore, the system is most often assembled on its basis. But this element is not necessary and you can connect everything with the help of conventional fittings and pieces of pipes, but it is more labor-intensive, in addition, there will be more connections.
One of its one-inch outputs is screwed onto the tank – the spigot is located at the bottom. A pressure switch and a pressure gauge are connected to the 1/4-inch outlet. To the remaining free one-inch outputs connect the pipe from the pump and wiring to the consumers. That’s all the connection of the hydroaccumulator to the pump. If you collect a scheme of water supply with a surface pump, you can use a flexible hose in a metal coil (with inch connections) – it is easier to work with it.

As usual, there are several options, you can choose.
Connect the hydroaccumulator to the submersible pump in the same way. All the difference is where the pump is installed and where to supply power, but it has nothing to do with the installation of the hydroaccumulator. It is placed where the pipes from the pump enter. Connection – one in the same (see the scheme).
How to install two hydro tanks on one pump
When operating the system, sometimes owners come to the conclusion that the available volume of the hydroaccumulator is not enough for them. In this case, it is possible to install a second (third, fourth, etc.) hydraulic tank of any volume in parallel.
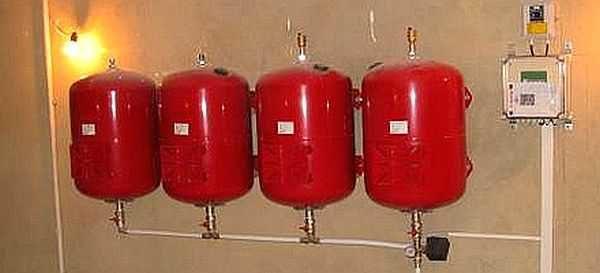
Recalibration of the system do not need to do, the relay will monitor the pressure in the tank on which it is installed, and the viability of such a system is much higher. After all, if the first hydroaccumulator is damaged, the second will work. There is one more positive moment – two tanks of 50 liters cost less than one for 100. The matter is more complex technology for the production of large-sized tanks. So it is also more economically advantageous.
How to connect the second hydroaccumulator in the system? At the entrance of the first to screw a tee, to one free output to connect the input from the pump (pivovyvodnogo fitting), to the remaining free – the second tank. That’s it. You can test the scheme.


Connecting the accumulator to the water supply can be a game changer! I remember when I set mine up – the water pressure improved instantly. Just make sure to check your connections and valves. It’s a solid DIY win! Cheers to smoother plumbing!