

Electricity is a serious and responsible business. If you are going to do all the work yourself, you need to do everything very carefully and diligently. Proper wiring in a private house – a guarantee of safety, because according to statistics 70% of fires occur due to electrical faults. If you are not confident in their abilities, it is better to entrust the work to professionals, only proven.
Περιεχόμενα του άρθρου
Plan of action
Wiring in a private house is done before the start of finishing work. The box of the house is kicked out, the walls and roof are ready – it’s time to start work. The sequence of actions is as follows:
- Determining the type of input – single-phase (220 V) or three-phase (380 V).
- Developing a scheme, calculating the capacity of the planned equipment, submitting documents and receiving the project. Here it should be said that not always in the technical conditions you will determine your declared power, most likely allocate no more than 5 kW.
- Selection of components and accessories, purchase of the meter, automatic machines, cables, etc.
- Electricity input from the pole into the house. Performed by a specialized organization, you need to decide on the type – air or underground, install in the right place automatic input and meter.
- Install a switchboard, bring electricity into the house.
- Laying cables inside the house, connecting outlets, switches.
- Arrange the grounding circuit and its connection.
- Testing the system and obtaining a certificate.
- Connecting electricity and its operation.
This is only a general plan, in each case there are nuances and peculiarities, but you need to start with obtaining technical conditions for connecting to the power grid and the project. To do this, you need to determine the type of input and the planned power consumption. It should be remembered that the preparation of documents may take six months, so it is better to submit them before the construction starts: the technical conditions are valid for two years. During this time, you will probably be able to throw out a wall, on which you can put an automatic machine and a meter.
How many phases
A private house can be supplied with single-phase voltage (220 V) or three-phase (380 V). According to the norms of energy consumption for a private house for a single-phase network, the maximum consumption per house can be 10-15 kW, for three-phase – 15 kW.
So what is the difference? The difference is that in a three-phase network can directly include powerful electrical appliances – electric stoves or heating boilers, ovens and similar equipment. However, the requirements for the input and wiring network 380 V is much stricter: the voltage is higher, more chances to get a serious injury. Therefore, if your house is not more than 100 squares, and you do not think to heat it with electricity, you better conduct 220 V.
Making a plan and getting a project
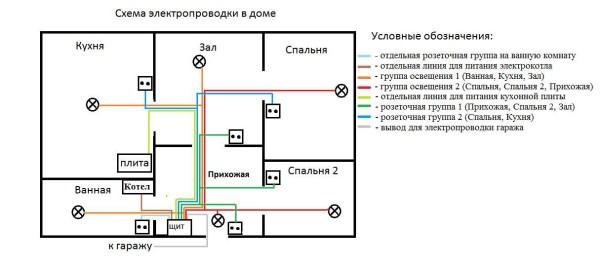
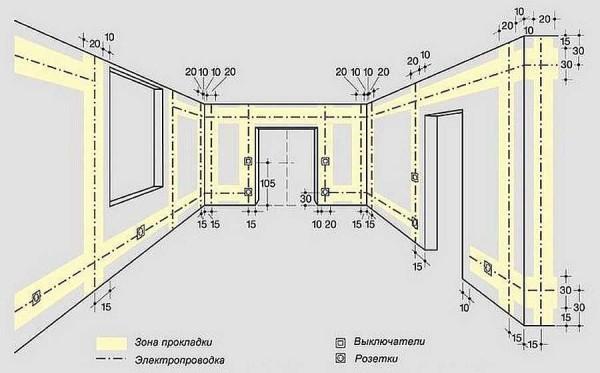
Having determined the type of input, you can start to develop a plan for electrification of the house. Take the house plan in scale, and draw where the equipment will stand, figure out where to locate outlets and switches. In this case, you need to take into account where what large-sized furniture will stand, and where it can be moved, so that in these areas do not put outlets and switches.
On the plan will need to put all the lighting devices: chandeliers, sconces, floor lamps, lamps. Some of them will need switches, some of them will need outlets. Then you will need to figure out which appliances in each room will need to be turned on. For example, in the kitchen there is a lot of equipment that works constantly. You will need outlets for it. There are also appliances that are turned on periodically. All this is drawn on the plan, the optimal location of the points of inclusion is determined. The same approach in each of the rooms.
Determining the total power
Having determined approximately what technique will stand in your house, summarize its power. The average power can be taken from the table: there is probably no equipment yet. And where there is, you take into account the starting loads (they are much higher). To the sum found, add about 20% of the reserve. The result will be the required power. It and specify it in the paperwork submitted to obtain permission to connect electricity to the site. If you are allocated the declared capacity, you will be very lucky, but do not hope for it. Most likely, you will have to invest in the standard 5 kW – the most common limit of electricity for a private house.

Breakdown of consumers into groups
All these consumers (this is the term of professionals) – lamps, spotlights, switches, sockets – are divided into groups. A separate branch is divorced electrics for lighting devices. Usually enough one, but this is not the rule, it may be more convenient or expedient to make two branches – on each wing of the house or on each floor – depends on the type and configuration of the building. Precisely in a separate group allocated lighting of the basement floor, utility rooms, as well as light on the street.
Then the outlets are divided into groups. How many can “sit” on one wire – depends on the diameter of the wire used, but not very much – three to five, not more. On the connection of each powerful device is better to allocate a separate power line: it is more reliable in terms of fire safety, and will contribute to a longer operation of devices.
As a result, you can have three to seven lines in the kitchen – here you have the most equipment and the most powerful ones too: you need separate lines for electric boilers and electric stoves. Refrigerator, microwave, electric oven, washing machine are also better to “plant” separately. Not so powerful blender, food processor, etc. can be included in one line.
In the rooms goes usually two to four lines: in a modern home and in any room there is something to include in the power grid. One line will be used for lighting. On the second will be outlets, in which you will need to include a computer, router, TV, phone charging. All of them are not very powerful and can be combined into one group. If you are supposed to install an air conditioner or will include an electric heater – you need separate lines.
If the private house is small – a dacha, for example, the groups can be two or three: it is for all lighting devices, the second – to the street and the third – for all internal outlets. In general, the number of groups is an individual matter and depends most of all on the size of the house and the amount of electrical equipment in it.

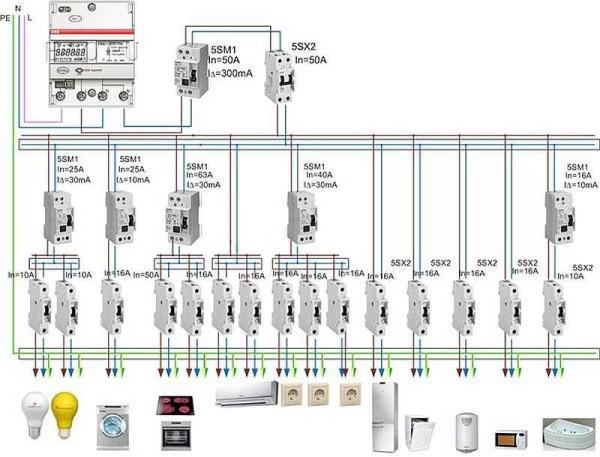
According to the number of received groups is determined by the number of automatic machines on the distribution board in the house: to the received number of groups add two or four for development (suddenly you forgot something important, or it will be necessary to include something new powerful, to divide too large or far separated group of the group into two, etc.). According to the number of groups is selected distribution board and the number of automatic machines in it: for each group is a separate automatic machine. If the private house is large – on several floors, it makes sense to put more powerful automatons on each floor, and to them to connect the automatons of the groups.
Where to put the switchboard
The norms of the place of installation of the electric switchboard is not normalized. There are only restrictions on the distance from the pipelines it must be at a distance of at least 1 meter. Pipes are taken into account any: water supply, heating, sewerage, internal drains, gas pipelines and even gas meters.
There are no restrictions on the premises. Many people put the switchboard in the boiler room: since it is a technical room, it is reasonable to collect all communications here. Accepting authorities do not make any claims. Sometimes it is more convenient to place the switchboard near the front door. If the protection class meets the requirements, there should be no complaints.
Selection of cables and accessories
Today’s standard wiring scheme of a private house includes two automatic machines. One – the entrance – is installed before the meter, usually on the street. It and the meter are sealed at commissioning. The second automatic RCD put in the house in front of the switchboard. The tripping current (disconnection) of these devices is selected so that the first automatic circuit breaker installed in the house (its current value is slightly less). Then in case of emergency you will not need to climb under the roof.

If the calculated load is less than 15 kW the scheme is standard – RCD + automatic, meter and further division into groups. With greater power consumption will need to install a transformer, its parameters and parameters of all equipment will be specified in the project.
Recently, when connecting a private house to the power grid, require to install a meter and automatic circuit breaker on the street. This requirement is not legally confirmed by anything, just so the electric service is easier to control consumption. If you want, you can fight, if not – choose a meter and automatic unit in a housing with increased dust and moisture protection – protection class not lower than IP-55. For installation inside the building, the protection should be less – IP-44, respectively, the price will be lower.
Selection of cables
For wiring in a private house, it is better to use cables, not wires. They have insulation, at least twice better, because the requirements for laying are not so tough, and it is safer to use them. All internal wiring should be made in a private house with protective grounding. Previously, there were no such requirements, but now many electrical appliances have three-pin plugs and for safe operation require grounding. Therefore, the cable must be three-core.
In electric cables, the cores are made of copper or aluminum. Although aluminum is cheaper, it is used less often: it is rigid, more often broken, it is more difficult to work with. With independent wiring in a private house and lack of experience, it can be a problem. In addition, in wooden houses inside it can not be used at all.
Determining the cross-section of conductors
After you have determined the material, you can choose the diameter of the cable cores. Do this depending on the planned load on the line according to the table.
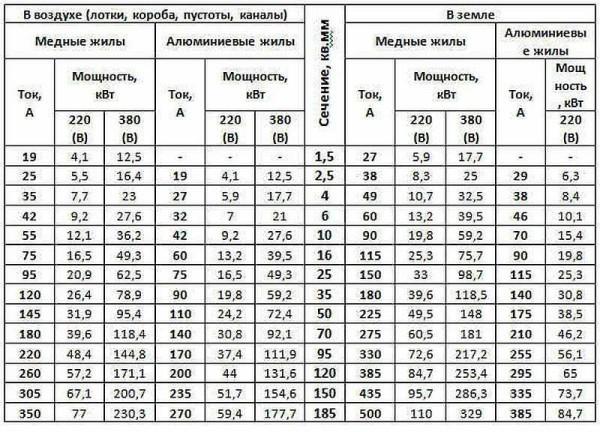
The cross section of the core is selected by the current or the power of all consumers connected to one automat. Here you will once again come in handy electrification plan of the house, where you have drawn groups of consumers. You calculate the sum of currents or powers of all devices and choose the necessary cross-section of conductors according to the table.
How to use the table? If you decide to lay copper wires, the voltage of the input is 220 V, then for internal wiring will be suitable for the left side of it, the corresponding column. Compare will compare the found power of all consumers connected to the group (it is easier to find and calculate). In the part where it comes to copper wires, laid in trays, voids, channels, column “220 V” find the nearest larger value. On this line move to the right up to the column “Cross-section, sq. mm”. The number specified here will be the required size of the conductors. From the conductors of this diameter will need to make electrical wiring from the automatic machine to outlets or switches.
To avoid confusion when calculating and laying, the cores of the same diameter denote a certain color on the plan (write down, so as not to forget what color that marked). After the diameter is determined for all consumer groups, count the length of the required cables for each size, to the found figures add a reserve of 20-25%. You have calculated the wiring for your home.
Selecting the type of sheathing
Certain requirements for the type of sheathing is only when laying electricity in wooden houses: there it is recommended to use triple (NYM) or double (VVG) cable insulation. In houses of less combustible materials can be used any insulation. The main thing is that it should be intact, without cracks, spalls and other damage. If you want to reinsure, you can use conductors with enhanced protection. This makes sense in rooms with high humidity (kitchen, bathroom, swimming pool, sauna, etc.).
Read more about how to assemble an electrical panel with your own hands here.
Selecting sockets and switches
Under some powerful appliances sockets are selected by the maximum (inrush) current. For other low-power consumers, they go standard. You need to know that there are:
- External – when the body sticks out of the wall. They are easier to install: a substrate is attached to the wall, and to it from above the socket. But such models are now used by few people, even in dachas. The reason is aesthetic: not the most attractive sight.
- Internal. Under the electrical part is made a recess in the wall, in it is installed and bricked up mounting box. Inside this box is inserted the electrical part of the socket or switch.
It is the internal electrical outlets and switches that are most often used today. They are decorated in different styles, painted in different colors. Selected mainly in the tone of the finish, and if it is impossible, put white color.
How to connect the pass switches (turn on/off the light from two or more places) read here.
Wiring with your own hands
Modern construction trends provide for hidden wiring. It can be laid in specially made grooves in the walls – grooves. After laying and fixing the cables, they are putty, comparing with the surface of the rest of the wall. If the erected walls will then be lined with sheet materials – gypsum board, gypsum board, etc., then the grooves are not needed. Cables are laid in the gap between the wall and the finish, but in this case – only in corrugated sleeves. The sheathing with the laid cables is fastened with clamps to the elements of the structure.
When laying it should be remembered that the internal wiring of a private house is done according to all the rules and recommendations. Only in this way can you guarantee safety. The main rules are as follows:
- laying wiring only vertically and horizontally, no rounded corners or beveled traces;
- all connections must be made in mounting junction boxes;
- horizontal transitions should be at a height of at least 2.5 meters, from them down the cable to the socket or switch.
A detailed plan of the route, such as the one in the photo above, should be saved. It will come in handy during repair or modernization of wiring. With him it will be necessary to check, if somewhere near it will be necessary to gouge or make a hole, hammer a nail. The main task is not to get into the cable.
Τρόποι σύνδεσης καλωδίων
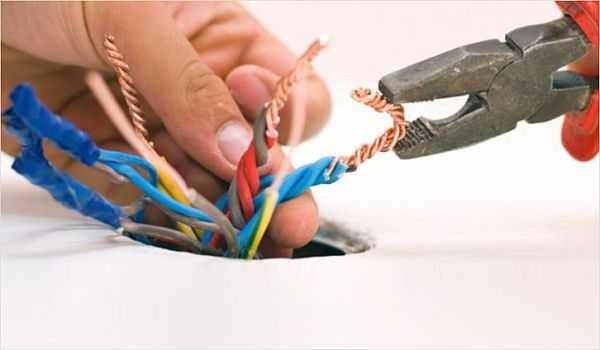
A large percentage of problems with electrical wiring comes from poor connection of wires. They can be made in several ways:
- Twisting. Only homogeneous metals or metals that do not react chemically can be connected in this way. Twist copper and aluminum can not be categorically. In other cases, the length of bare conductors must be at least 40 mm. Two wires are connected as tightly as possible, the coils are placed one near the other. The connection is wrapped with duct tape and/or shrink-wrapped. If you want the contact to be 100% and losses to be minimal, do not be lazy to solder the twist. In general, according to modern norms, this type of connection of wires is considered unreliable.

- Connection through a terminal box with screw terminals. Metal terminals are sealed in a heat-resistant plastic housing and tightened with screws. The conductor cleaned of insulation is inserted into the socket, fixed with a screw, using a screwdriver. This type of connection is the most reliable.

- Connection blocks with springs. In these devices, the contact is provided by a spring. A bare conductor is inserted into the socket, which is clamped by a spring.

Still, the most reliable methods of connection are welding and soldering. If it is possible to make a connection in this way, you can assume that you will have no problems. At least with connections.
Installation of electrical wiring in the house with your own hands requires careful fulfillment of all requirements. This is a guarantee of your privacy and the safety of your private property.
After the wires from the circuit breaker to the connection point of the outlet or switch are laid, they are checked for continuity tester – plumb the cores between themselves, checking the integrity of the conductors, and each separately to the ground – checking not damaged somewhere insulation. If the cable is not damaged, proceed to the installation of the socket or switch. Once connected, everything is once again checked with a tester. Then you can lead them to the appropriate automatic machine. It is desirable to sign the automatic machine at once: it will be easier to navigate.
Having finished the electrical wiring throughout the house, having checked everything yourself, call the specialists of the electrical laboratory. They check the condition of conductors and insulation, measure grounding and zero, according to the results give you an act (protocol) of tests. Without it, you will not be granted a permit for commissioning.

")


