

Eine der mühsamsten Arbeiten bei der Bodenbearbeitung ist das Pflügen und die Vorbereitung des Bodens für die Aussaat. Wenn Sie Maschinen haben - einen Motorblock oder einen Minitraktor - können Sie alles auf diese übertragen, aber zum Pflügen brauchen Sie einen Pflug. Der Kauf eines fertigen Pfluges ist zu kostspielig. Die Preise für Fertigerzeugnisse sind beträchtlich. Um Geld zu sparen, können Sie einen Pflug mit Ihren eigenen Händen herstellen. Dabei gibt es zwei Möglichkeiten. Die erste ist, ihn komplett selbst zu machen. Das ist ein schwieriger Weg - die Form der Teile des Pfluges ist nicht linear, mit Biegungen eines bestimmten Radius, und das Biegen von dickem Metall zu Hause ist sehr schwierig. Die zweite Möglichkeit ist, fertige Karosserien zu kaufen und den Rahmen und alle anderen Hilfsteile selbst zu montieren. Dies ist bereits eine einfachere Option, mit der es nicht schwierig ist, zu bewältigen.
-

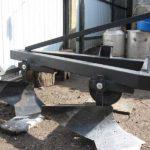
- Selbstgebauter Rahmen für einen Pflug an einem Minitraktor
-
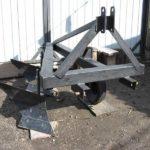
- Selbstgebauter zweischaliger Pflug auf einem Minitraktor
-
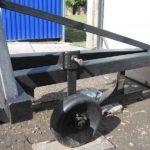
- Einbau des Stützrades
Inhalt des Artikels
Typen und Klassifizierung von Pflügen
Es gibt verschiedene Ausführungen von Pflügen:
- Pflugschar;
- Scheibe;
- drehen;
- kombiniert;
- Meißelpflüge.
Die gebräuchlichsten sind Pflugscharen. Sie wurden schon von unseren Vorfahren verwendet und werden auch heute noch auf den meisten Feldern eingesetzt. Für das Pflügen schwerer Böden, Gebiete mit hoher oder unzureichender Feuchtigkeit, werden Scheibenpflüge verwendet. Kombinierte und rotierende Pflüge sind komplexere Geräte, die sich für den Anbau von Neuland eignen. Meißelpflüge sind spezielle Geräte, die keinen Schichtwechsel vorsehen. Sie werden bedingt als Pflüge bezeichnet und sind vor allem in der privaten Landwirtschaft selten im Einsatz.
Je nach Art der Zugkraft werden die Pflüge in verschiedene Kategorien eingeteilt:
Und das ist noch nicht alles. Es gibt auch eine Klassifizierung nach Verwendungszweck: allgemein und speziell. Allzweckpflüge eignen sich für die meisten bebauten Flächen. Zu den Spezialpflügen gehören:
Dies sind nicht alle Sorten, aber die beliebtesten und am meisten verwendeten. Sie unterscheiden sich strukturell, und manchmal ernsthaft.
Konstruktion und Typen von Pflügen
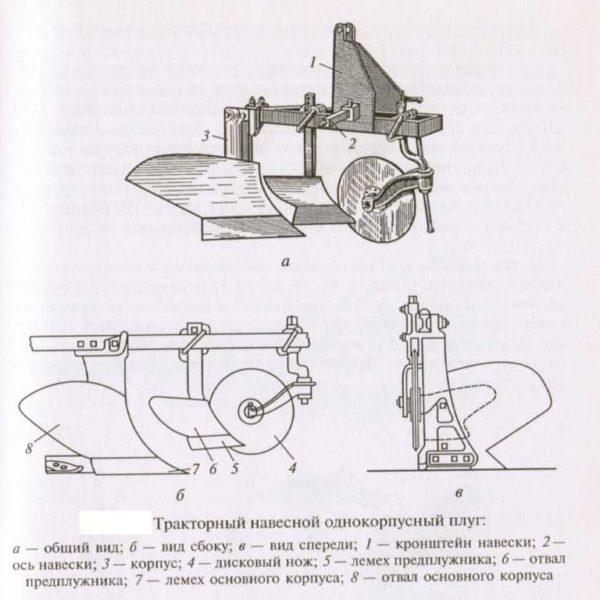
Um einen Pflug mit eigenen Händen zu bauen, müssen Sie Informationen über seine Struktur und den Zweck der Teile haben. Am häufigsten werden Pfluggeräte für allgemeine Zwecke verwendet. Sie bestehen aus mehreren Teilen, die sich bedingt in Arbeits- und Hilfsgeräte unterteilen lassen:
- arbeiten:
- Hilfsmittel:
- Rahmen - die Basis, auf der alles montiert ist, besteht aus Längsträgern, Versteifungsträgern und Abstandshaltern;
- höhenverstellbares Stützrad;
- Hubwerk - ein System zur Befestigung an einem Traktor oder einem anderen beweglichen Fahrzeug.
Wie funktioniert dieser Pflug? Der Skimmer entfernt die oberste Schicht der Erde mit den darauf wachsenden Pflanzen, dreht sie um und legt sie auf den Boden der Furche, die das Ergebnis der Arbeit des Körpers ist. Der Rumpf mit dem Gerät schneidet einen Teil des Bodens auf der Furchenseite ab, lockert ihn auf, dreht ihn in einem bestimmten Winkel (je nach Ausführung) und legt ihn auf die umgedrehte (vom Skimmer angelegte) Grasnarbe. Um die Furchenwand einzuebnen, wird ein Messer vor den letzten Pflugkörper gesetzt.
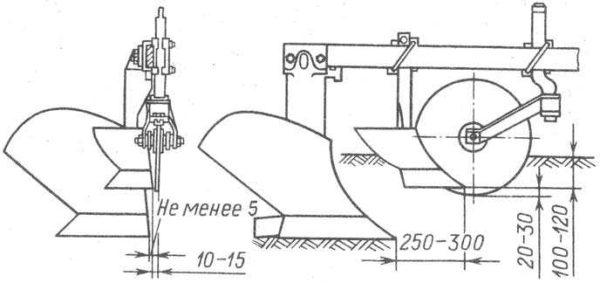
Allzweckpflüge haben eine Pflugtiefe von 20 bis 30 cm, Pflugscharen von 16 cm (auch hier fehlen Messer und Vorschneider).
Rümpfe
Nach der Anzahl der Rümpfe unterscheidet man zwischen Einhüllen-, Doppelhüllen- und Mehrhüllenpflügen. Der Rumpf besteht aus mehreren Teilen:
Das Streichblech ist die Arbeitsfläche - dieser Teil ist für die Qualität und Art des Pflügens verantwortlich. Die Bodenschicht wird mit der Pflugschar geschnitten und steigt dann zum Streichblech auf. Hier wird der Boden zerkrümelt und gewendet. Der Grad des Wendens hängt von der Form des Streichblechs ab. An der Unterseite des Körpers ist ein Feldbrett angebracht. Es soll verhindern, dass der Pflug in Richtung der bereits gepflügten Fläche abrutscht.
Wenn Sie einen Pflug mit Ihren eigenen Händen bauen wollen, müssen Sie ein Design wählen, das die Art des Bodens berücksichtigt, den Sie bearbeiten wollen. Pflugkörper sind:
Wer einen Pflug mit eigenen Händen bauen will, wählt die Form des Pflugkörpers je nach Bodenbeschaffenheit und Zielsetzung. Manchmal hängt die Wahl auch von der Art der angebauten Pflanzen ab. So erfordern beispielsweise Unterwurzelkulturen eine stärkere Lockerung, die keiner der oben genannten Pflugkörper bieten kann. Dann wird ein spezieller kombinierter Pflugkörper verwendet. Er hat ein verkürztes Streichblech und eine Pflugschar sowie einen Rotor. Beim Pflügen zerkleinert der Rotor zusätzlich die Erde, die von der Pflugschar kommt.
Das Formbrett
Das Pflugscharbrett ist eines der Arbeitsteile des Pfluges (ein Bestandteil des Körpers). Seine Aufgabe ist es, eine Schicht Erde von der Wand abzuschneiden, sie zu zerkrümeln und umzudrehen (umzukehren). Das heißt, die Qualität des Streichblechs bestimmt weitgehend, wie gut der Boden vorbereitet wird. Bei der selbständigen Herstellung eines Pfluges sollte man sich dies vor Augen halten.
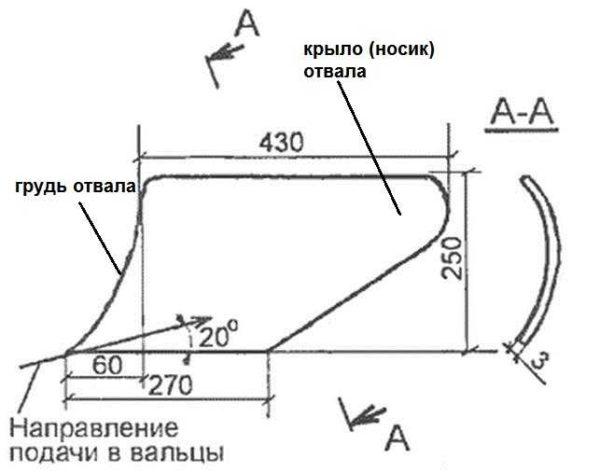
Die Schar wird aus Kohlenstoffstahlblech oder dreischichtigem Spezialstahl hergestellt. Er hat eine komplexe gekrümmte Form, die vom Grad der Bodenzerkleinerung und seinem Umsatz abhängt. Strukturell wird das Pflugscharbrett zwischen einer Brust und einem Flügel (Tülle) unterschieden.
Die Vorderseite des Streichblechs schneidet eine Erdschicht von der Furchenwand ab, zerkleinert sie und beginnt mit der Umwicklung der abgeschnittenen Schicht. Der Flügel des Streichblechs vollendet den Wickelvorgang. Wie Sie sehen, wird der Hauptteil der Arbeit von der Brust verrichtet, weshalb sie sich im Durchschnitt doppelt so schnell abnutzt. Aus diesem Grund besteht das Streichblech aus zwei Teilen. In diesem Fall kann die Messerbrust bei starker Abnutzung ausgetauscht werden. Eine weitere Besonderheit: Um die Reibung der Schicht auf der Oberfläche zu verringern, wird sie im Werk poliert.
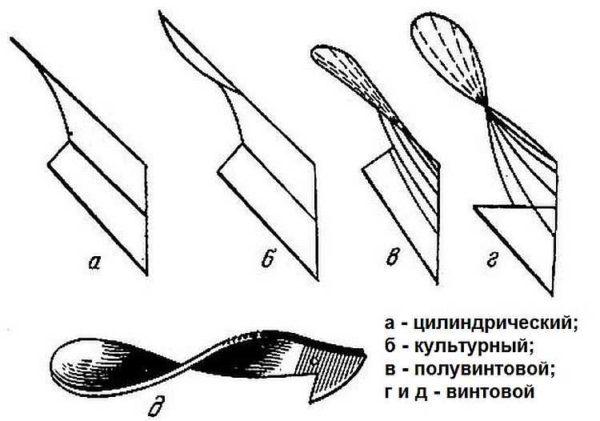
Es gibt vier Grundformen von Streichblechen, von denen jede bestimmte Eigenschaften für das Pflügen aufweist:
- Kulturschalbrett. Zerkrümelt die Schicht gut und wickelt sie ziemlich vollständig ein. Es wird zum Pflügen großer Flächen auf langem Land verwendet.
- Zylindrisch. Krümelt den Boden gut, wickelt ihn aber nicht gut ein. Daher werden Pflanzenreste in diesem Fall gleichmäßig mit dem Boden vermischt. Verwenden Sie ein solches Formbrett auf leichten Böden.
- Semi-Schraube und Schraube. Umhüllt die Schicht vollständig (Ernterückstände werden mit den Wurzeln nach oben abgelegt), krümelt aber sehr schlecht. Nach dem Pflügen mit einem Pflug mit einem solchen Streichblech weist das Feld ausgeprägte "Wellen" auf. Vor der Aussaat sollte es zusätzlich bearbeitet werden (Eggen, Fräsen usw.).
Bei der Auswahl der Materialien ist darauf zu achten, dass Schalkörper und Schar fast die gleiche Dicke haben müssen: der zulässige Wert der "Stufe" beträgt 1 mm. Auch der Spalt an der Verbindungsstelle zwischen Schar und Formbrett kann sehr klein sein - nicht mehr als 0,5 mm.
Pflugschar
Um einen Pflug mit den eigenen Händen herzustellen, muss man die Form der Pflugschar bestimmen. Die Pflugschar ist ein Teil, das die Erdschicht unterschneidet, auf dem auch die geschnittene Erdschicht aufsteigt und auf das Streichblech fällt. Für ihre Herstellung wird hochfester, gehärteter Stahl verwendet.
Das Schar wird wie folgt positioniert:
- zum Boden der Furche in einem Winkel von 22-30°;
- Die Wahl des Neigungswinkels in Bezug auf die Furchenebene hängt vom Typ des Streichblechs ab:
- 40° für ein Kulturschwert;
- zylindrisch - 45°;
- Schraube und Halbspirale - 35°.
Eine solche Anordnung bietet den geringsten Widerstand beim Vorwärtskommen, und die Klinge schneidet Wurzeln gut durch und zerbricht Erdklumpen, die auf ihrer Oberfläche abrutschen.
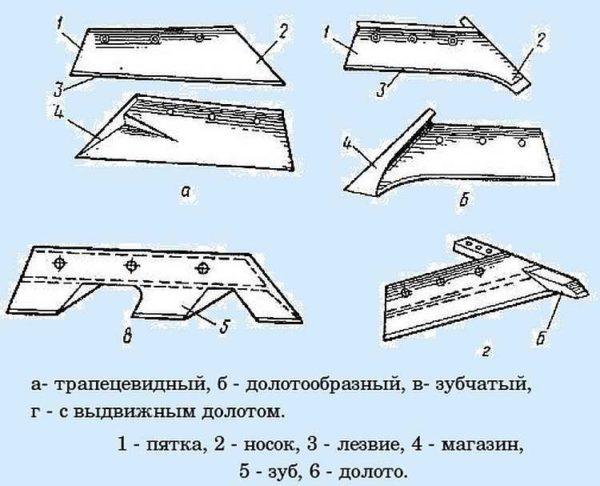
Pflugscharen gibt es in verschiedenen Formen (auf dem Foto oben). Herstellung eines Pfluges mit ihren eigenen Händen, werden sie je nach der Art des Bodens und der Komplexität der Herstellung gewählt:
- Trapezförmig. Am einfachsten in der Herstellung, gut in der Hinsicht, dass der Boden der Furche bei der Verwendung gleichmäßig ausfällt. Der Nachteil ist die schnelle Abnutzung und die Schwierigkeit, die Furche zu vertiefen. Aus diesem Grund werden Trapezschare am häufigsten auf Flächen eingesetzt, die schon lange bewirtschaftet werden. Um die schnelle Abnutzung auszugleichen, wird auf der Rückseite der Pflugscharen ein Lager angelegt. Wenn die Pflugscharen wieder herausgezogen werden, ist ein Teil der Reserve verschwunden.
- Gezahnt und mit einem einziehbaren Meißel. Diese Arten von Pflugscharen werden auf schweren Böden (Lehm, Ton) und dort, wo es viele Steine gibt, verwendet.
- Meißelförmig. Er zeichnet sich durch das Vorhandensein eines scharfen, nach vorne gerichteten Vorsprungs aus, dem Spike. Dieser Vorsprung reicht seitlich um 5 mm und nach unten um 10 mm über das Feld hinaus. Eine solche Biegung trägt dazu bei, dass der Pflug mit einer solchen Pflugschar besser und schneller eintaucht und gleichmäßiger pflügt. Um den Verschleiß auszugleichen, wird außerdem ein "Speicher" - eine Längenreserve - angelegt. Pflüge mit meißelförmigen Scharen werden auf schweren Böden eingesetzt.
Von all diesen Typen sind meißelförmige Pflugscharen am weitesten verbreitet. Sie sind stabiler im Betrieb, und beim Pflügen gibt es keine Probleme: Der Pflug lässt sich leicht auf die gewünschte Tiefe absenken.
Wenn die Pflugscharen verschleißen, werden sie zurückgezogen - schärfen Sie die Schneide. Tun Sie dies regelmäßig, denn mit einer stumpfen Klinge (Breite von mehr als 3 mm) erhöht sich der Widerstand des Pfluges um 50%. Daher ist es rentabler, das Gerät rechtzeitig zu überprüfen und zu warten.
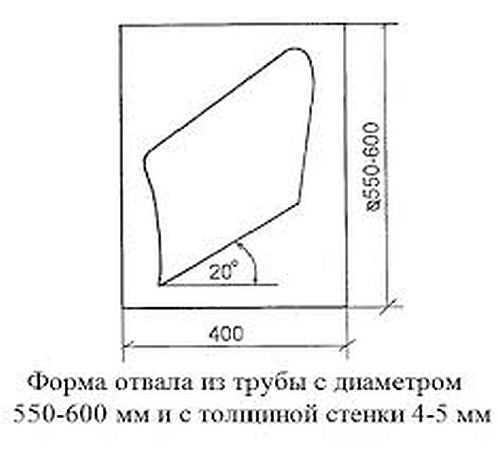
Zeichnungen
Wenn man einen Pflug mit den eigenen Händen machen will, muss man ein Muster zur Nachahmung haben. Wenn es einen alten Pflug gibt, kann man einen neuen nach seinem Vorbild herstellen. Und wenn es so etwas nicht gibt, werden Zeichnungen nützlich sein. Berücksichtigen Sie nur die Parameter Ihrer Technik, an denen Sie ihn befestigen werden.
Detaillierung einiger Abmessungen.


Kumpel, einen Pflug zu bauen klingt nach einem Riesenspaß! Ich erinnere mich, wie mein Kumpel und ich zum Spaß versucht haben, landwirtschaftliche Werkzeuge selbst zu bauen, und es war ein totaler Umschwung. Wir schnappten uns einfach etwas Schrott und machten uns ans Werk! Ich kann es kaum erwarten, das auszuprobieren!
Back when I was helping my grandpa on the farm, we whipped up a makeshift plow using scrap metal and an old tire. It was super satisfying seeing it work in the field. Nothing beats that hands-on experience in farming, right? Who knew DIY could be so fun?