

Even the most reliable faucets start to leak over time – they leak or drip. You don’t always need to call a plumber to fix a faucet. Most breakdowns can be eliminated on your own. But, before you repair a dripping faucet, you need to understand its design and the order of work.
Artiklens indhold
Typer
Let’s start with definitions. There are taps and faucets in the bathroom and not in the kitchen. Taps only supply water, faucets also allow you to regulate its temperature, mixing two streams – cold and hot water. In this article we will talk specifically about faucets and how to repair them. Repair of faucets is very similar, but has its own features. By the way, you can read about the repair of single-lever faucets here.
Faucets for the bathroom or kitchen are of several types:
Their device is different, so that the repair, even with the same damage, is significantly different. Therefore, each of the types will be considered separately.
Self-repair of the valve faucet
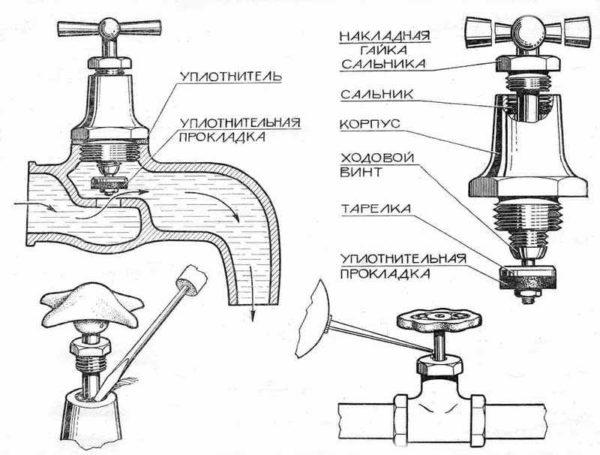
Valve taps can be called a classic of water supply. And, although they are gradually being displaced by new designs, there are still plenty of them. Their internal structure for decades has not changed. Only the design has changed – became more diverse and refined. Today you can find both the most ordinary models, and very exotic.
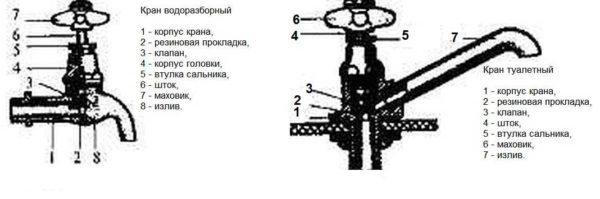
Water taps of this type are still used, as they are simple and reliable, serve not for years, but for decades. If all the “stuffing” is of proper quality, all that during this time can fail is the gaskets. Their replacement is the main way to fix the valve faucet.
Replacing the rubber gasket
If the faucet in the kitchen or bathroom continues to drip when the valve is completely closed, most likely the reason is in the lost elasticity of the gasket on the valve (see the photo in the next paragraph). It is no longer tightly pressed to the seat, because of which the water continues to flow and sometimes the faucet does not just drip, but even leaks. To fix the faucet in this case – replace the gasket. To do this, you will need a wrench, or better – an adjustable wrench and a set of gaskets.
Before fixing the dripping faucet, you turn off the water supply (you can completely, you can only in this branch, if possible). Then it is not unreasonable to make sure that the water is shut off. Water does not flow – start repairing. Need a wrench or adjustable wrench. It will be necessary to unscrew the head housing (the upper part of the housing).
It is better to work with an adjustable wrench. In order not to damage the surface during the operation, wrap a soft cloth around it, and then apply the wrench. Having unscrewed the head, you take out the valve. Now you can replace the gasket or put a new valve. Undermine the old one with something sharp – you can use a screwdriver with a flat blade, you can use an awl, etc.
When choosing a gasket, pay attention to the fact that its edges should be beveled at about 45 °, otherwise the plumbing will be noisy when working. If you do not have one in your arsenal, you can trim the edge with something sharp – a knife or scissors.
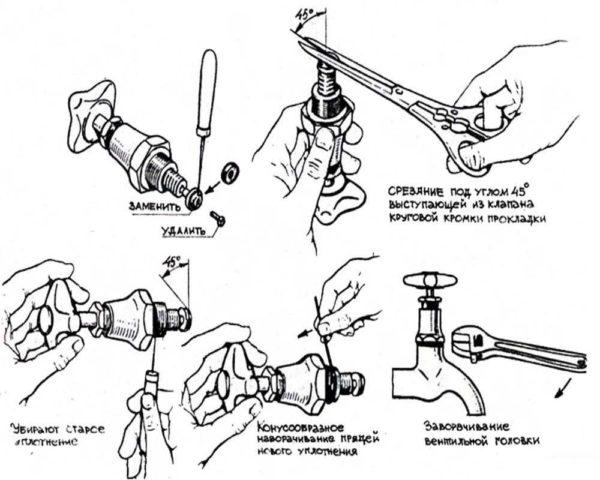
If you don’t have a suitable gasket, you can cut it out of a sheet of thick rubber (porous rubber is not suitable). The thickness of the rubber sheet or gasket is 3.5 mm, the inner diameter is slightly less than the stem diameter, the outer diameter should not protrude. Do not forget the 45° beveled edges.
Having installed the gasket, put the valve in place, screw the head. Newer models do not require a winding on the thread. Not only that, winding is contraindicated – it can cause a crack in the body. If the old USSR-era faucet is being repaired, the thread is placed on the soap, lubricated with packing paste, then screwed. After that, you can slowly turn on the water.
Sometimes with this gasket on the valve is the opposite story – the water does not flow or barely oozes. In this case, the gasket has come off the stem and blocked the flow of water. First you can try a couple of times to open/close the valve, and if it does not help – it is necessary to repeat the above operation, that is, to repair the valve by replacing the gasket. Just do not forget to remove the old, stuck to the seat.
Water oozes from under the stem
If water is dripping from under the valve, most likely the glands are worn out. There are two ways to fix a faucet with a leak from under the stem. First, you can try to tighten the body of the head. Do this again with an adjustable wrench. It is undesirable to use pliers, as they leave marks. Tighten the head as far as possible (just do not overdo it).
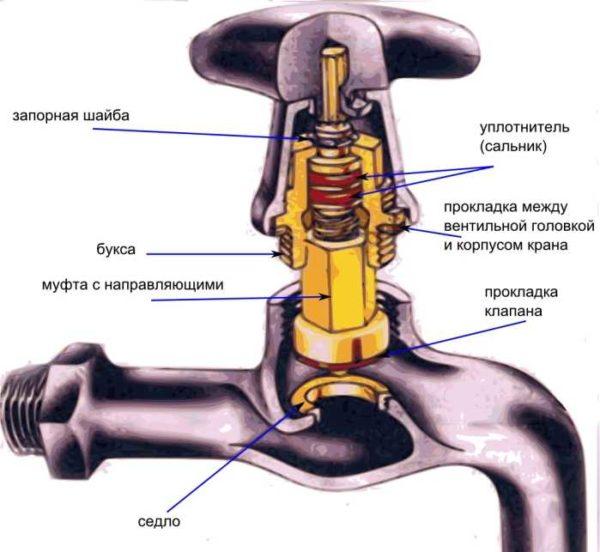
If the thread is tightened to the maximum, and water continues to ooze, it is necessary to replace the gaskets on the gland. To do this, first tighten the valve to the limit, then remove the valve head again, pry up with something sharp and remove both rubber rings, replacing them with new ones.
Water is not shut off
If the gasket is changed, but the water is not blocked, when turning the faucet is torn threads, it is necessary to change the stem – the thread on it is worn out. There are two options here – to replace the stem itself or the entire valve head.
If the threads are not worn out, the gasket is new, but the valve is leaking, inspect the seat. There may be a scour hole in the seat. It is formed gradually – it is washed out by high-pressure water. If the gasket is not pressed tightly in some place, this is where the sink will form. Sometimes the water undercuts the entire circumference, creating sharp edges that quickly damage the gasket. The sinkhole and sharp edge must be removed. Take an ordinary screwdriver and running it along the edge blunt the sharp edge. The same operation can be done with a natfile or a piece of sandpaper with a fine grain. The main thing to achieve an even (as far as possible) and not sharp edge.
How to repair a faucet with a cartridge
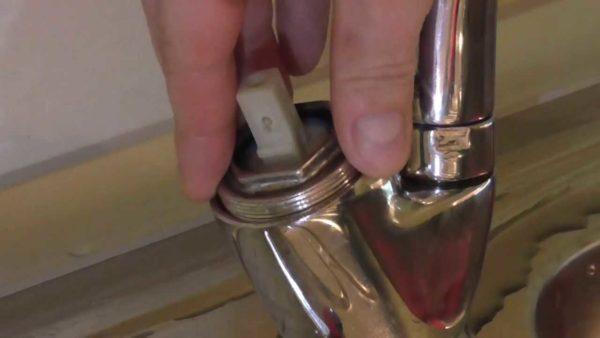
Most often in the bathroom or in the kitchen put taps with a single lever. They are also called flag or single-lever faucets. For opening/closing water in it is responsible for a special device – a cartridge, so they are also called cartridge.
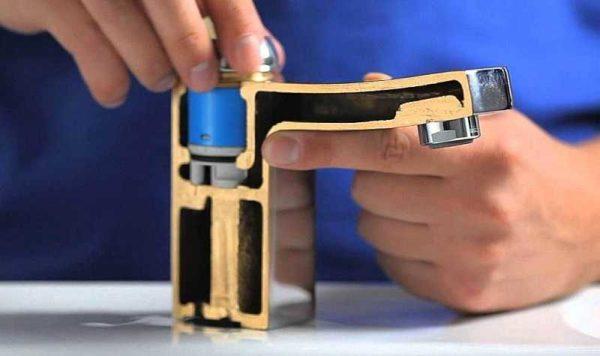
Inside the cartridge there are two plates with holes. The lower one is fixed rigidly, and the upper one is movable. To it is attached to the stem, and he in turn – to the handle. Turning the handle, we move the rod, and he moves the movable plate, which opens/closes the water and changes its pressure.
If there are problems with such a faucet, it can only be repaired by replacing the cartridge. The main malfunction in them – they start to leak – water oozes or drips from under the handle. To repair a current or dripping cartridge faucet you have to replace the cartridge. It’s the only way to do it.
Replacing the cartridge
The first thing to do is to shut off the water, then – remove the handle. To do this, first remove the colored plug – it closes the screw. Having unscrewed the screw, the handle is pulled upward, separating it from the stem. After the handle is removed, unscrew the pressure ring – it holds the cartridge. Now it remains only to take it out.
Then, together with the cartridge, you need to go to the store or market, buy exactly the same. The new one should match the dimensions, the holes in its bottom part should have the same shape and location. In general, you need to find an exact copy.
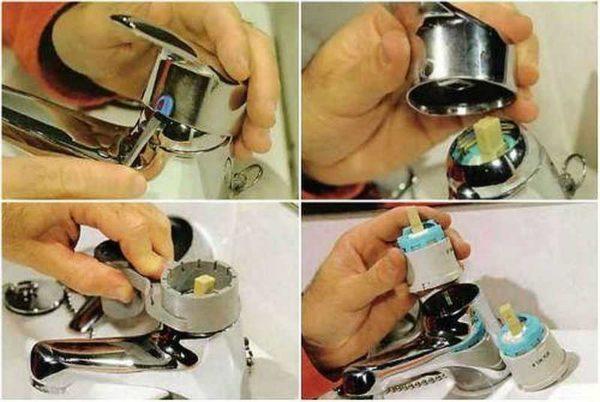
Assembly takes place in the reverse order:
- put the cartridge (strictly vertically, slightly twisting around its axis, so that the protrusions in the body fall into the notches on the cartridge),
- tighten the pressure nut;
- install the handle;
- screw in the fixing screw;
- insert the plug.
An initial check can be made after the pressure ring has been installed. You can open the water and check whether the faucet is now leaking.
If the water flow has become too weak
Most modern faucets have a mesh on the spout that traps solids that may be contained in the water supply. If gradually the water stream became not so elastic, and the pressure on other faucets did not change, the reason is the clogging of this very mesh. In this case, you can fix the faucet in a couple of minutes.

Unscrew the nut with the grid, which is located at the end of the spout. Wash it, clean the clogged holes (you can use a needle or an old toothbrush). Put the cleaned mesh back in place.


