

On a country plot or near the house there are usually three favorite places for recreation: veranda, gazebo, swings and pond. Even a small pond attracts people around it like a magnet. Water is mesmerizing even in small quantities … And the pond with your own hands can be built in a few hours. But this is a small artificial pond. To build a large one will require both money and time.
Artiklens indhold
Where to dig
Small artificial ponds are best viewed from above. Therefore, if there is an appropriate depression on the site, it is best to make it here. There is, however, a negative side to this: you will have to raise the edges of the bowl higher, so that rainwater does not get inside. The second option is to come up with a system of water removal (above the reservoir to make a drainage system).
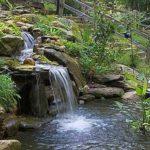
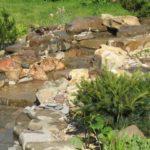
If there is a key somewhere on the site, it is logical to make a natural pond, digging or deepening the existing bowl, laying cobblestones or stones its boundaries, plant plants. The brook, which is necessarily in this case, can also be ennobled, laying out its edges with cobblestones, sinking them into the soaked soil, you will give greater strength to the bank, between them you can plant moisture-loving plants.
-

- Covering the bank with stones, you will avoid soil washout
-
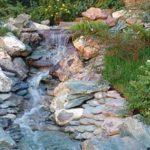
- Even a small waterfall is a magical sight
-
- How to dam a pond, if there is a natural stream on your plot – dig a pit, cover it with a stone and direct the stream into it.
-
- How to make a brook if you don’t have one on your property
Not everyone on the plot has such a luxury as a stream or a key. It is necessary to make artificial reservoirs. With proper design, they look no worse than natural ones.
How to make an artificial pond with a bowl (without a film)
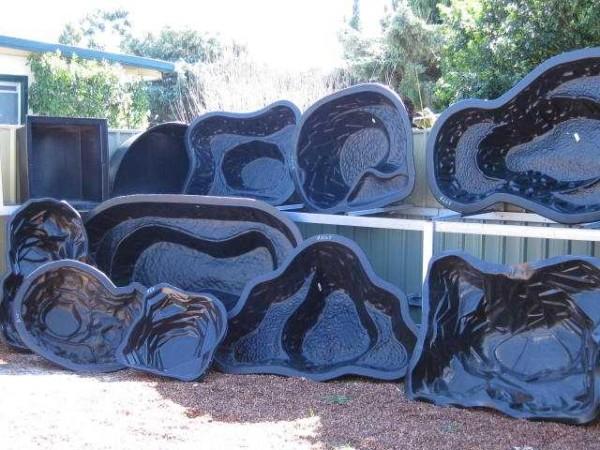
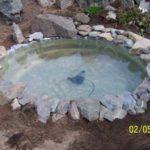
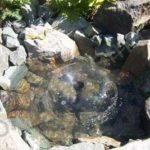
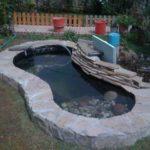
The easiest and fastest way to make an artificial pond in the dacha is to bury a ready-made bowl in the ground, formalizing and decorating its edges. There are plastic bowls – ready-made of different shapes, sizes and colors (mostly blue, green and black).
The arrangement of a plastic garden or dacha pond is not a complicated matter. Here are the step-by-step instructions:
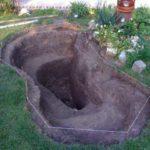
- It is necessary to dig an excavation according to the shape of the bowl. If the shape is very non-standard, you can turn it upside down in the place of installation, outline something contour (at least dig a shovel). The bowl is taken to the side, dig an excavation. It should be a little larger in size – a little wider, but not deeper. The edges or should be at the same level with the ground, or slightly protrude. If you can raise the edges a little, it will be even better: during rain, dirty water will not flow in.
- After the desired depth is reached, the bottom is leveled to the horizon: it is leveled first with a shovel, then compacted and a flat bar to remove the excess. The surface must be level and rigid: the plastic must be well supported. If the ground is poorly leveled (clay), you can pour 5-10 cm of sand, wet it and tamp it.
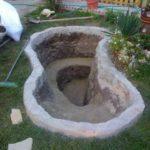
- The next stage is the installation of the bowl in the excavation. If the bottom was made flat, the edges of the bowl will become level with respect to the horizon. Now the space that remains between the wall of the bowl and the excavation should be filled with soil or sand and well tamped.
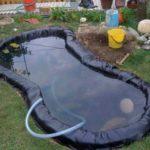
- Now it’s a matter of decoration: the installation is finished, you can pour water.
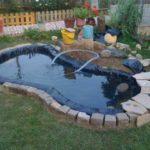
How this technology built a pond in the yard with backlighting, see in this photo report (you can browse the photo gallery yourself by clicking on the thumbnails below).
But not always and not everywhere there is an opportunity to constantly add and divert water to the pond. Then you will either have to plant such plants that will clean it, or periodically change it.
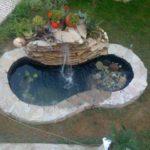
Pond from an old bathtub
It is not at all necessary to buy a bowl. You can use any container. Even an old bathtub. It turns out very well. All actions are the same, first digging a pit, in it put the bathtub, what goes on look at a series of the following photos. On them, the pond from the old bathtub is transformed into a really lovely corner.
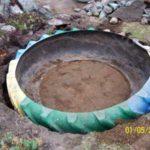
Pond from an auto tire (with film)
A mini-pond can be made from an old car tire, or rather from a tire. The bigger it is, the bigger and the pond. The most difficult thing in this case is to cut off one side part. If as a result the edges turned out sharp, they need to be treated with sandpaper. The second most difficult task is to dig a hole of the right size. This is the end of the difficulties. The rest is quite easy.
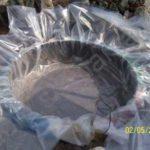
The cut tire is installed in the pit, poured on the sides with earth, well compacted. Also earth or sand is poured inside, the bottom is leveled. Take a piece of dense polyethylene film, you can roll up in half and cover the resulting tank. Do not try too hard: pour water, it will spread the film itself.
Instead of polyethylene can take a banner film (there are advertising firms that make outdoor advertising) or a piece of special for pools and ponds. They are much stronger (but more expensive).
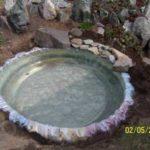
The protruding ends of the film are tucked around the walls of your pond, decorated with stones. The pond arrangement is over, further – decorating and planting plants. See how to make a pond from a tire in the photo report.
-
- The cut tire is installed in the dug hole, pour a little earth inside, leveling the bottom
-
- The film is covered. It will hold the water
-
- Water is poured, the film is finally smoothed, you can wrap the edges and press them with stones.
-
- The next stage of making a mini-pond for a dacha is decorating the edges with stones
-
- To revitalize the picture, the bottom is also lined with stones, installed a pump for an aquarium.
-
- Water, overflowing over the edge when the pump is turned on, is spread over the site: we made mini streams, along the edges of which we planted flowers. And the mini pond now gives life to a vast area planted with plants
That’s for sure nothing complicated in such a device is not. Such a pond in the dacha with their own hands can build anyone, and the investment is minimal.
In general, mini-ponds are made from tanks, barrels, pots, even flower pots. The main thing that there was a case, and to formalize it is not very difficult: gradually comes experience. They put them in the garden, at the dacha, near the house. It is possible to bring water, make a stream, it can be placed under trees, for example, or shrubs. And beauty and usefulness at the same time.
About the basics of landscape design read here.
Making a pond with a film
Creating this artificial pond from the film, you almost exactly repeat the work described above, only without installing the bowl:
- mark out the shape of the future pond;
- dig an excavation, forming, if necessary, ledges;
- clean the bottom from any sharp objects: roots, stones, etc..;
- level the banks of your pond;
- spread the waterproofing film;
- fill the pond with water;
- fix the edges of the film;
- decorate.
Dacha pond created by this technology can be more solid sizes. An important point: on loose soil to make a simple excavation and put the film will not work. You will have to invent some measures to strengthen the banks. In this case, you will have to either put a bowl, or make a more serious structure – made of brick or concrete. Next, we will consider examples of how to inexpensively make a pond from the film.
The first project: boards flush with the ground
Eight simple steps and your pond at the dacha is built. How to dig and equip a pond in the dacha, make it look like a natural one, see in the photo report.
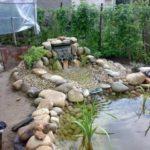
The second project: the sides are raised
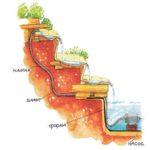
The second version of the homemade pond at the first stages is built almost the same as the first. Only after the depth of the excavation reached the design depth, the sides were raised, lining the edge with bricks and concreting. It turned out to be a pond with raised sides. The water circulation system was also made. It is presented in the picture below.
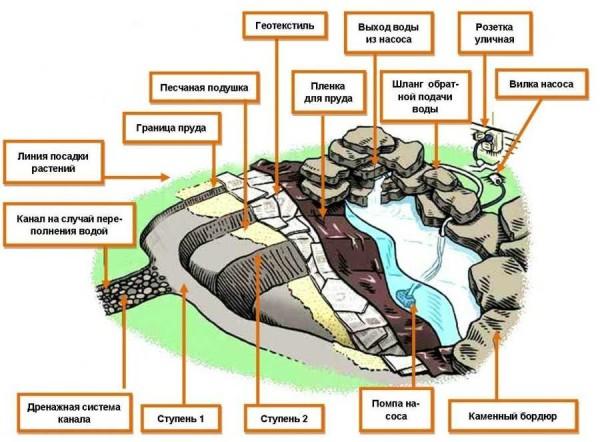
As you can see, this pond is more layered and its literage is more serious. If you want to have a pond of at least average size and do not build a serious bowl, you can do as shown in the figure: fill the created pit with sand, cover with geotextile, and only on top lay the film. Geotextile evenly distributes the load and does not allow plants to sprout. This is especially true if you are building a pond in the garden and there are bushes or trees nearby.
-
- After marking out the site, dig the pit
-
- The sides are raised: bricks are laid out and buried at half the height, concreted on top
-
- The foil is laid, water is poured in, the edges are wrapped around the boards.
-
- A decorative stone is laid along the outer edge, extending the edge. On top, covering the edge wrapped with film, sawed finishing stone is laid on the cement
-
- The curb is finished, we start to form the stream, covering the pump body.
-
- This is how it looks like before the plants have grown up
-
- The plants have grown up and the decorative pond is ready.
-
- Another angle
About how to make a fountain with your own hands read here.
Serious projects: from brick and concrete
If you want to have a large pond in the dacha, and you want to build it with your own hands, you will have to study the topic on the construction of pools. First, the construction of bowls – one in one repeats all the stages. Even the forms are sometimes made stepped. True, the banks are not decorated with plants, and do not plant them in the pool itself … But the construction process itself, with reinforcement, plastering, waterproofing is the same. Not only that, the water supply and water treatment system is also similar. Except that ponds don’t use chemical treatment methods, but filters, skimmers, and ultraviolet can be used.
In general, a large pond – not a cheap pleasure. And costs require not only construction, but also the maintenance of a large pond in normal condition: filters need to be regularly cleaned and change cartridges or backfill. But the pleasure, of course, a huge …
About the organization and construction of a waterfall on the site, read here.
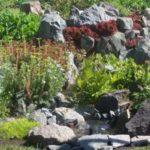
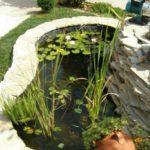
Plants for the pond
Forming or choosing a bowl, take into account not only its shape and depth. If you want plants to grow in the pond, you need a swampy coastal area. If you form the pond with the help of a film, you can make approximately such a profile, as in the picture.
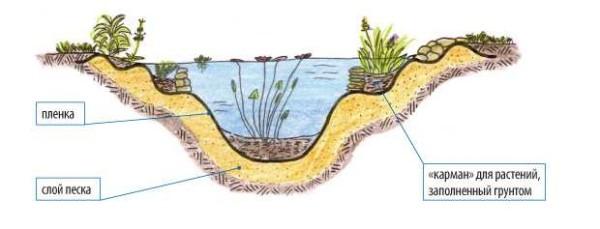
It is more convenient to do this if you pour the excavation with a layer of sand at least 15 cm thick. With its help, you will be able to make the relief as you like. To make the work easier and the film will not tear, put geotextile on the sand. This thin membrane is very tear-resistant. You can do what you want and you will not tear it. Having formed with its help the desired relief of the bottom, you can lay the film and lay stones on it, pour water and plant plants for the pond at different levels.
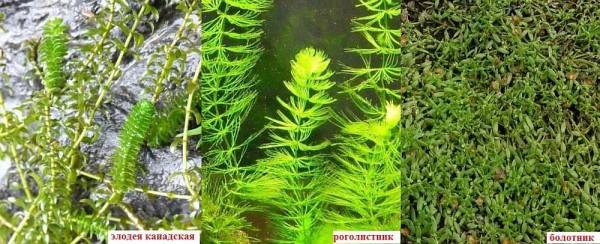
To ensure that there was enough oxygen in the water, you can plant elodea Canadian, hornwort and bog. They are in the photo below. Planted in the water are aquatic plants.
Deep-water
They are planted in the deepest place, on the bottom in special pots with a large number of holes. In the pot, the soil around the roots of the plant is well crimped and filled with small gravel. Stones prevent leaching and do not allow fish (if the pond with fish) to dig it up.
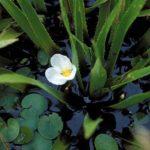
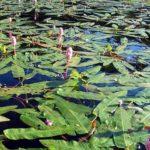
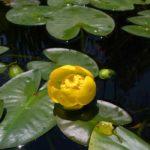
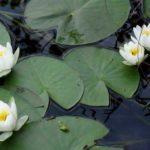
Best of all feel in artificial ponds goblets (dwarf, multi-petal and parish), lilies (white and hybrid), floating rdesta, telorez ordinary.
-
- Common teloresis
-
- Floating rdesta
-
- Multipetal lily
-
- White water lily
Shallow water
This type of plants can be planted close to the shore or at medium depth, sometimes even close to the shore in an almost dry place. The method of planting is similar: in containers with soil, sprinkled with fine gravel. Only this time in order to limit the growth of plants: in good conditions grow very quickly.
Deep-water and shallow-water plants should not be more than 30%, otherwise most of the water surface will be covered with leaves, and this is already – a swamp. Suitable for artificial reservoirs are the following types of plants: cereal and marsh aire, marsh calla, three-leaved vahta, tabernamontana reed, common and broad-leaved strelolist, whorled and regular-leaved uruta. Some of these plants for a dacha pond are in the photo below.
Coastal
These plants grow well on overwatered soil. They are planted in groups, more low-growing closer to the shore, then higher. When decorating an artificial reservoir, do not plant the banks abundantly in the first year. A year later you will have to fight with their overgrowth. If you choose to plant a tree or shrub, do not place it close, so that it does not cover the pond. There are a lot of plants, here are just a few: Astilbe Chinese
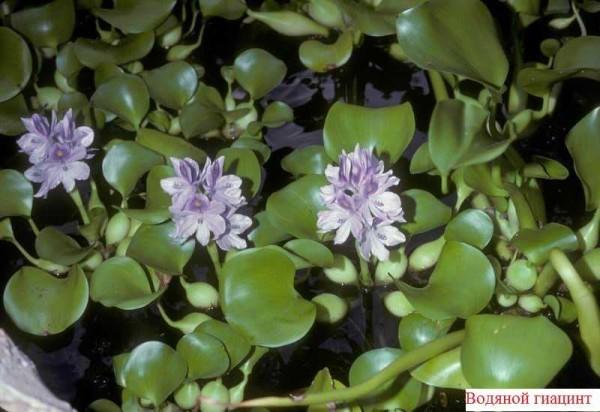
To keep the water in the pond from blooming it is important, of course, to have filters, but there are natural filters. These are also plants: Water hyacinth, which is also called Eichhornia excellent and beautiful.
Now you can not only make a pond with your own hands, but also plant it with beautiful plants.


Making a pond at the dacha is such a vibe! I remember digging mine with my buddies last summer. We added some cool plants and fish, and it became our go-to chill spot. Can’t wait for barbecues by the water this season! Totally recommend it for some backyard fun!