

The washing machine must be connected to three networks at once: water, sewerage and electricity. It is therefore necessary to choose a place for installation so that all three systems are located close to each other or it is possible to connect them there. Optimal for the installation of a washing machine are considered to be the bath, toilet and kitchen – they have all the necessary communications. Most often they require a little modification, but connect the washing machine to the communications is not very difficult and everything can be done with your own hands.
Contents of the article
Placement options
There are several places where you can put the washing machine:
- toilet;
- bathroom or combined bathroom;
- kitchen;
- corridor.
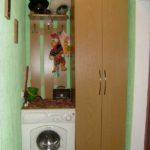
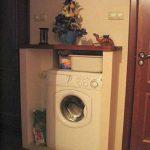
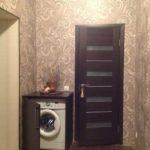
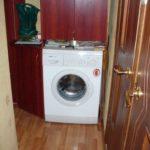
The most problematic option is the corridor. Usually there are no required communications in the corridor – neither sewerage nor water. You will have to “pull” them to the place of installation, which is not easy at all. But sometimes this is the only option. In the photo below there are several interesting solutions for how you can put the machine in the hallway.
-

- The photo shows a variant of installing a washing machine in a narrow corridor
-
- Make something similar to a portal – also a way out
-
- Hide it in a nightstand
-
- Build into the hallway furniture
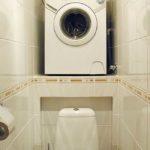
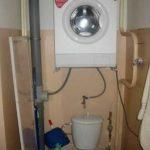
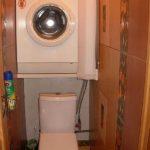
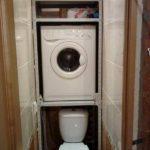
In the toilet, all communications are available, but in typical high-rise buildings, the size of this room is such that it is sometimes hard to turn around there – there is no space at all. In this case, they put washing machines above the toilet. To do this, make a shelf so that sitting on the toilet bowl it did not touch her head. It is clear that it should be very strong and reliable, and the machine with very good shock absorbers. In addition, they must be aligned perfectly, otherwise it can “jump” when squeezing. In general, with this method of installation of the washing machine, it will not hurt to make a few strips that will not let it fall off the shelf.
-
- The shelf is capital and reliable, but slippery – you need a rubber mat under the legs for cushioning
-
- Powerful corners are cast into the wall, and the washing machine is installed on them. Plastic stops were removed from the legs, and holes were drilled in the corners for the remaining screws. The fixation is reliable, it is only important that the vibration does not tear the corners out of the wall
-
- You can close it with vertical blinds.
-
- It’s already a whole cabinet. Only the doors are missing.
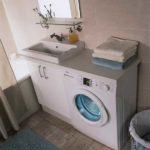
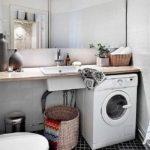
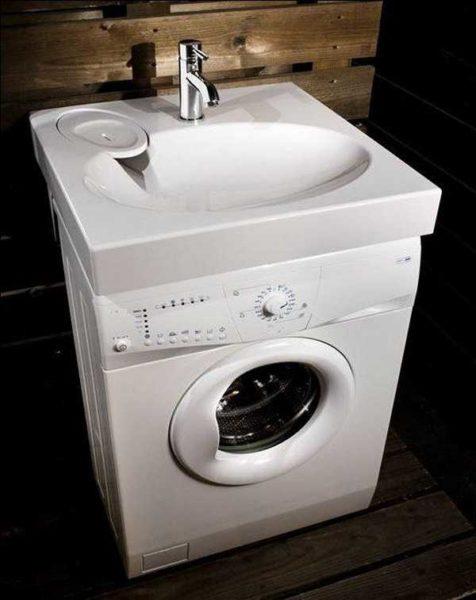
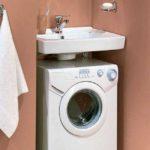
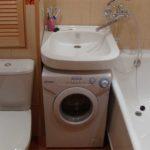
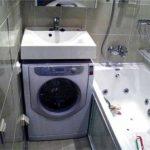
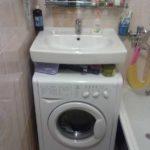
In the bathroom and combined bathroom there is usually not much space, but still more than in the toilet. There is a choice here. If there is space, you can put the washing machine next to the sink. From above you can install a countertop, which will be the logical conclusion, and also solve the problem of water getting on the body. To make everything look organic, you need to choose a machine of such a height that it fits into the size, and the sink itself is better square – they will then become wall to wall. If there is not enough space, you can push at least part of the body under the sink.
-
- Put the washing machine next to the sink
-
- The now fashionable bathroom countertops can be finished with mosaics
-
- If space permits, simply place the washing machine next to the sink.
There is a more compact way to put the washing machine under the sink. Only the sink needs a special shape, so that the siphon is installed at the back.

The next option for installing a washing machine is on the side of the bathtub, between its side and the wall. Today, the size of enclosures can be narrow, so this option is a reality.
-
- Narrow enclosures are no longer a rarity
-
- Between the bathtub and the toilet
-
- The sink should not be smaller than the cabinet
-
- No one prevents you from installing a sink on top
Just be aware, to put in the bathroom or combined bathroom such a technique is not the best idea. Because of the increased humidity, the body begins to rust quickly (tested on my own experience). However, the space is usually not very much, although in principle, you can put the machine under the washbasin or hang shelves over it. In general, it’s up to you.
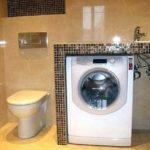
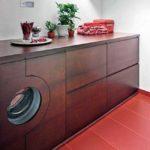
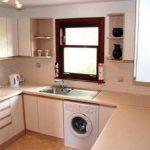
Another popular place to install a washing machine in the kitchen. It is built into the kitchen set. Sometimes closed with doors, sometimes not. This is already at the discretion of the owners. A few interesting photos in the gallery.
-
- Doors with a cutout under the “porthole”
-
- Put in the kitchen cabinet

-
- In the kitchen set the washing machine looks quite organically
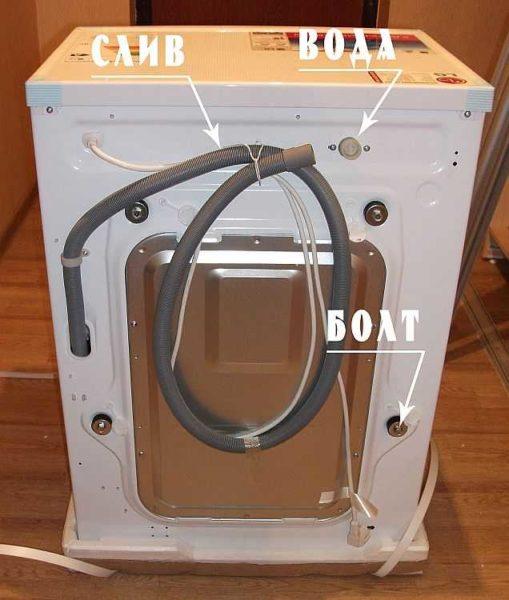
Removing the transportation bolts
Before you connect the washing machine, it must be unpacked and remove the mounting bolts and put plugs instead.
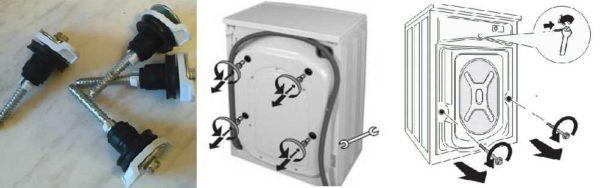
This procedure is mandatory immediately after unpacking. If you leave the bolts and turn on the machine, it will break. And this is not a warranty case. The number of bolts differs from manufacturer to manufacturer, but the scheme of their installation is in the instruction manual, and on the back wall they are visible. Just take a screwdriver and unscrew, the opened hole is closed with a plug.
Connection to the water supply
First of all, to what water connect the washing machine. In general, to cold water. Water is then heated by heating elements as necessary. Some owners in order to save money connect to hot water. So when washing less electricity is consumed. But the economy is doubtful, more hot water is used. If a meter is installed on the DHW, it is cheaper to pay for electricity than for hot water. It is also worth considering that connecting the washing machine to hot water is not very good in relation to the laundry: from the temperature, proteins curdle and then poorly laundered.
This was about ordinary washing machines, but there are models that are connected to both hot water and cold water. They have not one water inlet on the back wall, but two. In our country they are very rare, there is too little demand, and the prices for such equipment are much higher.
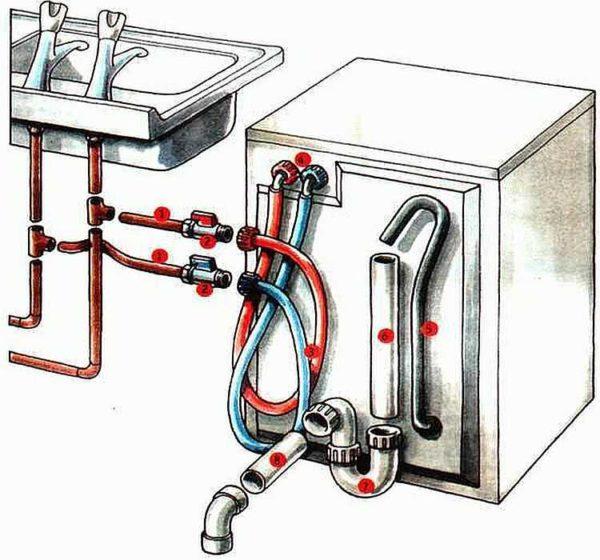
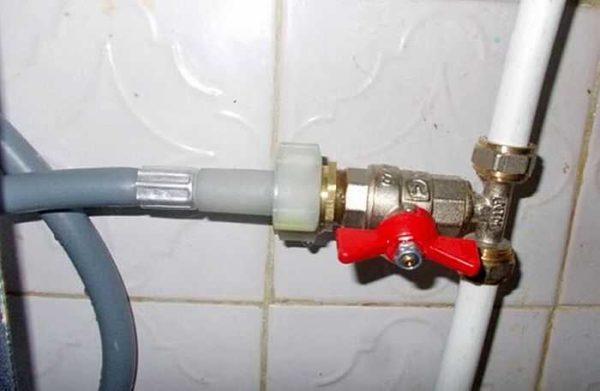
Now about the connection itself. Included with the washing machine is a rubber hose, which should be used to connect the washing machine to water. Its length is 70-80 cm, which is not always enough. If necessary, you can buy a longer one (3 meters is not the limit, it seems) in stores selling plumbing.
This hose is screwed onto the corresponding outlet on the back wall. There should be a sealing rubber gasket, so there is no need to wind it up. Tighten the hose cap nut (plastic) with your hands, if you use wrenches, just tighten it by half a turn. No more.
The other end of the hose should be connected to the plumbing system. If you have a free outlet somewhere, ending with a faucet – great, if not, you need to make a tapping.
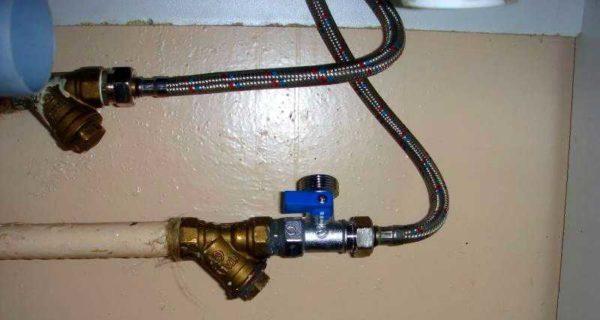
It is easiest with plastic, polypropylene or metal-plastic pipes – buy a tee (with one transition to metal), soldered/installed. If the water supply is divorced by metal pipe, cut tee will have to be welded.
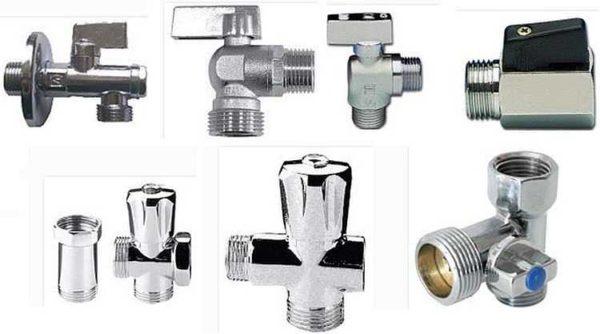
In any case, after the tee put a faucet. A simpler and cheaper ball valve. When installing it, you can wrap linseed oil on the thread and lubricate with paste.
There are tees with taps for connecting washing machines and other household appliances. In one of the branches, a ball valve is already installed and everything is made in one body. It looks more compact, but in case of failure of the tap you will have to change the whole tee.
Sometimes it is advised to put a filter before the faucet. Of course, it will not be superfluous, but if there is a filter at the entrance to the apartment or house, there is no urgent need for it.
Where to lead the drain hose
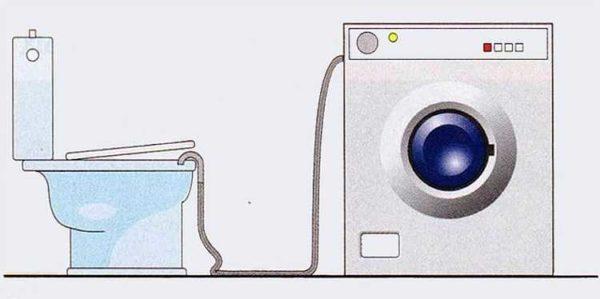
If there is a sink or sink siphon nearby, there are no problems. You will not even have to remake the sewer system. It will be necessary to buy a special siphon with an outlet for connecting washing machines and other household appliances and install it instead of the old one.

More options to connect the washing machine to the sewer directly. To do this, you can:
All these methods require reworking the pipeline, but the connection will be capital. There is one point: the diameter of the drain hose is much smaller than the size of the sewer gadfly. To ensure tightness and guarantee the absence of odors, special rubber sleeves are inserted into the branches. The hose is simply plugged into them. The elastic edge of the cuff crimps it, and the connection is ready.
There are still temporary options for connection. The drain hose is simply lowered into the bathtub, toilet or sink. This method, of course, is very simple, but not the best – the hose can fall, it can forget to put it in place after turning on the machine, etc. Then the water drains directly onto the floor, and to clean up the flood is not very pleasant, and the neighbors below will definitely not be happy.
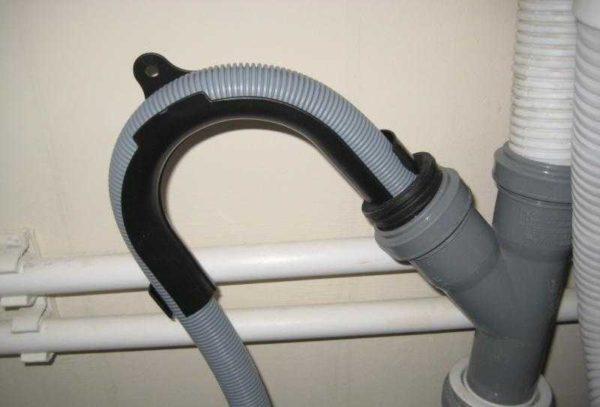
With any method of connecting the drain hose from the machine to the sewer, it is necessary to ensure that it is not bent and not laid in loops. Corrugated drain hose is prone to the formation of clogs, so it is necessary to monitor the minimum radius of the bend.
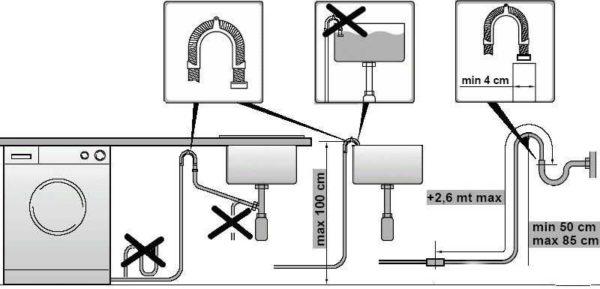
All these data are usually prescribed in the instructions, but usually the minimum bending radius is 50 cm, the maximum – 85 cm. In order to be able to control the position of the hose, there are special plastic clamps that are put on top of the corrugation and hold it in the desired position.
Connecting to the power supply
Since the power of the washing machine when the heating elements are turned on is decent, it is desirable to connect a separate power supply line from the switchboard. The scheme is simple, the phase from the input is fed to the automatic protection device, from it goes to the RCD, then the wire to the place of installation of the socket.
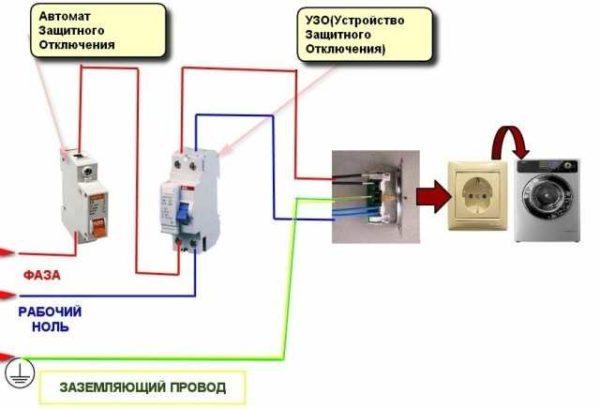
All manufacturers emphasize that the socket must have an earth connection. Only in this case, the factory warranty is preserved.
Now about the ratings. The protective automatic machine is selected according to the current that is required for the device. This figure can be found in the passport, and you can calculate. For a quick calculation, use the online calculator for calculating the current. For an independent solution you need, the power of the washing machine divided by 220 V, we will get the current consumption. For example, your machine has a power of 3.5 kW. We get 3500 W/220 V = 15.9 A. We take the nearest higher rated circuit breaker. They come in 6 A, 10 A, 16 A, 20 A, 25 A. For our case is suitable automatic circuit breaker for 16 A.
Let’s move on to the choice of RCD. In terms of current, it is taken one step higher than the nominal value of the automat, that is, for this example it is 32 A. But RCD has another characteristic – leakage current. For devices that are connected to a dedicated line, the recommended value is 10 mA. So, for a washing machine with a capacity of 3.5 kW, you need a circuit breaker for 16 A, RCD for 32 A with a leakage current of 10 mA.
It is also a good idea to calculate the cross-section of the wire. Today for wiring use mainly cables with copper conductors. They are more flexible, less heavy. Calculation is done by power or current consumption, but since the power spread of washing machines is limited, we can say at once that for devices up to 4.1 kW is enough cross-section of 1.5 sq. mm copper conductors, up to 5.5 kW – cross-section of 2.5 sq. mm.
One last thing about electrics: about sockets. When choosing a socket, you should not only look for the grounding contact. It is also necessary to look at what voltage the socket is designed for. Normal products have markings on the back of the socket. It indicates the maximum operating voltage, but sometimes put the rated current. If there are no inscriptions, it is better not to risk. Most likely it is a cheap Chinese consumer product.
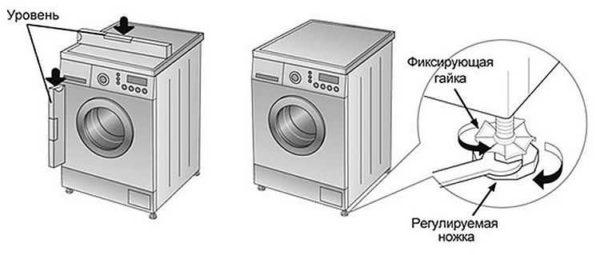
The last stage – level setting
Connect the washing machine to the water supply and sewerage – this is not all. It is necessary to provide it with normal conditions for work. In order that the washing machine does not jump during spinning, it must be set strictly vertical. The position of the body is adjusted with the help of adjustable legs. Take a construction level, laid on the lid, change the height of the legs, achieving that the bubble in the level was strictly in the center.
Check by laying the level parallel to the front part, then shift to the back wall. Then the procedure is repeated, but the level is applied to the side walls of the case – one side, then the other. Once the bubble is strictly centered in all positions, it can be considered that the washing machine is level.
If there is no level, you can try to align the machine by placing a glass with a rim with water poured into it. Water level over the rim. You change the position until the water is exactly over the rim. This method is less accurate, but better than nothing.
There is one more thing. Most often, washing machines stand on a tile floor, and it is slippery and hard. Therefore, even a perfectly aligned machine sometimes “jumps”, vibration during spinning on a hard floor can not be extinguished. To cope with the situation, you can put a rubber mat under the machine or rubber pads under each foot. This will be an excellent shock absorber.


