

When installing or repairing electrical wiring, connecting household appliances and many other jobs, you need to connect conductors. To connect the wires was reliable and safe, it is necessary to know the characteristics of each of them, where and when, under what conditions they can be used.
文章内容
Existing ways of connecting conductors
To connect wires can be made in several ways:
- welding – the most reliable method, providing high reliability of connection, but requiring skills and the presence of a welding machine;
- terminal blocks – a simple and quite reliable connection;
- soldering – works well if the currents do not exceed the standard and the connection is not heated to temperatures above the standard (65 °C);
- crimping with sleeves – requires knowledge of technology, special pliers, but the connection is reliable;
- use of spring clamps – wago, PPE – they are quickly installed and provide good contact if the operating conditions are met;
- bolted connection – easy to make, usually used in difficult cases – when it is necessary to switch from aluminum to copper and vice versa.
The type of connection is selected based on many factors. It is necessary to take into account the material of the conductor, its cross section, the number of conductors, the type of insulation, the number of conductors that will be connected, as well as operating conditions. Based on these factors and consider each of the types of connections.
Welding – high reliability in all conditions
When connecting wires by welding, the conductors are twisted, and the end of them is welded. As a result, a ball of metal is formed, providing a stable and reliable connection. And it is reliable not only in terms of electrical characteristics, but also mechanically too – the metal of the connected wires after melting forms a monolith and it is impossible to separate a separate conductor.
The disadvantage of this type of wire connection is that the connection is 100% unbreakable. If you need to change something, you have to cut off the fused piece and redo everything again. Therefore, for such connections leave some stock of wires – in case of possible redesign.
Of other disadvantages – you need a welding machine, appropriate electrodes, flux and skill. In addition, welding takes a lot of time, you need to protect the surrounding objects, and it is also inconvenient to work with a welder at height. Therefore, electricians, this type of connection practiced, in exceptional cases. If you do for yourself and know how to handle the welding machine well, you can practice on scraps. The main trick is not to melt the insulation, but to weld the metal.
After it cools down, insulate the welded area. You can use duct tape, or heat shrink tubing.
Connecting wires by crimping
Crimping wires requires a special aluminum or copper sleeve – it is selected based on the size of the twist (diameter of the bundle), and the material is the same as that of the conductors. Bare and cleaned to a shine wires are twisted, they are put on a tube-casing, which is clamped with special pliers.
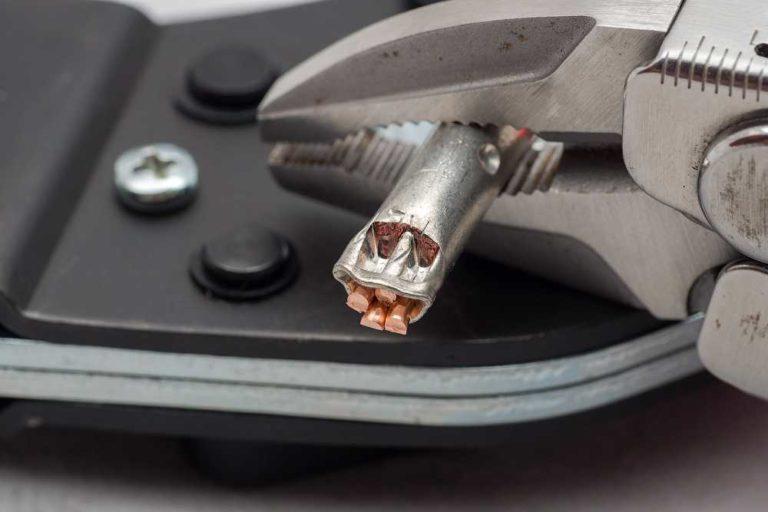
Both sleeves and pliers are different, there are several types. Each of them has its own rules of use, in which you need to be guided. It is necessary to pack wires according to certain rules, measure the size of the resulting bundle, adjust to the requirements. In general, it is quite a tedious task. Therefore, use this type of wire connection mainly professional electricians, and more and more often they are moving to spring clamps.
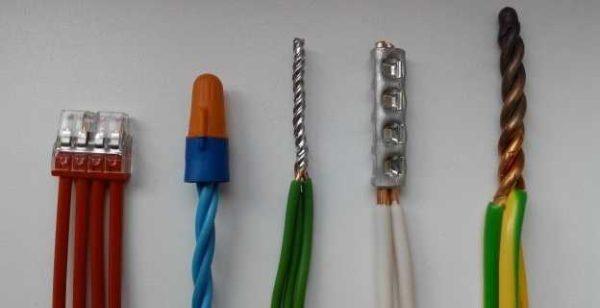
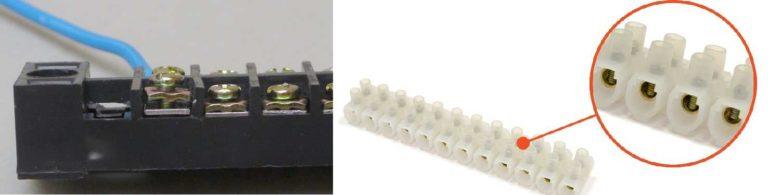
Terminal blocks
One of the simplest and most reliable connections of wires – through terminal blocks. They come in several types, but almost everywhere a screw connection is used. There are with sockets of different sizes – for different sizes of conductors, with a different number of pairs – from 2 to 20 and more.
The terminal block itself is a plastic housing in which a metal socket or plate is sealed. A bare conductor is inserted into this socket or between the plates and clamped with a screw. After the screw is tightened, it is necessary to give the conductor a good jerk to make sure that it is well clamped. Due to the fact that the connection points remain uninsulated, the area of application of terminal blocks – rooms with normal humidity.
The disadvantage of such a connection: due to the ductility of metals – especially aluminum – over time, the contact weakens, which can lead to increased heating and accelerated oxidation, and this again leads to a decrease in contact. In general, the wire connection in screw terminal boxes must be tightened periodically.
Advantages – quick, simple, low cost, does not require any skills, except the ability to use a screwdriver. Another important advantage – you can easily connect wires of different diameters, single and multi-core, copper and aluminum. There is no direct contact, so there are no risks.
Soldering
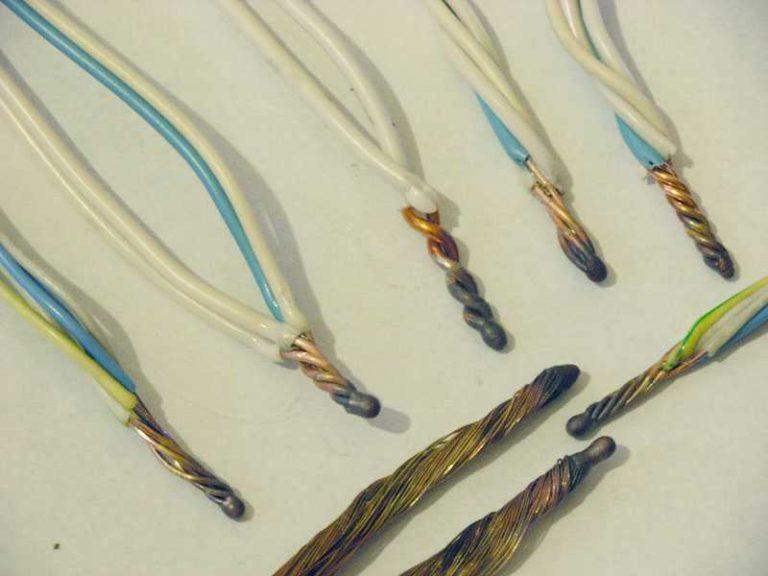
First, about the soldering technology. Connected conductors are cleaned from insulation, cleaned from oxide film to pure metal, twisted, then tinned. To do this, the conductors are heated with a soldering iron, applied to rosin. It should cover the place of connection completely. Tinned wires are twisted first with fingers, then pressed together using pliers. Instead of tinning, you can use soldering flux. It is well wetted wires, but after twisting.
Then, in fact, the soldering process begins: heat up the place of connection with a soldering iron or a narrow torch. When rosin or flux begin to boil, take on the soldering iron sting some solder, bring into the soldering zone, pressing the sting to the conductors. The solder spreads out, filling the gaps between the wires, ensuring a good connection. If using a torch, the solder is simply deposited a little at a time into the torch.
Further, after cooling down the soldering place, according to the technology it is necessary to wash off the flux residues (they accelerate oxidation), dry the connection, cover it with a special protective varnish, and then insulate with tape and/or heat-shrink tubing.
Now about the advantages and disadvantages of this method of connecting wires. In low-current systems soldering is one of the most reliable ways to connect wires. But, when wiring in a house or apartment, it is criticized mercilessly. The fact is that solder has a melting point of 195-210 degrees. When passing large currents connection is heated, (if incorrectly selected or defective protective automatic machines) solder melts and solidifies. After repeated repetitions, the solder flows off or, becomes porous, deteriorating the contact. Time after time, the contact gets worse and the connection gets hotter and hotter. If this process is not detected, the case may well end in a fire.
The second negative point is the low mechanical strength of soldering. The matter is again in the tin – it is soft. If there are a lot of wires in the soldered connection, and they are stiff, then when trying to pack them, often the conductors fall out of the solder – the elastic force is too great. Therefore, the connection of conductors soldered soldering in the wiring of electricity is not recommended to use: inconvenient, time-consuming and risky.
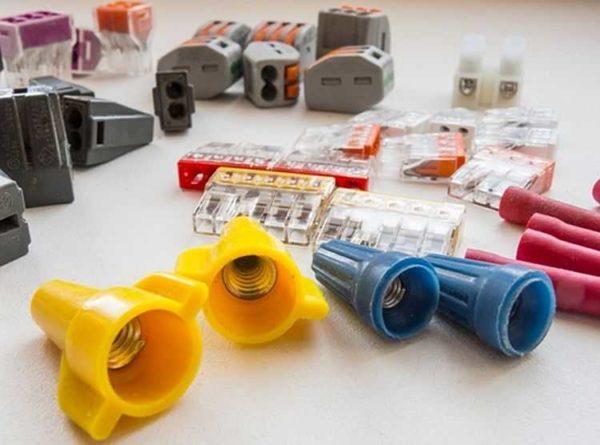
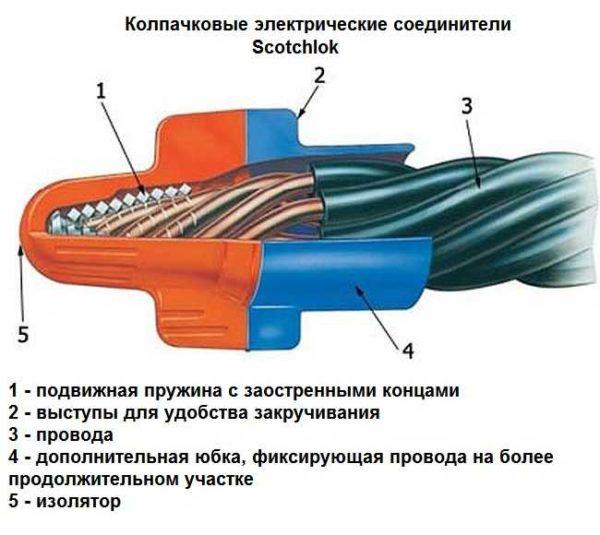
Spring clamps for connecting wires
One of the most controversial ways of connecting wires – with the help of spring clamps. They are of several types, but the most common two – terminal clamps wago (wago) and caps PPE. Externally and in the way of installation they differ greatly, but at the heart of both designs is a spring that creates a strong contact with the wire.
About this spring and there is a debate. Opponents of using wago say that the spring will weaken over time, the contact will become worse, the connection will begin to heat up more and more, which, again, leads to an even faster decrease in the degree of elasticity of the spring. After a while, the temperature may rise so high that the (plastic) housing melts, and what can happen next is known.
In defense of the use of spring clamps for connecting wires, it can be said that if they are used in accordance with the recommendations of manufacturers, problems are very, very rare. Although there are quite a few fakes of both wago and PPEs, as well as a fair number of photos of them in melted form. But, at the same time, many people use them, and under normal operating conditions, they work for years without complaints.
Clamps for wires wago
They appeared on our market a few years ago and made a lot of noise: with their help, the connection is very fast and easy, while having high reliability. The manufacturer has specific recommendations for the use of these products:
Inside these devices there is a metal plate that ensures proper contact. The shape of the plate and its parameters were developed and tested specially. The tests were conducted on a vibration stand for many hours, then heated-cooled. After that the electrical parameters of the connection were tested. All tests were passed perfectly and branded products always show themselves perfectly.
In general, the range of products from Wago is very wide, but for wiring installation or connection of household appliances, lighting fixtures, use two versions of clamps for wires: series 222 (detachable) with the ability to remake or change the connection and series 773 and 273 – which are called non-detachable.
Split
Wago 222 series spring-loaded wiring clamps have a certain number of contact pads – from two to five – and the same number of locking flags. Before starting the connection, the flags are raised and stripped conductors are inserted into them (up to the stop), after which the flag is lowered.
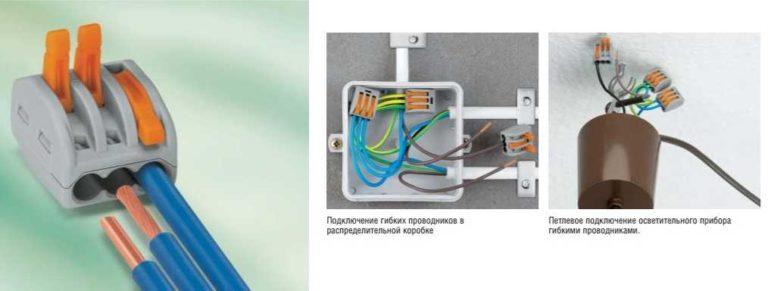
If necessary, the connection can be resealed – lift the locking flag and remove the conductor. Convenient, fast and reliable.
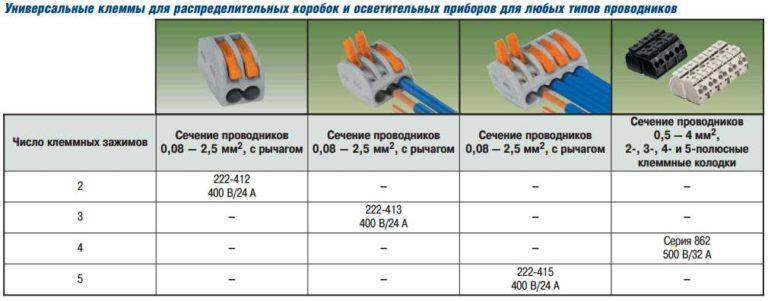
Used 222 wago series can be used to connect two or three, even five conductors made of copper or aluminum (you can connect different metals in one terminal). The conductors can be single or stranded, but with rigid wires. The maximum cross-section is 2.5 mm2. Soft stranded wires can be connected with cross sections from 0.08 mm2 to 4 mm2.
Non-connecting
There is another type of clamps, which does not provide for the possibility of remaking the connection of wires – series 773 and 273. When using these terminals, the work is a matter of seconds: the stripped wire is inserted into the corresponding socket. A spring clamps it in place, ensuring contact with the plate.
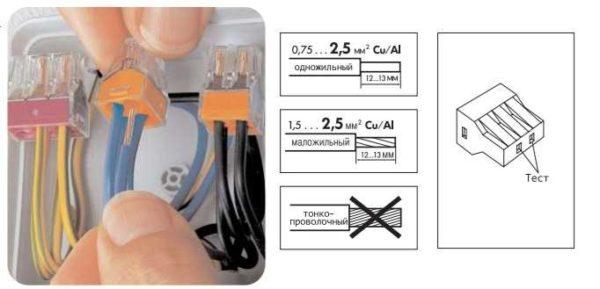
These spring-loaded wire clamps can be used to connect solid aluminum or copper wires with a cross-sectional area of 0.75 mm2 to 2.5 mm2, multi-core wires with rigid wires – from 1.5 mm2 to 2.5 mm2. Soft stranded conductors cannot be connected with these connectors.
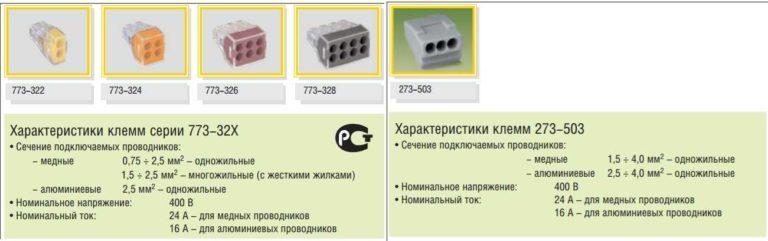
To improve contact, the wires must be cleaned of oxide film before connecting. To prevent further oxidation, wago manufacturers also produce a contact paste. This paste is filled into the interior of the clamp and, by itself, erodes the oxide film and then protects the wires from further oxidation. In this case, only heavily oxidized, dark conductors need preliminary cleaning, and the body of the clamp is filled with paste.
By the way, manufacturers say that if desired, the wire can be removed from the clamp. To do this, one hand is taken by the wire, the second hand holds the terminal box and rotates them back and forth with a small range, in opposite directions, stretching in different directions.
Lamp clamps (construction and assembly terminals for luminaires)
For quick and convenient connection of lamps or sconces, wago has special terminals of the 224 series. With their help, you can connect aluminum or copper wires of different cross sections and types (solid or stranded with rigid wires). Rated voltage of this connection is 400 V, rated current:
- 24 A for copper conductors;
- 16 A for aluminum conductors.
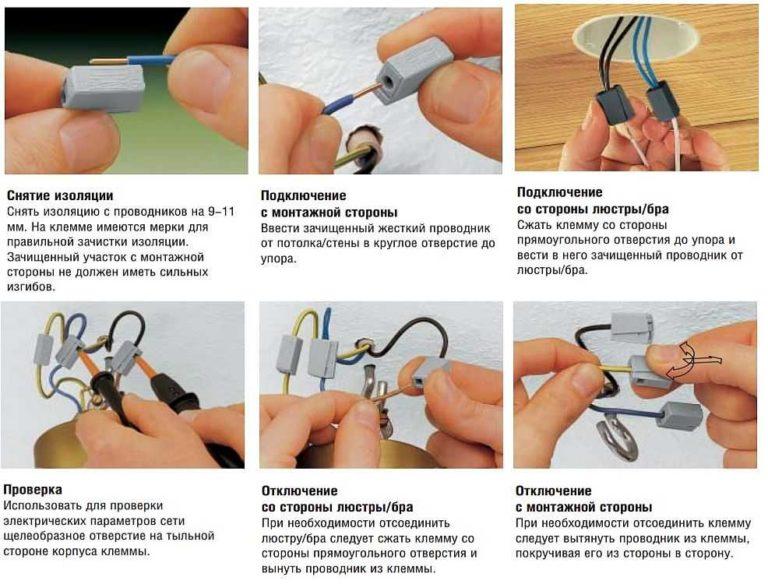
Cross-section of connected conductors on the mounting side:
- copper 1,0 ÷ 2,5 mm2 – single-core;
- aluminum 2,5 mm2 – single-core.
Cross-section of conductors from the side of chandelier or sconce: copper 0,5 ÷ 2,5 mm2 – single-core, stranded, tinned, pressed.
When connecting aluminum wires it is mandatory to use contact paste, and copper wires must be manually stripped to a clean metal.
There are two disadvantages of these products. First – the price of original terminals is high. The second – there are a lot of fakes at a lower price, but their quality is much lower and it is they burn and melt. Therefore, despite the costliness, it is better to buy original products.
PPE caps
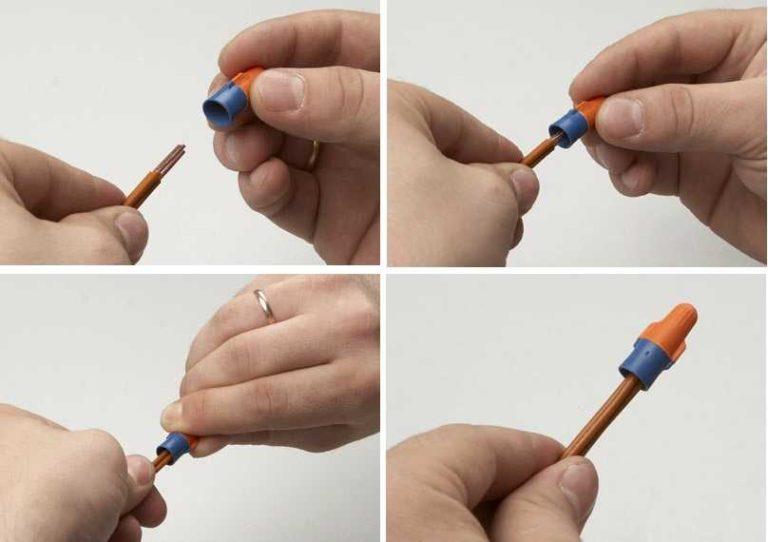
PPE caps (stands for connecting insulating clamps) – very simple to use devices. This is a plastic housing, inside which there is a spring, which has a conical shape. Insert the conductors stripped of insulation into the cap, the cap is cranked clockwise a few times. You will feel that he stopped scrolling, it means that the connection is ready.
These conductor connectors are produced by many manufacturers, there are different sizes, under different diameters and the number of connected conductors. To connect the wires was reliable, the size must be selected correctly, and for this purpose it is necessary to understand the labeling.
After the letters PPE there are several digits. Depending on the manufacturer, the number of digits varies, but they denote the same things. For example, there is such a type of labeling: PPE-1 1,5-3,5 or PPE-2 4,5-12. In this case, the digit immediately following the letters denotes the type of housing. “1” is put if the body – an ordinary cone, on the surface of which may be grooves – for better grip. If it is PPE-2, it means that the body has small protrusions, which are convenient to grasp with fingers and twist.
All other figures reflect the total cross-section of all conductors that can be connected using this particular PPE cap.
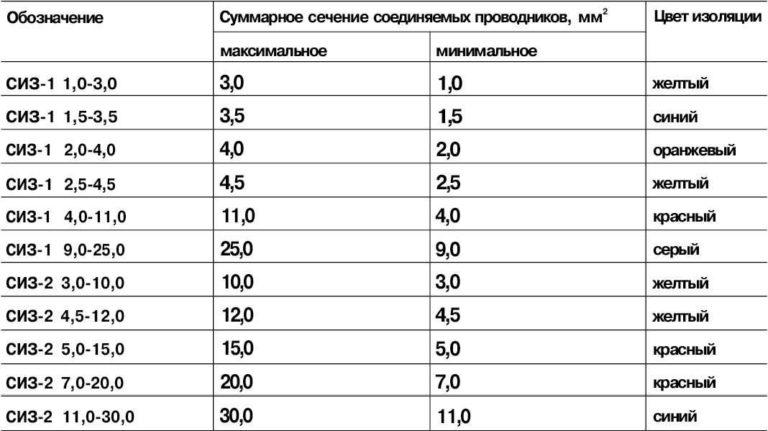
For example, PPE-1 2,0-4,0. This means that the body of the connecting cap is ordinary, cone-shaped. It can be used to connect two conductors with a cross section of at least 0.5 mm2 (in total they give 1 mm, which corresponds to the minimum requirements – see the table). The maximum number of conductors that can be included in the cap is 4 mm2.
In the second version of the marking after the abbreviation PPE is only a digit from 1 to 5. In this case, it is simply necessary to remember which of them will be useful for which cross-section of wires.
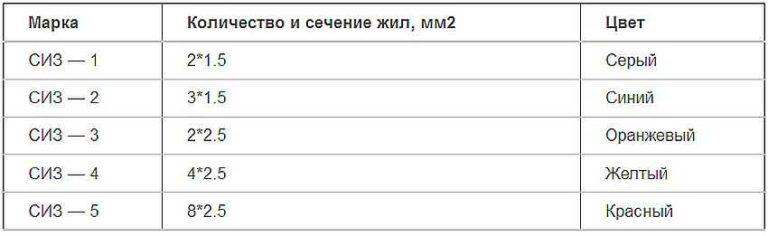
By the way, PPE caps can only connect copper wires – aluminum cores are usually thicker than the maximum allowable for these connectors.
Bolted connection
This connection is assembled from a bolt of any diameter, a suitable nut and one, or better – three, washers. It is assembled quickly and easily, and serves quite long and reliably.

First, the conductors are stripped of insulation, if necessary, the upper oxidized layer is removed. Next, a loop is formed from the stripped part, the inner diameter of which is equal to the diameter of the bolt. To make it easier – you can wrap the wire around the bolt and screw it (middle variant on the right picture). After all this is assembled in this order:
- A washer is put on the bolt.
- One of the conductors.
- A second washer.
- The other conductor.
- A third washer.
- Nut.
The connection is tightened first by hand, then with the help of wrenches (you can take pliers). That’s all, the connection is ready. It is used mainly if you need to make a connection of wires made of copper and aluminum, you can apply and when connecting conductors of different diameters.
How to connect aluminum and copper conductors
By the way, let us remind you why you can not directly connect copper and aluminum wires. The reasons are two:
- Such a connection is strongly heated, which in itself is very bad.
- Over time, there is a weakening of the contact. This happens because aluminum has a lower electrical conductivity than copper, as a result, when passing the same currents, it heats up more. As it heats up, it expands more, pushing the copper conductor away – the connection becomes worse and heats up more.
To avoid such troubles copper and aluminum conductors are connected using:
- terminal blocks;
- wago;
- bolted connection;
- branching clamps (make connections of wires on the street).
Other types of connectors can not be used.
How to connect wires of different diameters
If you need to connect conductors that have different diameters, in order to get a good contact, there should not be a twist. So, you can use the following types:
- terminal blocks;
- wago;
- bolted connection.


")