

In order to save space in small bathrooms, shower cabins are installed. They are available in different configurations, depending on which they are called a shower corner, cabin or hydrobox. However, all manufacturers sin by one thing: an unusable instruction. It contains a list of details and general instructions: put the tray, fix the walls… and everything else in the same spirit. No details. Because of this, assembling a shower cabin turns into a DIY task. There are many different models, it is impossible to describe them all, but we will describe and demonstrate common problems and ways to solve them.
文章内容
Types and kinds
First of all, shower cabins are distinguished by their shape: angular and straight. In our country are more common angular, because they are easier to fit into small rooms.
But the corner ones can be of different shapes. More common with a rounded front part – in the form of a sector of the circle, but there are also beveled and rectangular base.
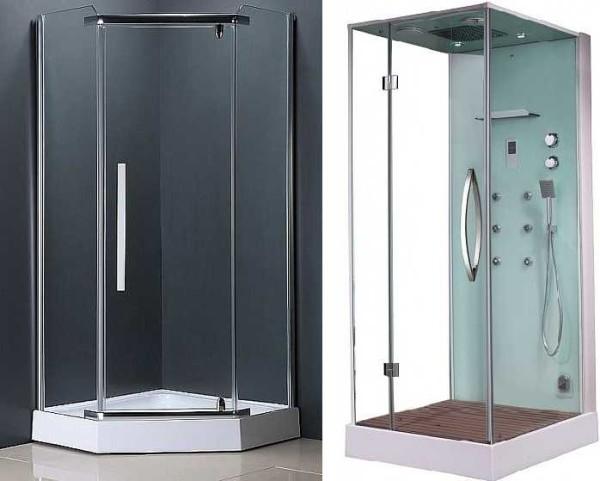
Now actually about the equipment. According to this feature shower cabins are divided into closed and open. In open ones there is no top panel, as well as side walls. Closed ones have them. Open shower cabins are most often called “shower corner” or corner. Its equipment can also be different – with a tray or without.

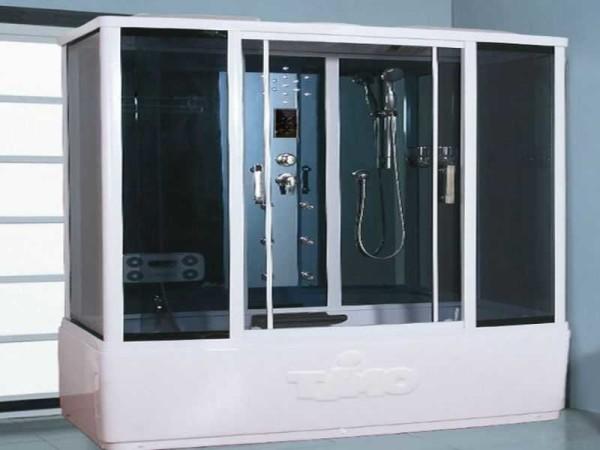
Some closed shower cabins have many additional functions – different types of jet massage, shower – ordinary, tropical, etc., built-in sauna or steam generator for hamam. Such multifunctional devices are correctly called “hydromassage cabins”, and simply – hydrobox.
It is clear that the more complex “stuffing”, the more labor-intensive will be the assembly. But whirlpool cabins are assembled at the very beginning in the same way as a shower corner with a tray. If you understand how to assemble the basic – to install the walls and roof will be easier. The main thing, as usual, the basis, and the assembly of a shower cabin of any complexity begins with the installation of the pallet and guides for the doors.
How to assemble a shower cabin – corner
Most often it is the corner with a tray that is bought. Without a tray, you have to drive with the floor and drain for a long time. It is easier to put a ready-made trough. Therefore, first of all, we will describe the order of installation of such a shower cabin. How to make a tray for a shower cabin from tiles read here.
Let’s say right away that models with a tray require a height reserve of at least 15 cm: at the bottom there is a siphon and hoses of water drainage. So for the installation of the cabin 215 cm high ceiling height should be at least 230 cm, and then it will be difficult to work. If your ceilings are low, you will have to put the cabin without a tray – only the walls, and the drain to do in the floor.
Installation of the tray
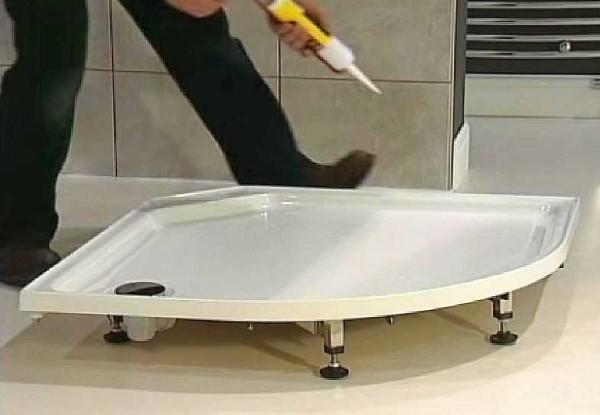
The tray in modern shower cabins is made of plastic. It is reinforced with several layers of fiberglass fabric, increasing its strength, but still it is impossible to stand on it without support. The set comes with several metal pipes of square cross-section, which are assembled into a structure that supports the bottom.
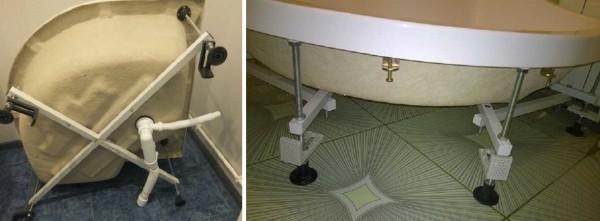
But not everyone dares to install a shower stall on a few iron. Some prefer to make the base from a brick or a wooden bar.
Assembly of a shower cabin on a metal frame
In some models, the first thing to do is to attach a decorative protective cover to the pallet. It is simply inserted into the groove and screwed on with metal plates. Then the installation process continues. What is wrong with this method? How to change or repair the drain if necessary? The casing can not be removed – it is attached from the inside. The only way is to make a door yourself beforehand, and then put the modified panel in place.
The order of assembly of the shower tray is as follows:
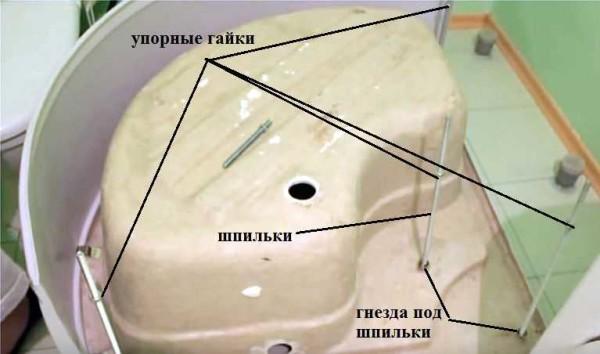
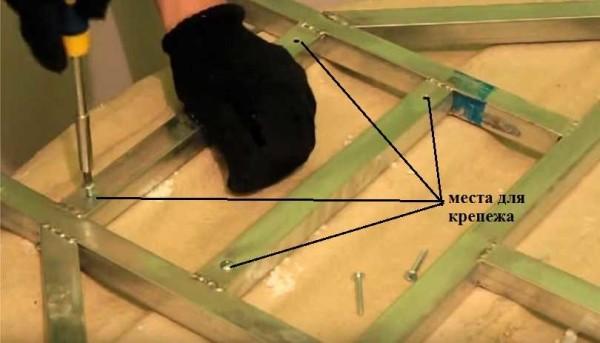
- The studs are screwed into the available sockets. In some designs, there are fewer sockets than support beams. Then there are short studs in the kit. They are simply inserted and held by the bolts, redistributing part of the load.
- On the installed studs, nuts are screwed on, which will stop the metal support frame, preventing it from resting on the pallet.

- On the studs with nuts put on the frame, it has holes drilled for this purpose.
- On the protruding ends of the studs screw on more nuts, only now they are on the other side of the pipe.

- There are holes in the support structure, into them we screw the bolts that come with the kit. Ideally, they should go into the corresponding holes on the pallet. Under these holes there is a reinforcement, otherwise the screw will simply pierce the plastic.

- After checking how level the frame lies, and correcting if necessary, tighten all the double bolts on the studs. You will get a fairly rigid fixation (everything was wobbly before).
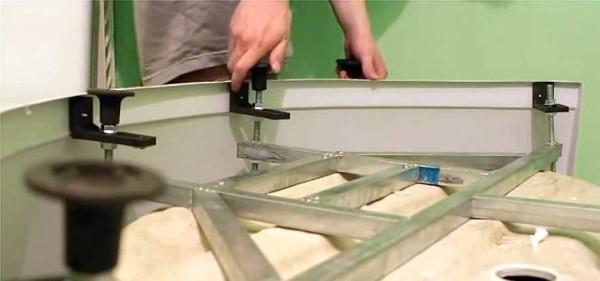
- Now we start assembling the legs.
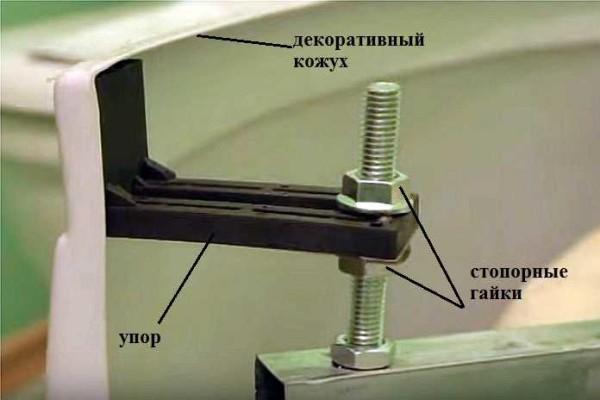
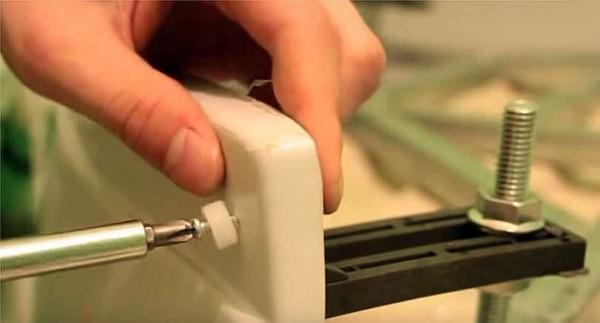
- Install the stops. They are also put on two nuts.

- Having corrected the shape of the front surface of the decorative casing, screw the stops on. There are screws with washers for this purpose. The washers are covered with decorative plates.

- Screw on the feet. It remains to align the legs. There are two ways. If the pallet is small and shallow, it is easier to turn it upside down, put it in place and controlling the plane on the level to set the level by screwing the legs. If the pallet is massive and deep, and still stands a decorative casing, it is unrealistic to get to all the legs. In this case, twist the legs by setting them at the same height. You can check how evenly they are aligned with the help of an ordinary construction level – laying it in pairs on different legs, or with the help of a laser plane builder (how to use it read here).

- Install the stops. They are also put on two nuts.
- Turn the pallet over. If all legs are level and the floor is level, the tray should stand level and tight.

The assembly of the shower cabin – corner is already half done. It remains to assemble the doors.
Assembly of the pallet on the base of bricks or foam blocks
Here everything is incomparably easier, although it largely depends on the shape of the pallet. Most often the base is made of brick or foam blocks. It is more convenient to work with high-density foam blocks. They have sufficient load-bearing capacity to withstand the required weight, but at the same time easy to cut with a saw, they are easy to give the desired shape.
First, the entire structure is folded dry, without mortar or glue for foam blocks. Just do not forget that the mortar/glue will raise the construction a little. And this is the second advantage of foam blocks: for their installation is enough layer of glue in a couple of millimeters, and for bricks requires at least 6-8 mm.
Try on the glue or mortar beforehand, as the shower tray will become, you can also try on the glue or mortar: suddenly somewhere not put enough. To do this, the solution is laid out, more or less leveled with a trowel, cover with a film, and already on the film put the tray. Removing it you will absolutely see whether everywhere is enough glue.
Putting, if necessary, the solution, put the pallet in place. To level it is a matter of technique: take a construction level, and focusing on its indications, tapping in different places. Pay attention! You can install the shower tray on the film without removing it from the mortar. In this variant, it is possible to dismantle without destruction.
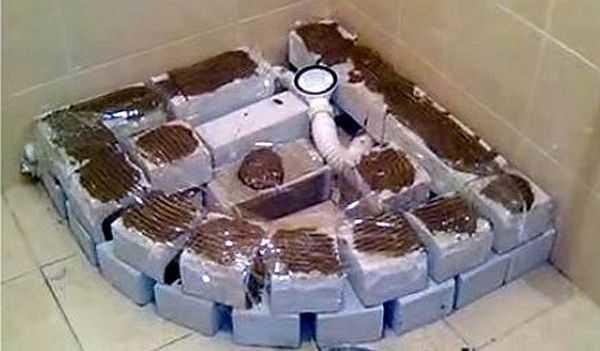
Folding the brick base, do not forget that you need a place to install the drain, pipes from it. It is also necessary to provide for the possibility of replacing the trap. To do this, make a window on one side, providing access to the necessary parts. It can then be closed with a decorative door or cover.
Before the final installation of the tray connect the drain. For those who have at least once put a sink or a bathtub, this is not a problem. More about this in the following video. One moment: when installing the trap, do not forget to lubricate the hole under the drain with sealant. There, of course, there is a rubber band, but with a sealant will be more reliable.
How to make a shower tray from tiles can be read here and a shower cabin to it.
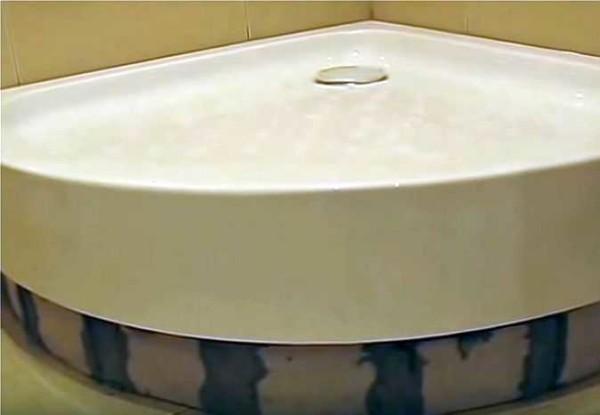
Sealing the pallet
After the tray is put in place, the joint needs to be sealed. Usually use a transparent sealant. Just note that acrylic sealants turn yellow after a while (after a couple of months), so it is better to look for silicone.
Well fill all the gaps and gaps, you can do it twice. In order not to work by eye, you can put the tray, draw a line with a marker, then move away and a couple of millimeters below the mark to apply one or two continuous strips of sealant. Push the pallet back into place and press it well. Fill the voids existing on top.
There is a second way. It is more aesthetic. Close the joint with a sanitary corner. It itself has a sealing rubber, but you can also lubricate it with sealant. This corner can close a small gap, which is formed if the angle in the bathroom is not exactly 90 °.
Organization of ventilation in the bathroom is described here.
Installation of door guides
Next, the assembly of the shower cabin continues with the installation of door guides. Even if the cabin is without side panels, it is first necessary to assemble the guide frame for the doors, install it on the pallet, and then already mark the places of installation of fasteners. To assemble the frame is to fasten together the side posts and two rounded guides. Fixed glass sidewalls can be installed to add rigidity to the structure.
Why can’t the door posts be attached to the wall right away? Because bathroom walls are rarely perfectly flat. If you attach the uprights in this way, you will get skewed doors that will not close/open properly. To understand the whole difference, you can mark strictly vertical, as it should be put side rails vertically. Then assemble the supporting frame, put it in place and look at the deviations. In 99% of cases there are significant deviations.
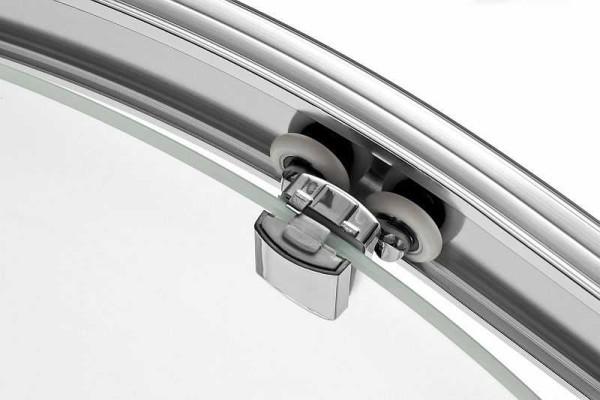
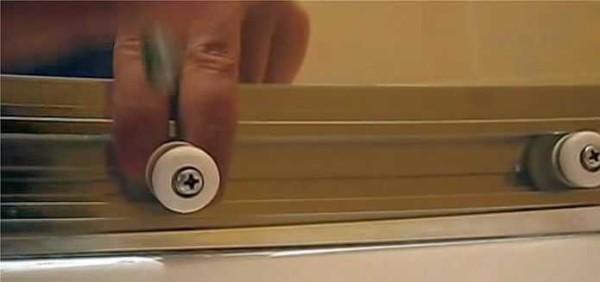
When assembling the frame of the shower cabin, there can be no discrepancies. There are two arcs, there are two posts. You align the grooves and holes, tighten with screws. Then you install side panels made of glass. They are fixed with brackets-stoppers. After that, do not forget to install the rollers for the shower cabin. They can have a different design, but, most often, their installation requires removing the side stoppers from the guides, drive two rollers into the profile from both sides, put the stoppers in place.
In some models it is necessary not only to install the rollers, but also to hang the glass, otherwise you can’t carry it. But then it is better to work with two people. One is difficult.
Having put the assembled frame on the pallet and checked whether it became correctly, mark with a marker the places of installation of fasteners. Having removed the cabin, drill holes, install dowels.
Lubricate the joints of the frame to the walls with sealant. Apply the strip should be generous – it is better to wipe off the excess. Then put the rails in place and screwed on the bolts. The remaining gaps are re-filled with sealant. The installation of the shower enclosure is almost finished: it remains to hang the doors and install the seals.
If the doors have not been installed, they are hanged. Start from the top. Most models have holes in the door leaf: top and bottom. These are the places where the rollers are attached. Some shower cabins have two holes, some have four. Their number depends on the design of the rollers.
A screw is taken, a plastic gasket (from the kit) is put on it. After inserting the screw into the hole, put on the second gasket. Next: there is a thread inside the roller, and you need to get into it with the screw, then supporting the outside of the roller with your fingers, inside the screw. This acrobatic element is repeated with all the rollers. Only until all the screws are installed, you do not need to tighten them. Only to tighten them so that the door holds and does not fall down.
After the doors are hinged, tighten all the fasteners. There is one last thing left: installing the gaskets on the doors. They are simply snapped (pressed with your finger) on the side edges of the two joining halves of the door. In the same way they are fixed on the other side – on the posts at the walls.
For details on hanging the doors of the shower cabin in one of the models, see the video.
About the installation and connection of the boiler can be read here.
Features of installation of a shower cabin-hydrobox
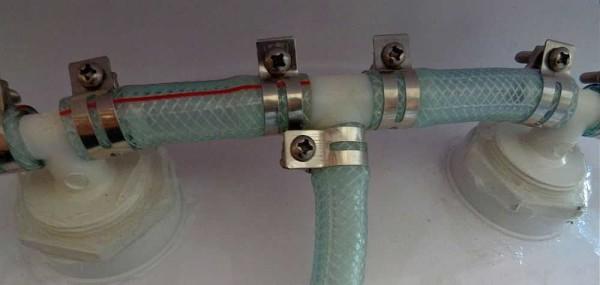
In closed shower cabins and hydroboxes, after installing the pallet, it is necessary to assemble a panel that covers the wall. There are mounting holes on it, in which are pre-installed all “accessories” – jets, holders, soap dishes, seats, speakers, lights, etc. The shape and size of the bottom all different, so it is difficult to make a mistake. It is desirable to lubricate all “landing holes” with sealant: less dripping will be later.
Particularly worth stopping to install the nozzles. In addition to installing the atomizers themselves, they must be connected to each other with sections of hose. It is put on the nozzle spigots, tightened with clamps. All this is assembled according to the scheme available in the instructions. Pay special attention to the fact that the nozzle tips were intact and the clamps well tightened. It will not be superfluous to smear each seating place with sealant (both under the nozzle and under the hoses).
The wall with connected accessories is placed in a special groove. The place of connection is also pre-lubricated with sealant. Cold, hot water is connected, you can check the performance of the system.
After installing the walls, the cover is assembled. There is usually a rain shower, maybe a lamp. When installing them, you can also use sealant – there is little chance that water will get in… On the shower spigot, a hose is put on, which is tightened with clamps. Conductors are connected to the lamp leads, the place of connection is thoroughly insulated, you can several successively put on heat-shrink tubing.
The assembled cover is installed on the wall. The joint is again lubricated with sealant. Before the sealant hardens, the assembled door frame is installed. When the doors are installed depends on the model. In some cases they need to be hinged before installation, in some cases – after. All joints are sealed.
In sufficient detail, the assembly of the shower cabin-hydrobox is shown in this video. There are no comments, but the sequence of actions is clear.
How to assemble a shower cabin, hopefully, it is clear. Models and modifications are very many, but the main problematic nodes tried to describe. If you missed something, write in the comments – we will complete the article)).


