

Electric switchboard in a private house, cottage, apartment has a dual function: it provides input and distribution of electricity and creates safe operating conditions. If there is a desire to understand in not the simplest question, you can assemble the electrical panel with your own hands. The input circuit breaker and the meter should be put by representatives of the electricity supplying organization, but further, after the meter, you can collect the scheme yourself (although they do not like to lose money). However, before commissioning the house you will need to invite them to be present at the start-up, check everything and measure the grounding circuit. All these are paid services, but they cost much less than a complete assembly of the switchboard. If you do everything correctly and according to the norms, you will get even better on your own: you are doing it for yourself.
文章内容
What should be in the switchboard
And in an apartment and in a private house there are several options for the layout of the switchboard. This mainly concerns the place of installation of the input automatic circuit breaker and the meter. In a private house, the meter can be put on the pole, and the automat – on the wall of the house, almost under the roof. Sometimes the meter is put in the house, but this is if it was built a couple decades ago. Recently, meters are put in the house very rarely, although there are no regulations and instructions on this matter. If the meter is in the room, it can be put in the switchboard, then when choosing the model of the switchboard, it is necessary to take into account the dimensions of the meter.
About how to connect electricity from the pole to the house, read here.
In some apartment buildings, meters stand in boxes on the stairwells. In this case, the cabinet is needed only under RCDs and automatic machines. In other houses, it stands in the apartment. When modernizing the electrical network, the cabinet will have to be bought with the calculation that it will fit the meter too or buy a separate box for the meter with an input circuit breaker.
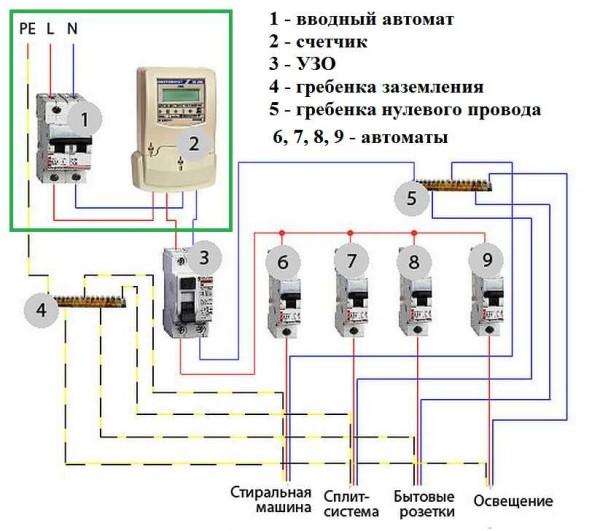
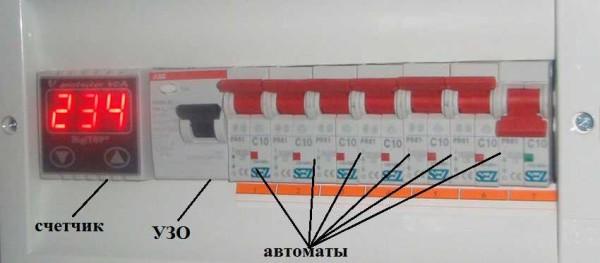
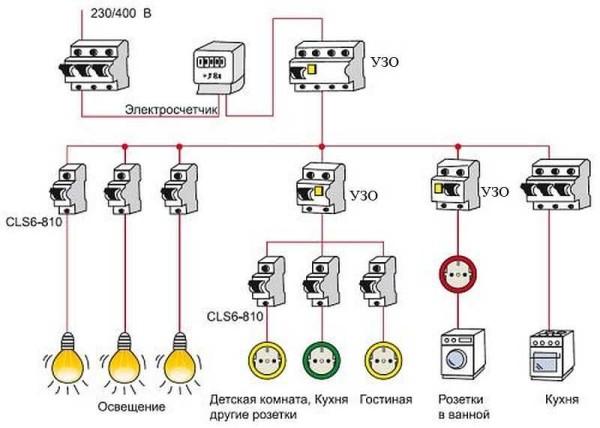
When drawing up a power supply scheme, safety is very important. First of all, it is provided for people: with the help of RCD – protective disconnection device (on the photo at number 3), which is installed immediately after the meter. This device is triggered if the leakage current exceeds a threshold value (there is a short circuit to ground or someone sticks their fingers in the socket). This device breaks the circuit, minimizing the possibility of electric shock. From the RCD phase goes to the inputs of automatic machines, which are also triggered when the load is exceeded or a short circuit in the circuit, but each on its own section.
In the second place it is necessary to ensure the normal operation of household appliances and electrical appliances. Modern complex appliances are controlled by microprocessors. They require stable power supply for normal operation. Having observed for some time the voltage in our network, it is not stable: it varies from 150-160 V to 280 V. Such a variation imported equipment can not withstand. Therefore, at least some groups of automatic machines that supply power to complex equipment, it is better to include through a stabilizer. Yes, it costs a lot. But in case of voltage surges the first to “fly” control boards. They are not repaired at our company, but simply replaced. The cost of such replacement is about half the cost of the device (more or less depends on the type of device). This is hardly cheaper. Assembling an electrical panel with your own hands, or only planning it for now, remember this.
The stabilizer is installed on one or more groups and is included after the RCD and before the group automatic machines. Since the device is not a small device, it can not be installed in the switchboard, but next to it – please.
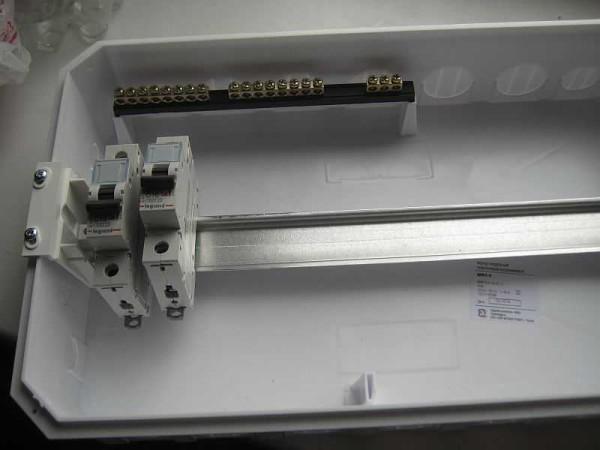
Also in the panelboard installed two tires: grounding and neutral. All grounding wires from appliances and devices are brought to the grounding bus. On the “zero” bus the wire comes from the RCD, and is fed to the appropriate inputs of automatic machines. Zero is usually denoted by the letter N, when wiring is usually used blue wire. For grounding – white or yellow-green, phase lead red or brown wire.
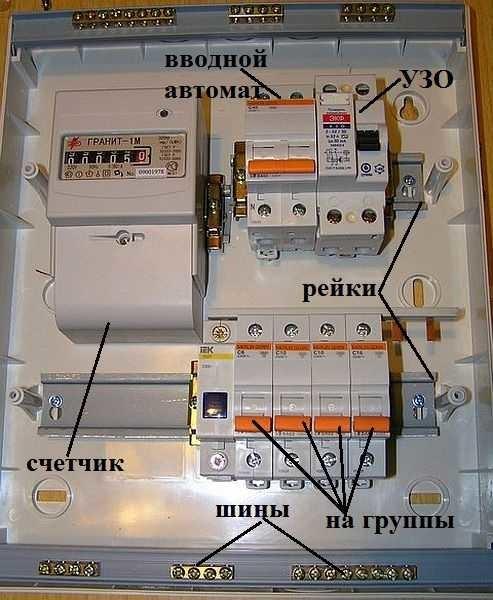
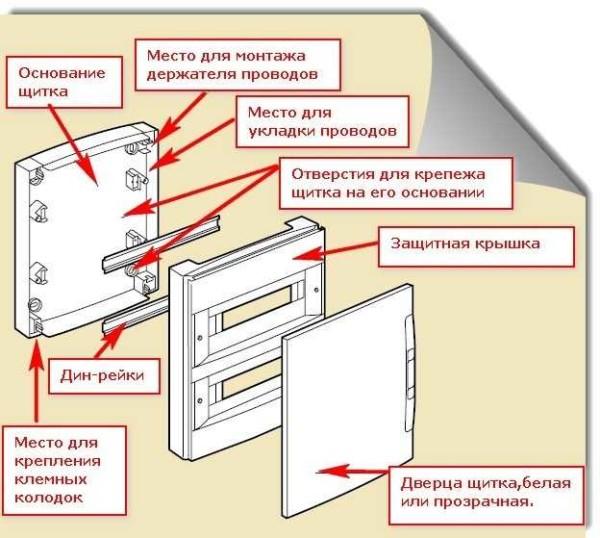
When independently assembling an electrical panel, you will need to purchase the cabinet itself, as well as rails (called DIN-rails or DIN-rails), on which automatic machines, RCDs and switches are attached. When installing the rails, check their horizontality with a level: there will be no problems with the attachment of circuit breakers.
All circuit breakers must be connected to each other. This can be done with the help of conductors – connecting their inputs in series, or with the help of a ready-made connecting comb. Comb – more reliable, although it costs more, but if you take into account the time you will spend on the connection of all the automata, it is unlikely that a few tens of rubles are of such fundamental importance.
Scheme for several groups
Not always power supply schemes are simple: groups of consumers are divided by floors, separately lead outbuildings, garage lighting, basement, yard and adjacent territory. With a large number of consumers in addition to the common RCD after the meter, put the same devices, only of lower power – for each group. Separately, with the mandatory installation of a personal protective device, lead the power supply for the bathroom: this is one of the most dangerous rooms in the house and apartment.
It is very desirable to put protective devices and each of the inputs that go to powerful appliances (more than 2.5 kW, and such power can have even a hair dryer). Together with a stabilizer, they will create normal conditions for the operation of electronics.
In general, when developing an accurate scheme, you will have to find a compromise: to make the system safe and do not spend too much money. It is better to take equipment from proven companies, and it costs a lot. But power grids are not an area in which you can save money.
How to connect an electric cooktop read here, and about connecting an electric water heater (storage or flow) read in this article.
Types and sizes of electrical cabinets
We will talk about cabinets/drawers for the installation of automatic machines and other electrical stuffing, about their varieties. By type of installation, electrical panels are for outdoor installation and for indoor installation. The box for outdoor installation is fixed to the wall with dowels. If the walls are combustible, an insulating material that does not conduct current is placed under it. When mounted, the outdoor switchboard protrudes above the wall surface by about 12-18 cm. This should be taken into account when selecting the place of its installation: for ease of maintenance, the panel is mounted so that all its parts are approximately at eye level. This is convenient when working, but can threaten injury (the corners are sharp), if the place for the cabinet is chosen unsuccessfully. The best option is behind the door or closer to the corner so that there is no possibility of hitting your head.
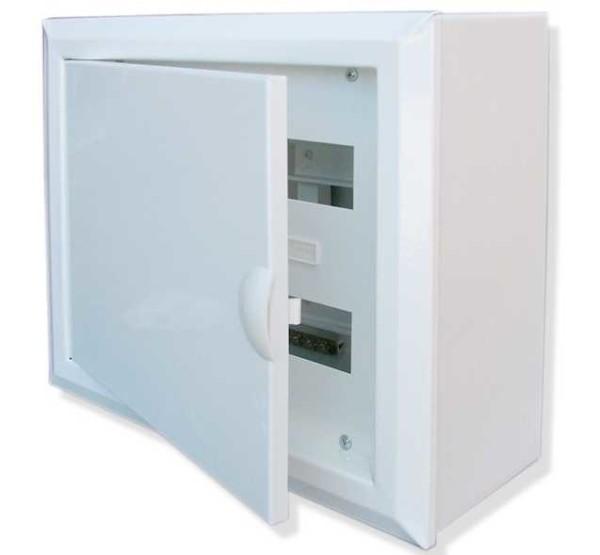
The shield for flush mounting implies the presence of a niche: it is installed and bricked up. The door is at the same level with the surface of the wall, can – protrudes a few millimeters – depends on the installation and design of a particular cabinet.
Cases there are metal, painted with powder paint, there are plastic. Doors – solid or with inserts made of transparent plastic. The sizes are different – stretched upward, in width, square. In principle, under any niche or conditions, you can find a suitable option. One tip: if possible, choose a larger cabinet: it is easier to work in it, especially important if you collect the electrical panel with your own hands for the first time.
When choosing an enclosure, often operate with such a concept as the number of seats. It means how many single-pole automatic machines (12 mm thick) can be installed in this enclosure. You have a schematic diagram with all the devices on it. You count them taking into account that two-pole have double width, add about 20% for the development of the network (if you buy another device, and there will be nowhere to connect, or during the installation decide to make two groups from one group, etc.). And for this number of “landing” places look for a panel suitable in geometry.
Installation and connection of elements
All modern circuit breakers and RCDs have a unified mounting under a standard mounting rail (DIN-rail). On the back side they have a plastic stop, which snaps onto the rail. Place the device on the rail by hooking it with the notch on the rear wall and press the lower part with your finger. After the click, the element is installed. It remains to connect it. Do it according to the scheme. The appropriate wires are inserted into the terminals and a screwdriver press the contact, tightening the screw. It is not necessary to tighten it strongly – you can crush the wire.
Work with the power off, all switches are switched to the “off” position. Try not to grasp the wires with both hands. Having connected several elements, turn on the power supply (input breaker), then turn on the installed elements one by one, checking them for short circuits.
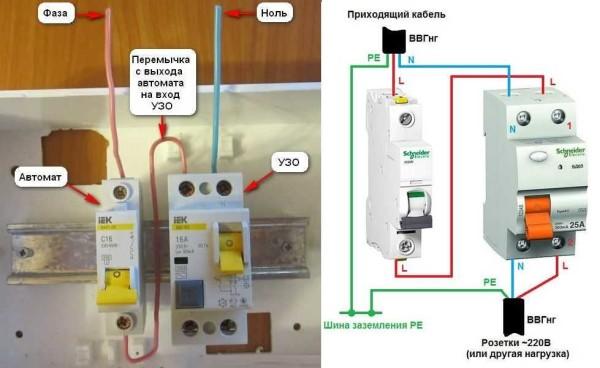
Phase from the input is fed to the input circuit breaker, from its output goes to the corresponding input of the RCD (put a jumper copper wire of the selected cross-section). In some schemes, the neutral wire from the water is fed directly to the corresponding input of the RCD, and from its output goes to the busbar. The phase wire from the output of the protective device is connected to the connecting comb of automatic machines.
In modern schemes, the input circuit breaker is put double-pole: it must simultaneously disconnect both wires (phase and zero) to completely de-energize the network in the event of a fault: it is safer and so are the latest requirements for electrical safety. Then the circuit of the RCD and looks like the photo below.

On the installation of RCDs on a DIN-rail, see the video.
In any scheme, the protective ground wire is connected to its own bus, where similar conductors from electrical appliances are wound up. The presence of grounding – a sign of a safe network and make it vital. Literally.
On how to properly connect the RCD, see the video lesson.
When independently assembling the switchboard, take into account that the input circuit breaker and the meter will be sealed by the energy supplying organization. If the meter has a special screw on which the seal is attached, the input automatic machine does not have such devices. If it is not possible to seal it, you will either be denied the start-up or the whole panel will be sealed. Therefore, inside the general switchboard put a box for one or two places (depending on the size and type of automatic machine), and in it mount the input automatic machine. This box is sealed upon acceptance.
Individual automatic machines are installed on the rails just like RCDs: they are pressed to the rail until the click. Depending on the type of automat (for one or two poles – wires), the corresponding wires are connected to them. What are the automatic machines, and what is the difference between devices for one and three-phase network, see in the video, the choice of the nominal value of the automatic protection device is described here.
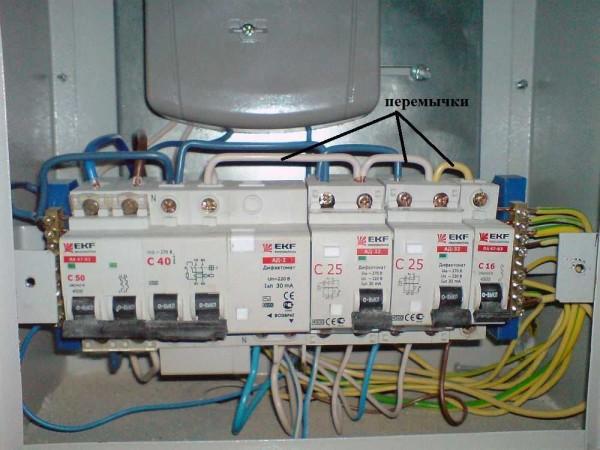
After the necessary number of devices are installed on the mounting rail, their inputs are connected. As said before, this can be done with jumpers from the wire or a special connecting comb. How the connection of wires look like, see the photo.
There are two ways to make jumpers:
- Cut conductors of the necessary segments, bare their edges and bend them in an arc. Insert two conductors per terminal, then tighten them.
- Take a sufficiently long conductor, with 4-5 cm strip 1-1.5 cm of insulation. Take round-nosed pliers and bend the bare conductors so that the resulting arcs are connected to each other. Insert these bare sections into the corresponding sockets and tighten.
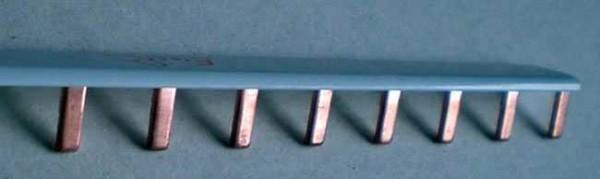
This is how it is done, but electricians talk about the poor quality of the connection. It is more reliable to use special tires. Under them on the body there are special connectors (narrow slots, closer to the front edge), in which the contacts of the bus are inserted. These busbars are sold by the meter, cut into pieces of the required length with ordinary wire cutters. Having inserted it and installing the feeder conductor in the first of the automata, screw the contacts on all the devices to be connected. On how to connect the circuit breakers in the switchboard with the help of a busbar, see the video.
To the output of automatic machines is connected to the phase wire, which goes to the load: on household appliances, to sockets, switches, etc. Actually, the assembly of the switchboard is finished.
Choice of automatic machines in the house or apartment switchboard
In the electrical panelboard use three types of devices:
- Automatic circuit breaker. Disconnects and turns on the power supply in manual mode, and also triggers (breaks the circuit) in case of a short circuit in the circuit.
- RCD (residual current device). It controls the leakage current that occurs when the insulation breaks down or if someone picks up the wires. If one of these situations occurs, the circuit is broken.
- Differentialcircuit breaker (differential circuit breaker). This is a device that in one case combines the two: controls and the presence of short-circuit and leakage current.
Dif-automatic usually put instead of a bunch – RCD + automatic. This saves space in the switchboard – it requires less space for one module. Sometimes it is important: for example, you need to include another power line, and there is no space for installation as there is no free automatic circuit breaker.

In general, more often put two devices. Firstly, it is cheaper (dif.automatic machines are more expensive), and secondly, when one of the protective devices works, you know exactly what happened and what to look for: short circuit (if the automatic machine was switched off) or leakage and possible overcurrent (RCD was triggered). If the circuit breaker tripped, you will not find it. Unless you put a special model, which has a flag that shows what fault triggered the device.
Automatic protection devices
Protective automatic machines are selected by the current that is required for consumers of this group. It is calculated simply. Add up the maximum power of all devices connected simultaneously in the group, divide by the voltage of the network – 220 V, get the required current capacity. The device rating should be slightly higher, otherwise it will be switched off by overload when all loads are switched on.
For example, adding up the power of all devices in the group received a total value of 6.5 kW (6500 W). Divided by 220 V, we get 6500 W / 220 V = 29.54 A.

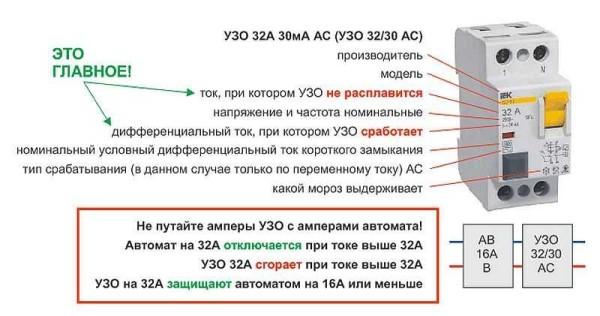
The current ratings of automatic machines can be as follows: (in A) 6, 10, 16, 20, 20, 25, 32, 40, 50, 63. The closest larger to the specified value – 32 A. This is what we are looking for.
Types and types of RCDs
RCDs are of two types of action: electronic and electronic-mechanical. The difference in price for a device with the same parameters is large, but electronic-mechanical is more expensive. But it is necessary to buy them for the panel in the house or apartment. The reason is the same: they are more reliable, since they operate regardless of the presence of power, and for the work of electronic necessarily need power.
For example, the situation is as follows: you repair the wiring, for example, a socket and de-energized for this network, that is, turned off the input circuit breaker. In the process, somewhere damaged the insulation. If an electro-mechanical RCD is installed, it will trip even if there is no power. You will realize that something was done wrong and will look for the cause. An electronic one is inoperable without power and if you turn on a network with damaged insulation, you may have problems.
To figure out which device you have in front of you, all you need is a small battery and a couple of wires. Power from the battery is applied to either pair of contacts of the RCD. The electro-mechanical one will trip, the electronic one will not. More about it in the video.
RCDs are further distinguished by the type of current to which they react:
- AC type – alternating sinusoidal current;
- type A – alternating current + pulsating direct current;
- type B – alternating + pulsating direct + rectified current.
It turns out that type B gives the most complete protection, but these devices are very expensive. For a house or apartment panel is quite enough, type A, but not AC, which are mostly sold, since they cost less.
In addition to the type of RCD, it is selected by current. And on two parameters: nominal and leakage. Rated is the one that can pass through the contacts and not destroy (fuse) them. Rated current of RCD is taken on a step higher than the rated current of the automatic machine installed in tandem with it. If the circuit breaker is required for 25 A, then the RCD take a 40 A.
On the leakage current is even simpler: in the electrical distribution boards for apartments and houses put only two ratings – 10 mA and 30 mA. 10 mA put on the line with one device, for example, on the gas boiler, washing machine, etc., as well as in rooms where you need a high degree of protection: a child’s room or bathroom. Accordingly, RCDs for 30 milliamperes are installed in the lines, which include several consumers (devices) – on sockets in the kitchen, rooms. On the line of lighting such protection is rarely put such protection: there is no need, except for the street or in the garage.
More RCDs are different on the time of delayed triggering. They are of two types:
- S – Selective. Triggers after a certain time after the occurrence of leakage current (quite a long period of time). They are usually placed at the input. Then, in the event of an emergency, the device on the damaged line is first disconnected. If the leakage current remains, then the “older” selective RCD will trip – usually the one on the input.
- J – Triggers with a delay (protection against accidental currents), but with a much smaller one. This type of RCDs are put on groups.
RCDs are of the same type as RCDs and are selected in the same way. Only when determining the current capacity, you immediately calculate the load and determine the rating.
A few explanations on the installation of the built-in cabinet for the panel, the order of connection see in the video from the practice and a generalist.
One important detail that is important for safety. On the RCD or dif-automatic is a button “test”. When it is pressed, the leakage current is artificially created and the device must work, the switch goes to the “off” position and the line is de-energized. This is how the operability is checked. It is necessary to do this at least once a month: to be sure of the reliability of protection. One by one, check all the available RCDs in the circuit. This is important.
Probably, this is all the information you need to assemble the electrical panel with your own hands. Maybe you still need to learn more about how to divide the load into groups, read about it here.


")