

Creating a unique atmosphere at home is not an easy task. Although there are many finishing materials, furniture and styles available today, they are not unique. And you want something of your own, personal, personal, something that no one else has. There is a way out, of course. Even two. The first is to order some product from a master. The second is to make with your own hands. And no one has not invented a better interior decoration than paintings, but not everyone can draw. And do not. You can make paintings from unusual materials. Such works will definitely be unique and inimitable.
Innehåll i artikeln
From felt and on felt
Not often we can see paintings and panels from felt. He generally in recent years has become a wild thing, as well as products made of it. Hats and some other small things are perceived normally, but felt paintings are rare. So, describing paintings from unusual materials, let’s start, perhaps, it is with felt. To begin with, you can make a landscape, flowers. They are easier to realize. With experience, you can make more and more interesting panels.
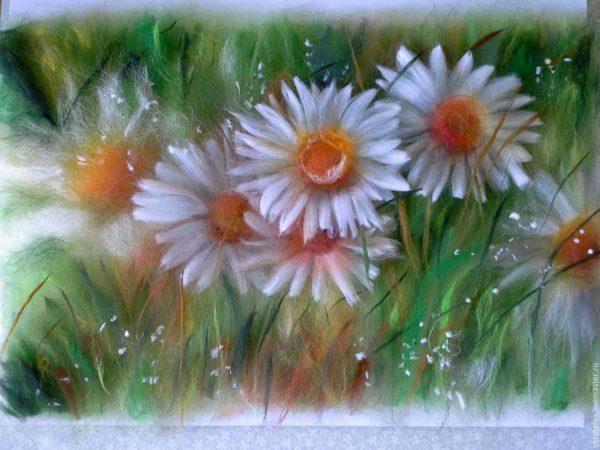
For felting, special wool is used. When creating paintings, it is laid out in layers and the base (fleece), forming the desired pattern. When creating pictures from wool, the process takes place in several stages. First lay out the background, relief, then all the finer and finer details.
Making the background
To begin with, we take those shades of wool that create the background. Lay them out on the fleece, trying not to leave voids. It is desirable to make two thin layers. The resulting background is transferred to a foam pad (5 cm thick or more). Then we take a special needle (for filtzing). Holding it vertically, often-frequently pierce the stacked wool. This we achieve that it is connected to the base. If you look at the back side of the fleece, you should see the threads coming out.
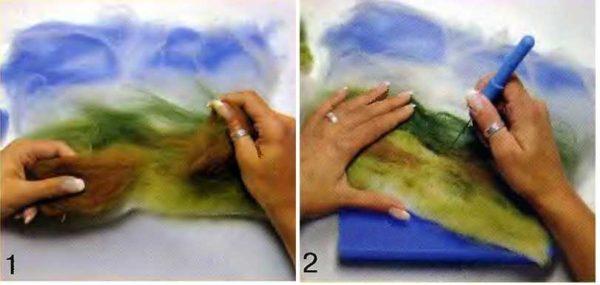
Then the workpiece is laid on polyethylene (in size it is larger than the picture itself), the wool is wetted with a soap solution (one tablespoon of grated baby soap per 1 liter of hot water) and begins, in fact, the process of felting. To begin with, wet wool is kneaded with hands (press down, gradually increasing the pressure). Wet wool threads interlock with each other with a pile, forming a single surface – this is the process of wet felting. The result is felt. Only for paintings we do not need to achieve high density. We stop when the base is dense enough. We blot excess moisture with a terry towel.
Adding details
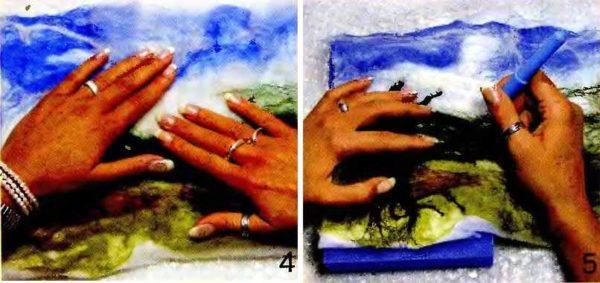
Now we need to add details to the background: trees, flowers, stones, etc. With dry hands (wool sticks to wet ones) we lay out tree trunks, bushes, stones. On the new parts well pass the needle, wet, knead with hands. Then use more rigid means – a wooden rolling pin. Wet picture carefully back and forth pass with a wooden rolling pin.
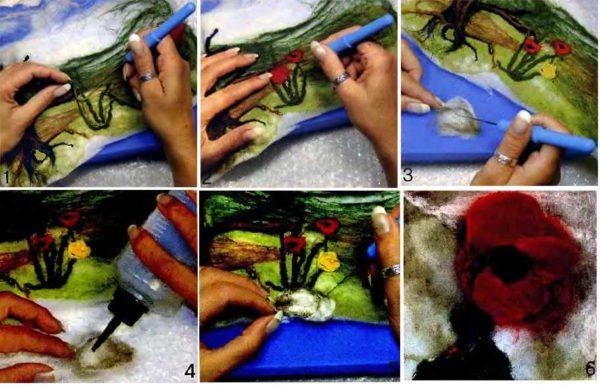
Last we lay out volumetric small components: flowers, clouds, stones, thin branches, stems, leaves… To make them volumetric, we use up to eight layers of wool, petals are made of balls, stems – of twisted bundles. The procedure is the same: laid, profaltsevali (poked with a needle), wet, felted, remove the rest of the liquid. If the detail turned out not voluminous enough, you can repeat the process.
Photo of works: paintings from wool (felt)
Paintings / panels of threads
The most, perhaps, the most common way to create paintings from colored threads – embroidery. But this is a very laborious and time-consuming process, although the masters get pleasure. But there are also ways that are faster. Much faster. These are glued paintings from threads and stretched (winding). So you can not say that these paintings from unusual materials. But the techniques are definitely unusual.
Gluing
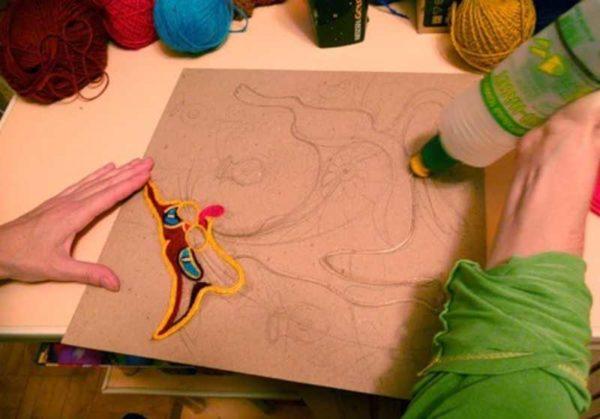
Thread take any threads, you can for knitting. Paintings are made on a rigid base: on cardboard, plastic, glass. The technology is not complicated. First, the outline of the picture is drawn on the base. On cardboard and opaque plastic it is drawn, on glass and transparent plastic you can not draw, and put down the drawing. Next, the fabrication begins:
- The contour is smeared with PVA glue, a thread of the desired color is glued on it. In some variants it is contrasting (black, for example), in others – in the tone of the detail.

- The formed contours are filled with threads. You can glue the base, lay a dry thread on the glue, or you can moisten the thread with glue and lay it on a dry base. Spiral filling looks good. This method is good if it is a part of the hull, background or other similar object. The second method – sections of threads of the required length, which are laid along one of the edges. This method is used when the direction of the thread is important – for drawing relief, direction of wool, etc.

- Fill the background. It does not necessarily have to be made of threads.
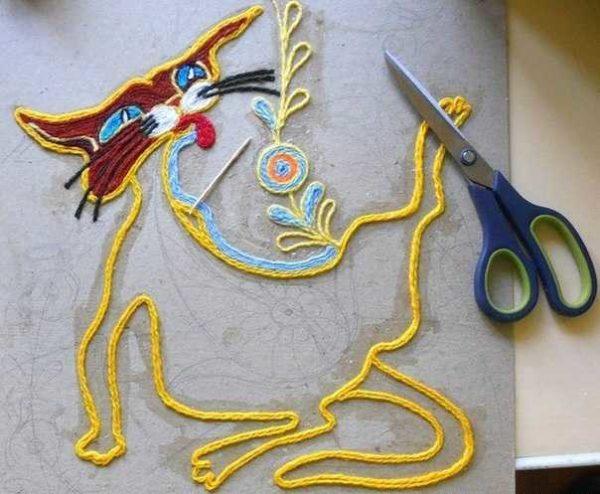
That’s all. When everything is filled, we leave the finished panel of threads to dry for a few days. After the glue dries, it can be covered with transparent varnish (take a water-based – and dries quickly, and does not smell).
From the threads are good cartoon characters, drawn characters, pictures and sketches. All stylized and very individual. Exact, photographic match will not get, as this technique is not designed for this. But it is simple, easy to understand and requires very little time. This is an ideal activity for joint creativity with children.
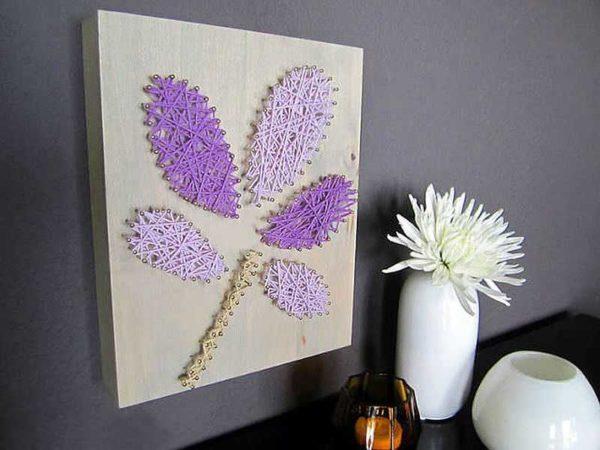
From threads and nails
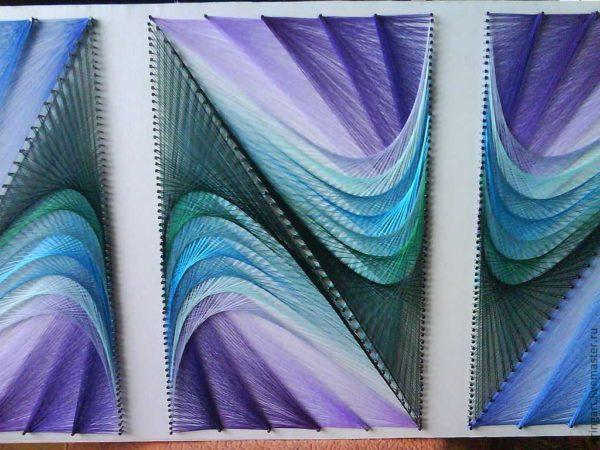
Interesting paintings are obtained from threads and nails. This technique has its own name – “string art” (string art). From the English word string – string (thread).
In appearance, it is difficult to confuse them with something, since the technique is original, the images are graphically clear. Depending on the object, can be suitable for a child’s room, decorated in fantasy style or for a living room in the style of art nouveau pop art, art deco. You can find options even for minimalism … The pluses can also include the fact that making a picture from threads and nails (pins) takes a little time. The smallest ones can be made within an hour. The technique is simple, so you can attract children.
What materials are needed
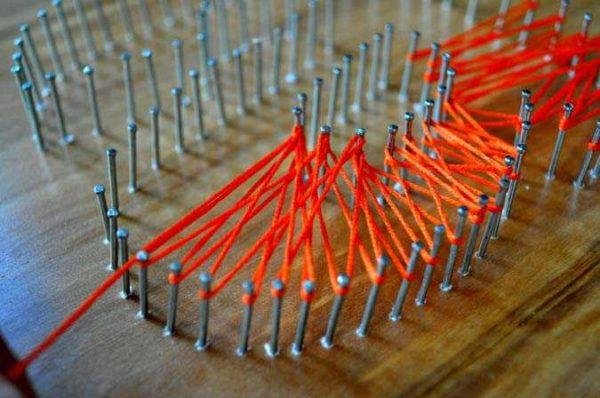
Threads can be taken any. Most often use threads for knitting. Depending on the texture, different results are obtained. Smoother ones give clearer lines, “furry” create a denser background. They are pulled on small nails or pins. Nails of any color and thickness. The main thing is that the caps were neat, but not small (not finish nails). Length – depends on the scale of the picture. For small ones a centimeter and a half is enough, for larger ones you can use three centimeters.
Pins are suitable, if the picture will be with fantasaynym flavor: butterflies, dragonflies, flowers … In this case, we find pins with beads. They also serve as a decoration at the same time.
The base is used any, in which you can hammer the nails. It is most convenient to use high-density foam. It is light, it is easy to go into it and nails and pins. Wood, chipboard (can be laminated, can be sanded) is also suitable.
Basic manufacturing technique
The very process of creation is simple. You choose a drawing. To begin with, it is better to pick up something simple, with not a very large number of elements. For an example, let’s take a stylized flower.
On the chosen base is applied contour. If you know how, you can draw by hand, if you are not sure of your abilities – cut out a stencil, apply. Next, along the contours nail with a step of about 1 cm. In places of sharp bends can be more often.
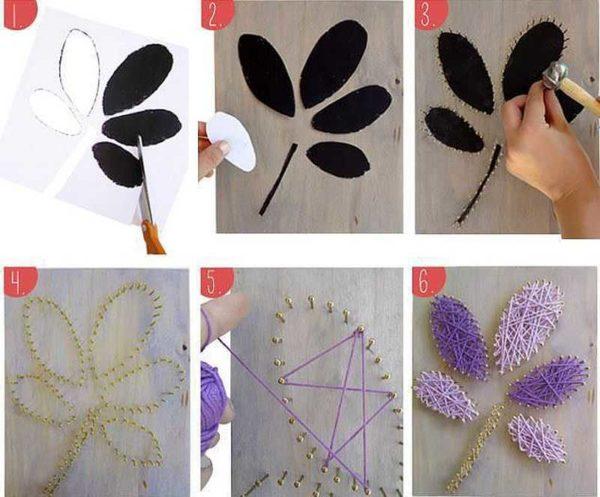
After all the nails are stuffed, we take threads, make a loop at the end, fix it on one of the nails. The first nail is chosen absolutely arbitrarily. Having fixed the thread, in a chaotic order we begin to entangle the nails. Filling can be made more and less dense. In any case, it is desirable to see that these are separate threads. This is the charm of these works. When the entire volume is filled, fix the threads on one of the nails. That’s it. You can only hammer the nails a little, if necessary.
Variants and variations
Now a little about the nuances. In the above example, only the figure bounded by nails is filled. But it can be the other way around. Filled with threads what is outside the limits outlined by the nails. Also interesting pictures are obtained.
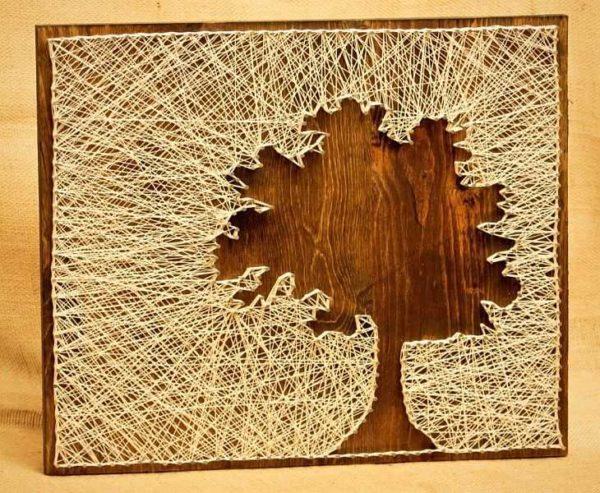
And in the first and second case, the difference in color between the background and threads should be significant. This gives clarity to the image. In more complex variants, the threads are stretched not chaotically, but creating a certain binding. This is far from simple, experience comes with years of practice. Such paintings look magical.
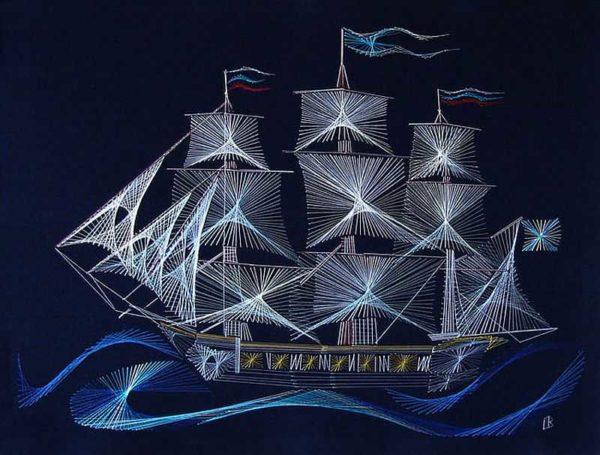
Another way to create unusual paintings from threads and carnations – to draw in this way only some elements of the picture. Here it is important to break the image into fragments, the place of each nail is calculated, since they are also elements of the very picture.
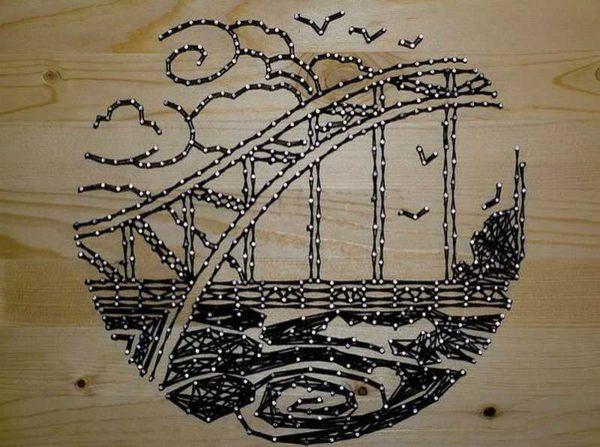
This technique is a way to paint a landscape with nails and threads. It takes a special vision that allows you to break the picture into lines that will generally create a whole image.
Photos of finished pictures of threads and nails
Panorama of buttons, beads, beads, beads
Here is a really unusual material for creating paintings – buttons. Different sizes, shapes, textures, colors. All of them go into business. Can be used as they are, can be painted, decorated with sequins, sequins, etc. It all depends on the idea and desire of the author. The basis for paintings from buttons – any. Cardboard, wood, foam, fiberboard, chipboard, MDF, sheet plastic, glass. Depends on the idea and the desired effect. To the base of the buttons are glued. Glue – universal, which when drying remains transparent.
Technique – start with a simple
Sometimes buttons are used only as part of the picture. Since they are volumetric, they are used to make flowers, foliage, other small and medium-sized convex details. Background, large fragments are made in any other technique, but in most cases it is a drawing or applique. Such paintings are not difficult to make independently or with the participation of children.
Basic technique
If desired, you can make any image, silhouette or even a picture from buttons. You should start with the most simple drawings. In the process there seems to be nothing complicated, but a lot of time is taken away by a large work. To begin with, it is better to see the result in a few hours. Choose a simple form: a heart, an apple, the moon, the sun, a large flower of a simple shape, an image of an animal, a bird. Just remember that portrait resemblance is not for this technique. You should get a recognizable shape.
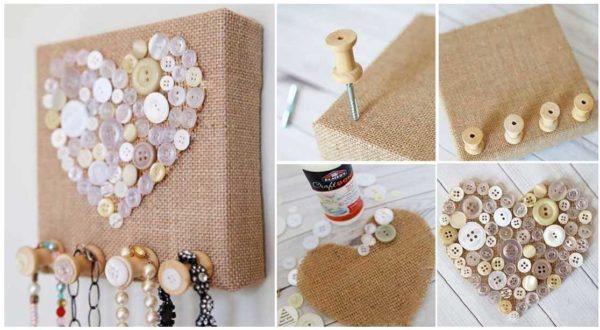
The manufacturing process is simple. The first thing you do is to apply the contour to the base. It turns out – draw by hand. No – cut out of paper. The picture can be printed. You cut out the drawing along the contour, attach it to the base, trace it with a pencil. If you need several colors, trace the boundaries that separate them (colors).
Next, you fill in the outline with the available buttons. For some drawings a clear even edge is important. It can not be achieved with the help of buttons, even the smallest size. In this case, you can use beads, beads. Voids inside, you can also close with beads or beads. All this looks very organic.
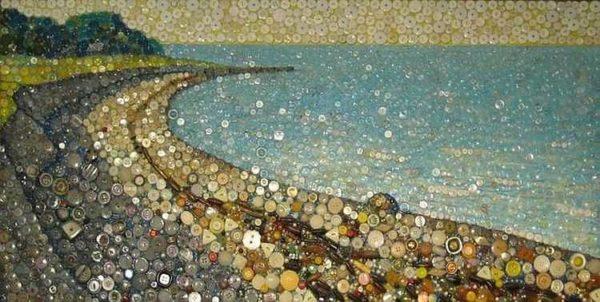
With experience, you can take on more serious canvases. But patience and assiduity you should be just huge. Here is already important shade and size of each button.
Panels and paintings of fabric and lace
Fabric and lace – also quite a non-standard material for making panels and paintings. This is not about applique or patchwork techniques – they are difficult to perform and require specific skills. It is about the fact that now there are such fabrics, the pattern or texture of which can be a decoration of modern interiors. Lace, too, is no longer the domain of the rich. And if there are old napkins or you know how to knit them yourself, you can make very interesting paintings, panels. The main thing – the idea and the ability to see in an ordinary piece of cloth future panel.
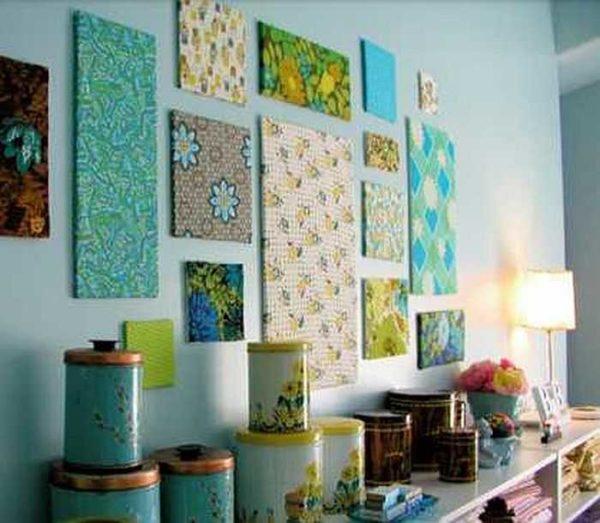
Panel from fabrics and textiles
The first idea is to find two-color fabrics. The main condition – the colors should be the same, the patterns are different. The easiest way to find black and white variants. All other shades – you will be tortured to run to the stores. Although, the Internet can come to the rescue. Selected fabrics are stretched on the frames. Frames can be the same size and shape, can be different. Both options look good.
Next idea: find fabrics with matching colors. There can be three or four colors, and they should meet in different combinations in the selected scraps. As a rule, take two basic colors: white + black, white + gray, black + gray and to them add one or two colors. Just note that the “additional” colors must be present in the interior design. So, firstly, the panel will not be too motley, and secondly, it will easily fit into the interior.
Found fabrics are again stretched on frames of different sizes and placed on the wall. One moment: if with the same frames to miss hard, then different sizes and shapes to combine beautifully can be hard. Take a closer look at the photo and make something similar.
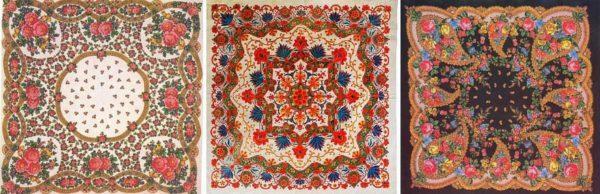
The third idea: find a large bright picture, divide it into several fragments. It will turn out a kind of modular painting, which are so popular in recent years. If the fabrics you see do not inspire you, try to find scarves. Russian, Chinese… with any ethnic motifs. Such paintings are 100% unusual and will help make your home stand out.

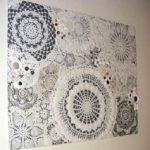
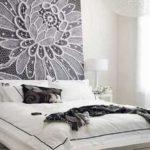
Lace fairy tale
Lace is a work of art in itself. It can simply be stretched over a contrasting backing. So much for paintings made of unusual materials.
-

- From crocheted napkins you can make a marvelous panel of beauty
-
- A large fragment on a contrasting background
-
- Small lace napkins with separate frames
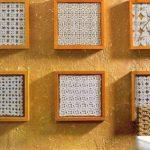
There is an idea that will help to make from a few napkins many different pictures. The napkins, however, will be spoiled. So, cover the frame with colored solid-colored paper of a saturated tone. Apply the lace, spray paint from a spray can. The paint should be contrasting.
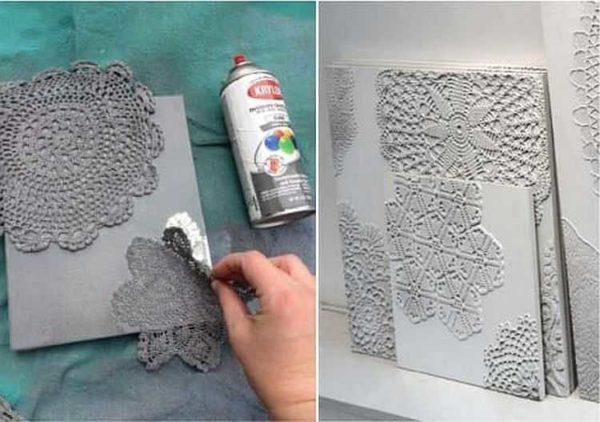
With this technology, you can make single paintings, you can – triptychs, modular paintings, etc. The best effect is obtained with knitted napkins. They have a more relief pattern. The pattern of factory lace is harder to transfer to paper, but it is also possible.


