

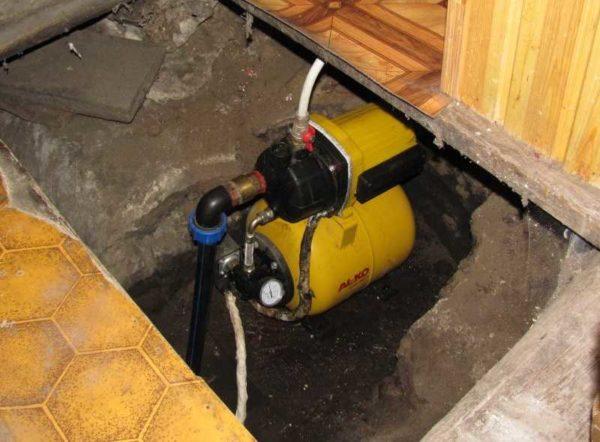
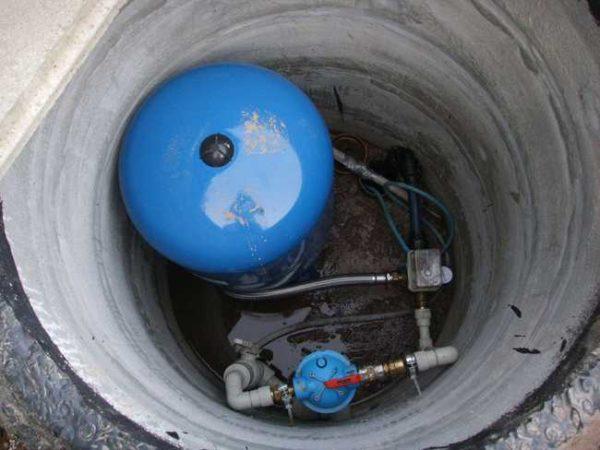
Individual water supply of a private house or dacha can be from two sources – a well or a borehole. To automate water supply to the house and to create a stable pressure it is necessary to install a pumping station. It consists of a pump, hydroaccumulator, pressure switch and safety group (pressure gauge and release valve). The plus side of this idea is that with this scheme of water supply any household appliances can work, another good news is that the connection is not too difficult a task, if desired, you can install and connect the pumping station with your own hands.
Vsebina članka
Choosing the place of installation
Install pumping stations near the water source – well or well – in a specially equipped pit – caisson. The second option – in a utility room in the house. The third – on a shelf in the well (with a well this number will not pass), and the fourth – in the subfloor.
How to determine the depth of suction
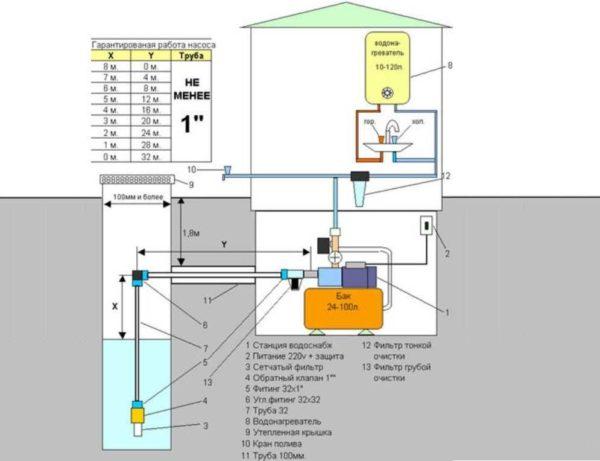
When choosing a place, first of all, the technical characteristics – the maximum suction depth of the pump (from where the pump will be able to lift the water) – are guided by technical characteristics. The whole point is that the maximum suction depth of pumping stations is 8-9 meters.
Suction depth is the distance from the water mirror to the pump. The supply pipeline can be lowered to any depth, it will pump water from the level of the location of the water mirror.
Wells are often deeper than 8-9 meters. In this case it is necessary to use other equipment – a submersible pump or a pumping station with an ejector. In this case, water can be supplied from 20-30 meters, which is usually enough. The minus of this solution is expensive equipment.
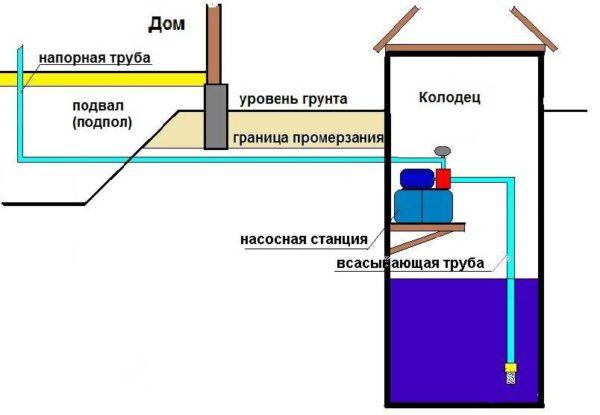
If you lack just one meter before you can put conventional equipment, you can put the station in a well or above the well. In the well, a shelf is attached to the wall, in the case of a well, the pit is deepened.
When calculating, do not forget that the level of the water mirror “floats” – in summer it usually drops. If the depth of suction you have on the verge, in this period there may simply be no water. Later, when the level rises, the water supply will resume.
Safety considerations
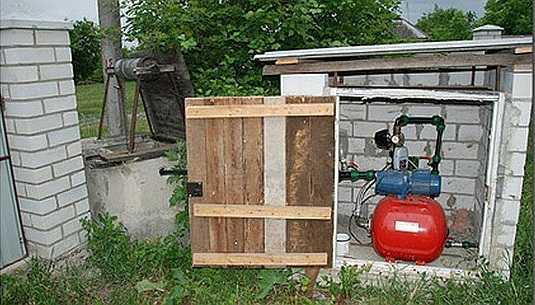
Another thing to consider is the safety of the equipment. If the installation of the pumping station is supposed to be near a house with permanent residence, there are fewer problems – you can choose any option, even in a small shed. Only one condition – it should not freeze in winter.
If it is a dacha, which is not permanently inhabited, the matter is more complicated – it is necessary to arrange such a room, which is not conspicuous. The safest way to install a pumping station is in the house. Although it can be carried away even in this case.
The second place where you can install a pumping station – buried camouflaged caisson.
The third is on the shelf in the well. Only in this case, the traditional house for the well should not be made. You need a steel cover, which is locked on a reliable lock (to weld hinges to the ring, in the lid to make slots on which to hang locks). Although, under the house can also hide a good cover. Only the design should be thought out so that it does not interfere.
Convenience and operating conditions
Installing a pumping station in the house is good for everything, except for the fact that the equipment is noisy when working. If there is a separate room with good soundproofing and according to technical characteristics it is possible – no problem. Often make such a room in the basement or in the basement. If there is no basement, you can make a box in the basement. Access to it – through a hatch. In addition to soundproofing, this box should have good thermal insulation – the operating temperature range starts from +5°C.
To reduce the noise level, the station can be placed on thick rubber – to dampen vibration (created by the cooling fan). In this case, it is even possible to install in the house, but the sound will certainly still be.
If you stop at the installation of a pumping station in a caisson, it should also be insulated, and also waterproof. Usually for these purposes use ready-made reinforced concrete containers, but you can make a caisson from concrete rings (like a well). Install a ring with a bottom down, and a ring with a lid on top. Another option is to build a brick, pour the floor with concrete. But this method is suitable for dry areas – the groundwater level must be one meter below the depth of the caisson.
The depth of the caisson is such that the equipment was installed below the freezing level. Insulation polystyrene foam. Better – extruded. Then at the same time you also get waterproofing.
For a caisson made of concrete rings, it is convenient to use a shell (if you find the right diameter). But you can also plate polystyrene foam, cut into strips and glue it. For rectangular pits and structures are suitable slabs that can be glued to the walls with bituminous mastic. Lubricate the wall, apply the insulation, you can additionally fix it with a couple of nails/dowels.
Connecting the pumping station
Choosing the equipment and the place for installation is half the battle. It is also necessary to correctly connect everything in the system – the water source, the station and the consumers. The exact scheme of connection of the pumping station depends on the chosen location. But in any case there is:
- A suction pipeline that goes down into the well or well. It goes to the pumping station.
- The station itself.
- The pipeline that goes to the consumers.
All this is true, only the schemes of tying, depending on the circumstances, will vary. Consider the most common cases.
Water supply from a well for permanent residence
If the station is put in the house or in a caisson somewhere on the way to the house, the connection scheme is the same. On the supply pipeline, lowered into the well or well, a filter is installed (most often – the usual mesh), after it is put a check valve, then the pipe already goes. Why the filter – it is clear – to protect against mechanical impurities. The check valve is needed to ensure that when the pump is switched off, the water does not flow back under its own weight. Then the pump will be switched on less often (longer service life).
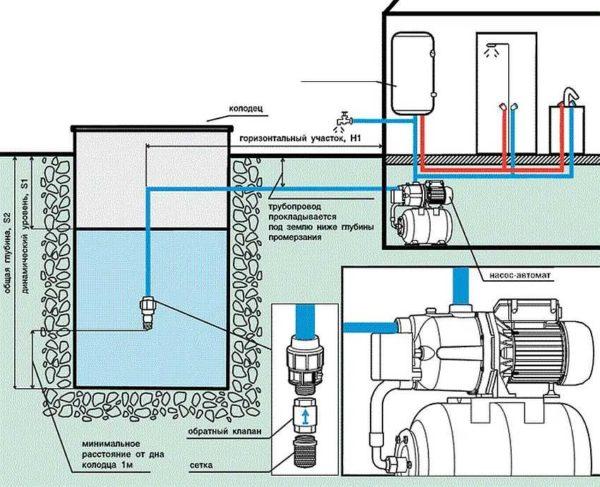
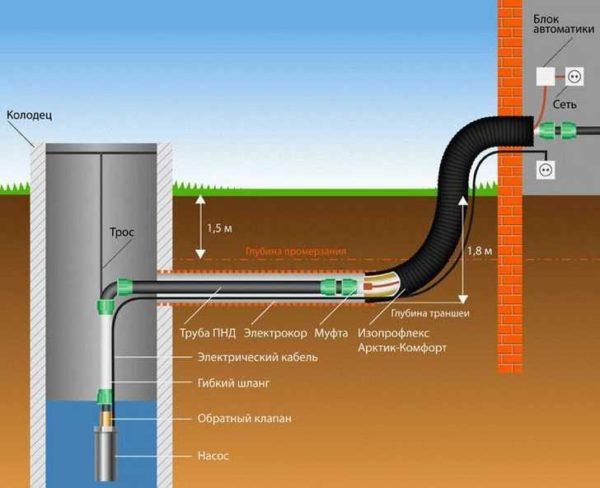
The pipe is led through the wall of the well at a depth just below the freezing level of the ground. Then goes in the trench at the same depth. When laying the trench, it should be made straight – the fewer turns, the less pressure drop, which means that you can pump water from a greater depth.
To be sure, you can insulate the pipeline (lay sheets of polystyrene foam on top, and then fill with sand, and then – with soil).
At the entrance to the house, the supply pipe passes through the foundation (the place of passage is also insulated), in the house can already rise to the place of installation of the pumping station.
This way of installing the pumping station is good because if everything is done correctly, the system works without problems. The disadvantage is that it is necessary to dig trenches, as well as to lead out/input the pipeline through the walls and also in the fact that if a leak occurs, it is difficult to localize the damage. To minimize the chances of leaks, take proven quality pipes, lay a whole piece without joints. If there is a connection, it is desirable to make a viewing well.
There is also a way to reduce the amount of earthwork: lay the pipeline higher, but insulate it well and additionally use a heating cable. This may be the only way out if the site has a high level of groundwater.
There is another important point – the cover of the well should be insulated, as well as the rings from the outside to the depth of freezing. Simply the section of the pipeline from the water mirror to the outlet in the wall should not freeze. This is why insulation measures are required.
Connecting the pumping station to the water supply system
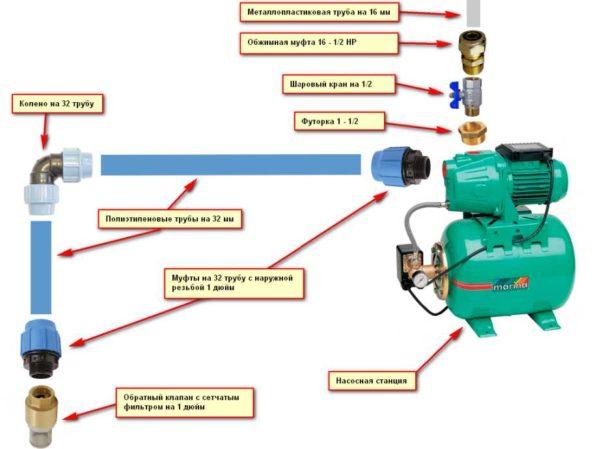
Often a pumping station is put to increase the pressure in the water supply for centralized water supply. In this case, the input of the station is connected to the water pipe (also through a filter and check valve), and the output goes to consumers.
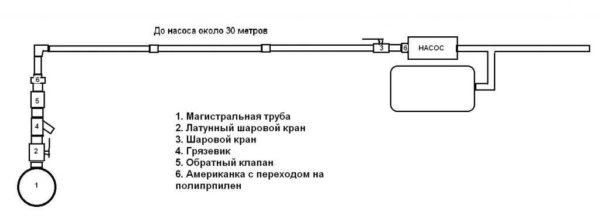
At the inlet it is desirable to put a shut-off valve (ball valve) to be able to disconnect your system if necessary (for repair, for example). The second shut-off valve – in front of the pumping station – is needed to repair the pipeline or the equipment itself. Then at the outlet it also makes sense to put a ball valve – to cut off consumers if necessary and not to drain the water from the pipes.
Connection to the well
If the suction depth of the pumping station for the well is sufficient, the connection is no different. Except for the fact that the pipeline comes out at the place where the casing ends. Here you usually arrange a pit caisson, here you can also put the pumping station.
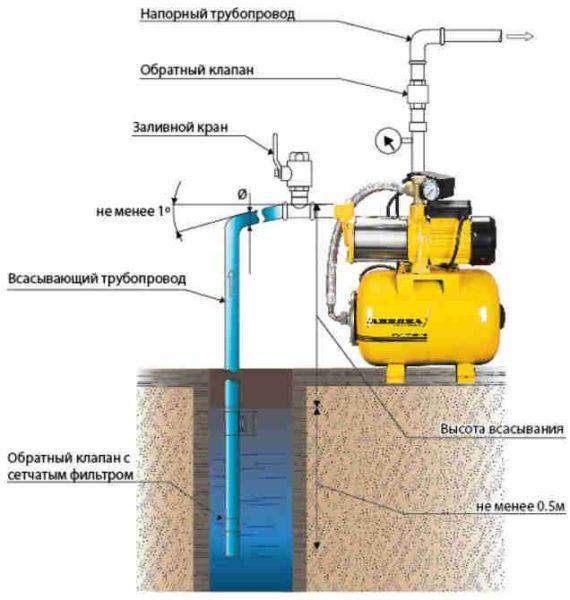
As in all previous schemes, a filter and a check valve are installed at the end of the pipe. At the inlet, you can put a filler cock through a tee. It will be needed at the first startup.
The main difference between this method of installation is that the pipeline to the house is actually on the surface or buried at a shallow depth (not everyone has made a pit below the frost depth). If the pumping station is installed at the dacha, it’s no big deal, the equipment is usually removed for the winter. But if the water supply is planned to be used in winter, it must be heated (heating cable) and insulated. Otherwise, it will not work.
Starting the pumping station
In order to start the pumping station in operation, it is necessary to fill it and the supply pipeline completely with water. For this purpose, there is a special filling hole in the housing. Pour water into it until it appears. Screw the plug back in place, open the tap at the outlet to the consumers and start the station. At first the water comes with air – the air plugs, which were formed when filling the pumping station, come out. When the water flows in a steady stream without air, your system has entered the working mode, you can operate it.
If you have poured water, and the station still does not start – the water does not pump or goes jerkily – it is necessary to understand. There are several possible causes:
- there is no check valve on the suction pipe lowered into the source, or it does not work;
- there is a leaky connection somewhere in the pipe, through which air is being sucked in;
- the resistance of the pipe is too high – you need a larger diameter or smoother walled pipe (in the case of metal pipe);
- the water mirror is too low, not enough power.
To exclude the breakdown of the equipment itself, you can start it by lowering a short supply pipe into some container (a tank of water). If everything works, check the main line, suction depth and check the check valve.

")


