

With the advent of LED lamps appeared the opportunity to make the lighting design of apartments and houses more diverse. And when invented flexible tape with attached to them small LEDs, which can shine in different colors and even smoothly change color, only imagination is required: connecting the LED strip – the matter is not difficult. Once done the operation you can easily repeat it.
Isi artikel
Types and types
Before connecting the LED strip is worth understanding their types and labeling. So you will not make a mistake with the choice of power supply and accurately calculate the required intensity of luminescence, the length of the tape and other parameters.
Colors and types of luminescence
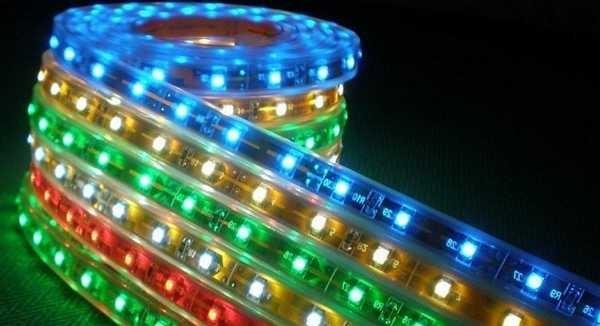
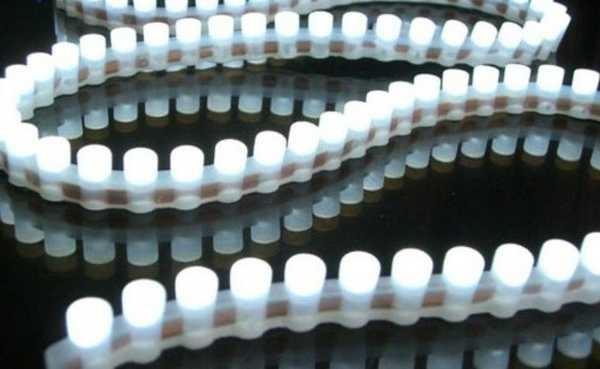
You probably noticed that LED strips differ in the type of luminescence. They come in:
- Monochrome. Assembled from elements of the SMD type, give out a certain color. The initial letter of the English spelling of the color is indicated in the marking:
- LED-W-SMD – white (can be tinged with blue or yellow, also called warm or cold light),
- LED-R-SMD – red,
- LED-B-SMD – blue,
- LED-G-SMD – green.
- Universal. Marked RGB – give different shades depending on the command from the control panel. They work in pair with controller and remote control.
The most popular in interior lighting are ribbons of monochrome crystals. The constant change of colors is too stressful, does not allow you to relax. This – illumination, not lighting. Therefore, universal tapes are used to create advertising, car backlighting – where it is necessary to attract attention. SMD tapes are mainly used for interior design.
Degree of protection
Since the area of application of LED tapes is extensive, the degree of protection is different. For dry rooms are produced ordinary open – without protective coating. There are waterproof – they can be used in wet rooms – in bathrooms, for example. They are covered with a layer of varnish. There is another option – moisture-resistant. They are sealed in a hermetic case and can be mounted directly in water – in an aquarium, pond or swimming pool. They can also be used for outdoor lighting.
For outdoor styling cars most often use LED strips, placed in a transparent polymer tube. It protects not only from moisture, but also from mechanical damage, but their cost is higher.
The size of LEDs, their brightness and density
Let’s deal with the dimensions. If you take a few tapes, you can see that they are made of LEDs of different sizes. In addition, they are sometimes located tightly one next to the other, in some – at a fairly decent distance, and there are also tapes with LEDs in two lines.
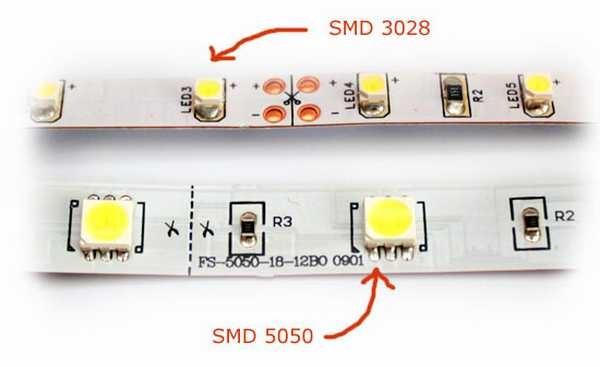
The size of the elements externally distinguish not difficult to distinguish, but how to understand it by labeling. Dimensions are displayed in the numbers that stand after the letters that denote the type of LED. For example, LED-R-SMD3528 (red) and LED-RGB3528 (universal) are assembled from elements with dimensions of 3.5 * 2.8 mm, LED-G-SMD5050 (green) and LED-RGB5050 (universal) – 5.0 * 5.0 mm.
These are the two most common types, although there are larger ones – 56*30 mm, and there are also smaller ones – 20*20 mm.
The larger the size of the crystal, the greater the intensity of light they produce. For monochrome crystals, the figures are as follows:
- 3,2*2,8 mm in size gives out a luminous flux from 0,6 to 2,2 lm;
- size 5,0 * 5,0 mm – from 2 to 8 lm.
Universal LEDs with the same size have a lower intensity: in one case sealed three small crystals of different colors, so the intensity of RGB luminescence is lower:
- 3.2*2.8 mm produces 0.3 to 1.6 lm;
- 5.0*5.0 mm – from 0.6 to 2.5 lm.
All values are given for crystals without protective coating. Any of them reduces the luminescence intensity and it should be taken into account when calculating the luminescence brightness.
Length calculation
Above we talked about each individual LED on the tape, and the tape is a lot of them and they are located at different densities, respectively, can give out a stream of light of different intensities. The minimum number of crystals on one meter – 30 pcs, the highest density in one row – 120 pcs / m, in two rows – 240 pcs / m.
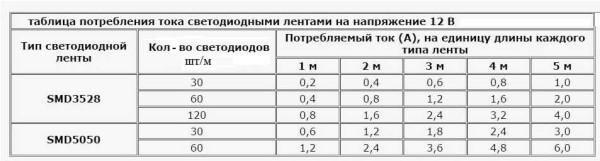
Depending on the number of crystals changes and the total intensity of luminescence and electrical power consumption. For convenience in calculating the required lighting intensity and electrical parameters, technical data are summarized in the table.
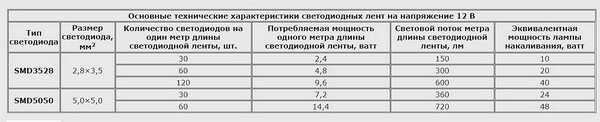
According to this table, you can determine what length is needed tape for backlighting. For example, you want to make backlighting in the room, the glow of medium intensity. It is necessary to replace two incandescent lamps of 80 W. It is necessary to organize a light flux of about 140 W (two 80 W lamps will never give 160 W).
If for these purposes to take SMD3528 with the number of LEDs 120 pcs / m will need about 5 meters of tape (take with a reserve of 20%), SMD5050 with an installation density of 60 pcs / m will require 4-4.5 meters.
In general, LED tape sold on meters. From the factory it comes spools of 5 meters and is not always necessary a piece of this length. Therefore, it is possible to cut off the necessary amount: on the dotted dotted lines with the image of scissors. Strictly along these lines and can be cut.
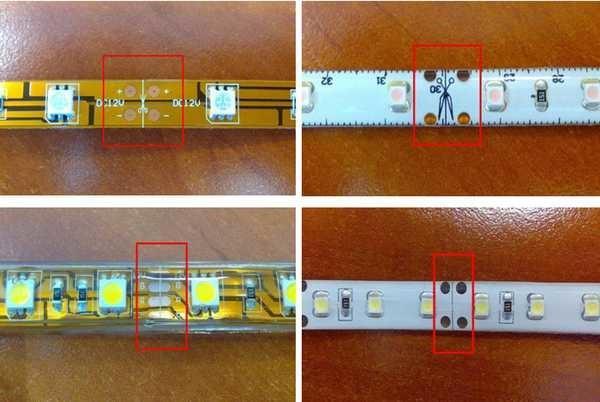
If the scissors are not drawn, then there is necessarily a dotted line. Also, the cutting line can be determined by the presence of contact pads on both sides of the line.
Connecting the LED strip
Most LED strips operate from a voltage of 12 V or 24 V. If the line of crystals is one, the power supply requires 12 V, if they are two – 24 V. Suitable any source of direct current, issuing such a voltage: battery, power supply, battery, etc.
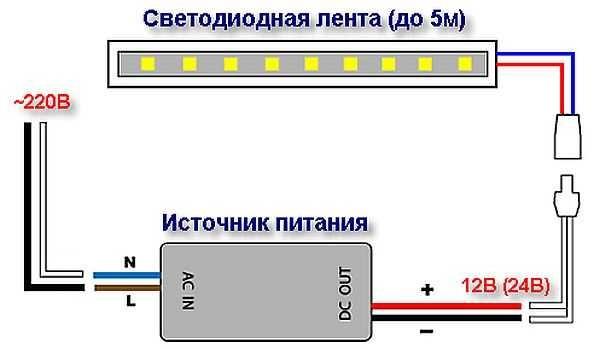
To connect the tape to the household network 220 V requires a converter or adapter (also called blocks or power supplies, adapters).
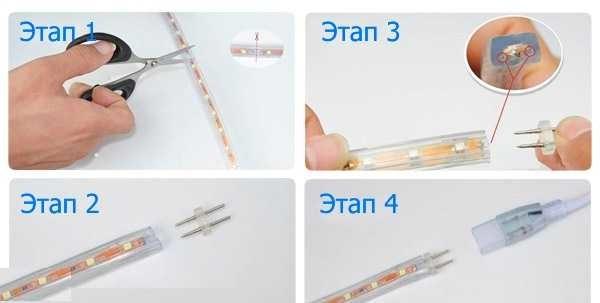
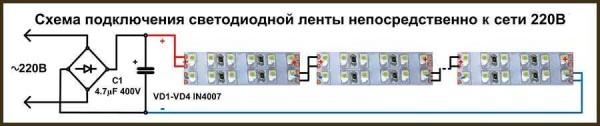
Recently, there are tapes that can be connected to the network in 220 V. All of them are sealed in plastic tubes – 220 volts is no joke. They are also cut along the marked lines, connected with the help of a special connector, which is inserted into the conductors. To the connector is connected to the cord with a built-in rectifier (it is a diode bridge and a capacitor).
This tape differs from the usual tape that it has small sections (20 pcs) with LEDs are not connected in series, but in parallel, and so that the diodes are directed toward each other. Due to this we get the required voltage of 220 volts or so. Alternating current is converted to direct current by means of a diode bridge, and the ripple is damped by a capacitor.
In principle, such a tape can be assembled from the usual, but you will need to take care of the insulation: touching the element connected to the household network without an adapter is fraught with serious consequences.
How to connect several LED strips
Each of the tapes, depending on the modules used and the number of elements on one meter, consumes a different amount of current. The average parameters are shown in the table. Knowing what length you want to mount the backlight, you can choose an adapter that will give the required current.
Sometimes the required length of the tape exceeds 5 meters – when it is necessary to illuminate the room around the perimeter. Even if the power supply can give the required current, connect two or more five-meter ribbons in series can not. The maximum allowable length of a single branch – that’s the 5 meters that come in a spool. If you extend it by connecting the second one in series, a current many times higher than the calculated current will flow along the tracks of the first tape. This will lead to rapid failure of the elements. It may even melt the track.
If the power supply capacity is such that it can be connected to it several tapes, to each of them pull separate conductors: the connection scheme is parallel.
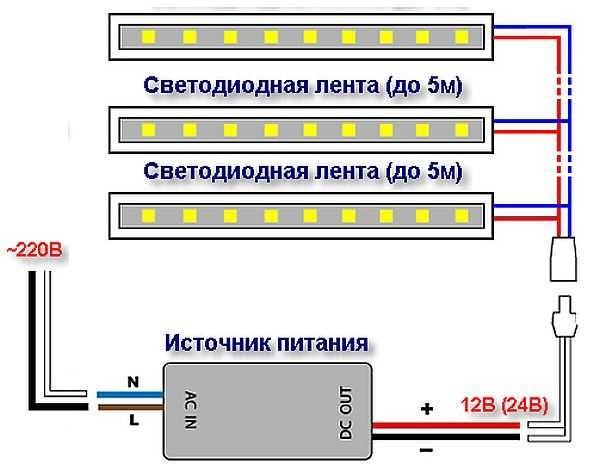
In this case, it is convenient to place the power supply in the middle, for example, in the corner, and from it – two tapes on either side. But it is often cheaper to buy several lesser adapters than one more powerful one.
Connecting RGB tape through the controller
First the power supply is connected in series, then the controller. Between them they are connected by two wires. From the controller comes out already 4 conductors, which are divorced to the corresponding contact pads of the RGB tape.
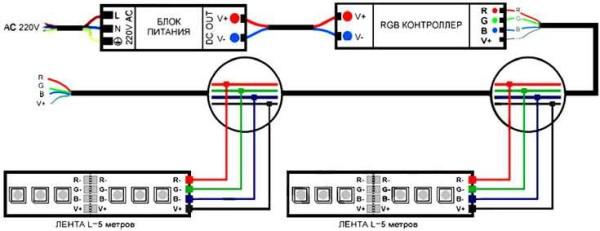
Just as in monochrome ribbons, and in this case, the maximum allowable length of one line is 5 meters. If you need a longer length, then from the controller are two bundles of wires of 4 pieces each, that is, they are connected in parallel. The length of the conductors can be different, but it is more rational to have the power supply and controller in the middle, and two branches of backlighting go to the sides.
Ways of connection
Connecting the LED strip to the power supply is serial. Therefore, pay attention to polarity: connect “+” only to the same pole, and “-” – to the minus.
At the end of the tape that comes on the bobbin soldered conductors. If the glow is monochrome, the conductors are two – “+” and “-“, in multicolor 4, – one common “plus” (+V) and three colored (R – red, G – green, B – blue).

But not always a 5-meter piece is needed. often shorter sections are required. Cut the tape along the lines drawn.
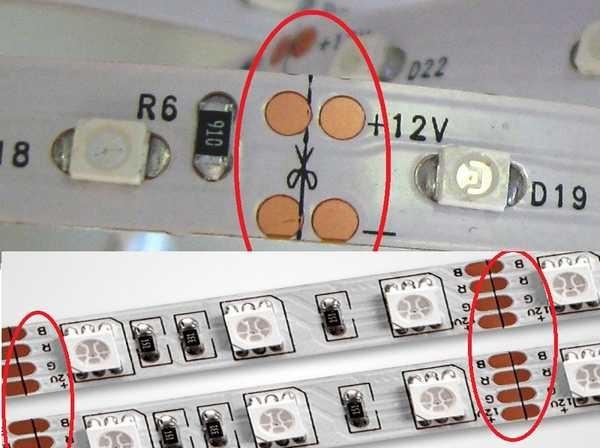
On the photo you see on both sides of the cut line contact pads. On each tape they are signed, so it is quite difficult to get confused when connecting. To make it even easier, use conductors of different colors. This way it’s more obvious and you won’t get confused.
Connectors
Connect the LED strip can be without soldering. For this there are special connectors. These are specially designed devices – plastic housings that ensure proper contact. There are connectors:
Everything is very simple: the lid is opened, the tape or conductors with bare ends are inserted. The lid is closed. The connection is ready.
The method is very simple, but not very reliable. The contact is ensured only by pressure, and if the lid is loosened a little, problems start.
Soldering
If there are at least some soldering skills, it is better to use this method. To work, you will need a soldering iron of medium power, with a thin or sharpened stinger. You need rosin or flux, as well as tin or solder.
Strip the insulation from the ends of the conductors, twist them into a tight bundle. Take a heated soldering iron, lay the conductor on the rosin, warm it up. We take a little solder on the soldering iron’s sting and heat the wires again. The conductors should be tightened with tin – tin-plated. In this form conductors are easy to solder.
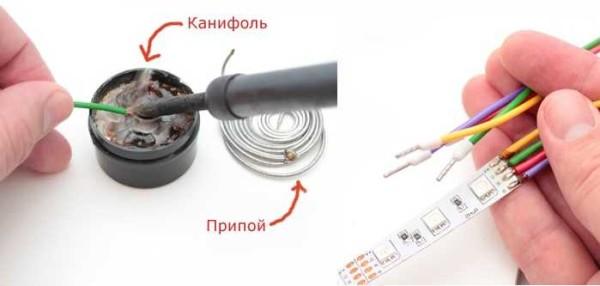
Similarly, it is desirable to tin the contact pads: dip the soldering iron in rosin, heat the pad. Make sure that the tin does not flow beyond the pads. Take the prepared conductor, place it on the pad, heat it with a soldering iron. The tin should melt and tighten the conductor. Hold the conductor in place for about 10-20 seconds (sometimes it is easier to hold it with thin pliers or tweezers – the conductor gets warm), twitch it. It should hold firmly. Solder all the necessary conductors in the same way.
On RGB tapes with 4 wires, make sure that the pads are not connected during soldering. The distance between the pins is very small, the slightest sweat can ruin the whole thing. Be careful.
Watch the process of soldering diode tape in the video. You will need to repeat everything.

")


Connecting an LED strip is a game changer for any vibe! I recently decked out my room, and it totally transformed the atmosphere. Just make sure you get the right power supply and connectors; otherwise, it’s all in the dark! Seriously, you won’t regret brightening up your space!
Oh man, connecting that LED strip was a blast! I was all set, got my tools, and boom, the colors lit up! I love how easy it was—just splice and connect. Now my room feels like a vibe zone! Gotta try it with music next!