

You can run the cable through the plot underground. This is a more labor-intensive process, but more reliable in terms of safety – there is less chance that someone will borrow it. This moment is especially relevant at dacha and garden plots. But cable laying in the ground is made according to certain rules, prescribed in the PUE. These rules and explanations to them and are set out further.
Artikli sisu
What cables to use
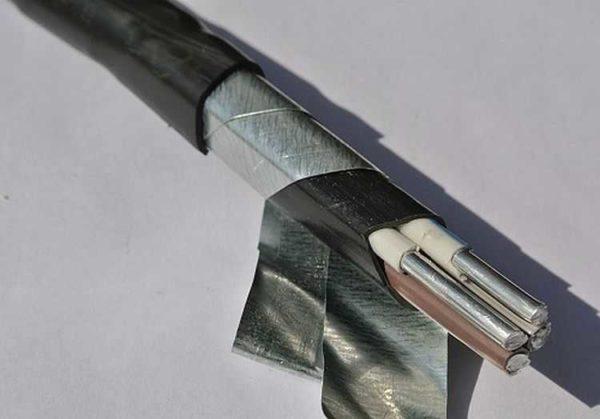
If we talk about GOST, then it says that armored cables should be laid in the ground, covered from above with a waterproofing layer. That is, the underground entry into the house from the pole, with a sufficiently large allocated power is desirable to do armored cable. This AVBbshv (armored with aluminum conductors and armor made of two steel galvanized strips, covered with a protective layer on top) or VBbshv (the same, but with copper conductors), PvBShv – also armored, but with insulation made of cross-linked polyethylene and the same steel bands as armor. Suitable AASHp, AASHv, AAB2l, AAP2lShv, ASShl and so on. These types of cable products are used on lands with normal acidity.
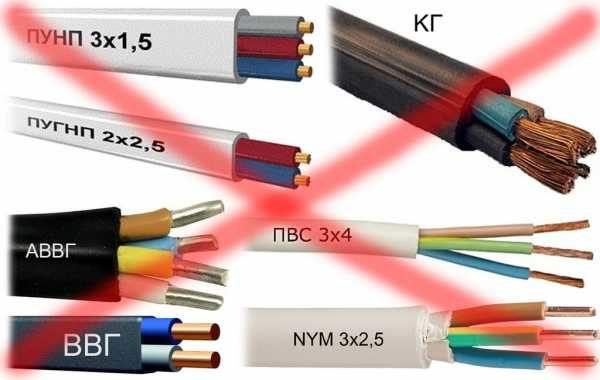
Cable laying in the ground with increased chemical activity – salt marshes, swamps, large amounts of construction debris, slag – requires lead armor or aluminum sheathing. In this case you can use AABl, AASHv, AAB2l, ASB, AAPl, ASPl, AAP2l, AASHp, AVBbshv, AVBbshp, APvBbshv and others.
If you need to connect a small dacha, which has only a few electrical appliances, bathhouse, barn or other outbuildings (pigsty, chicken coop, etc.), you can use the usual cable in PVC sheathing, as it is strong enough and precisely sealed. For wiring lighting on the site often use NYM, CIP, for a few years is enough VVG. But these products are not designed for laying underground and they quickly fail.
More serious cables cost, of course, more expensive, but they serve much longer. If you take into account the labor intensity of work on their installation, it is more appropriate to use special cables, and this is AASHv, AASHp, AAP2l, AVVG, AABl, APSVG, ASB, AAPl, APvVG, APVG, ASPl, etc.
In the regions of the Far North for underground laying use special products with increased resistance to frost – PvKShp.
Basic rules and technology
First it is necessary to develop a cable laying route. It is clear that when laying in a straight line, it will require a smaller amount. But, unfortunately, this is not always possible. When laying the route, it is desirable to avoid:
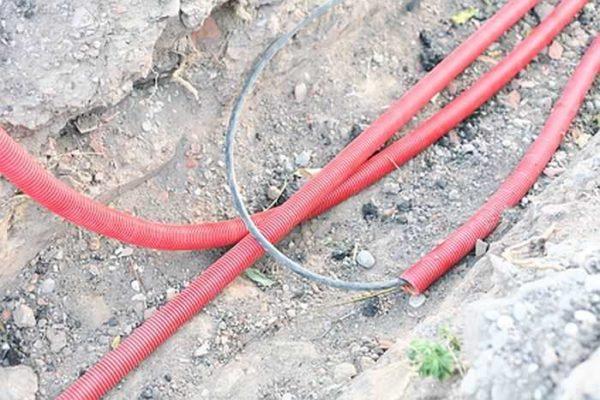
If it was not possible to avoid all the difficult places – it is not terrible. In these areas, you can lay the cable not in the ground, but in a corrugated tube, HDPE pipe or metal. These are what are called cases. When using several pieces of metal pipes in a row, they must be welded. This is done so that in the joints they do not damage the sheath.
Procedure and technology of cable laying in the ground
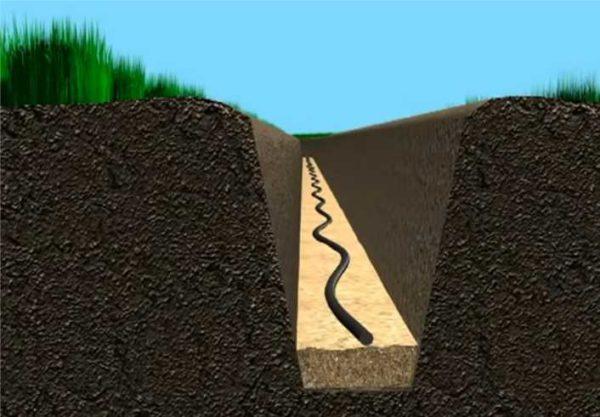
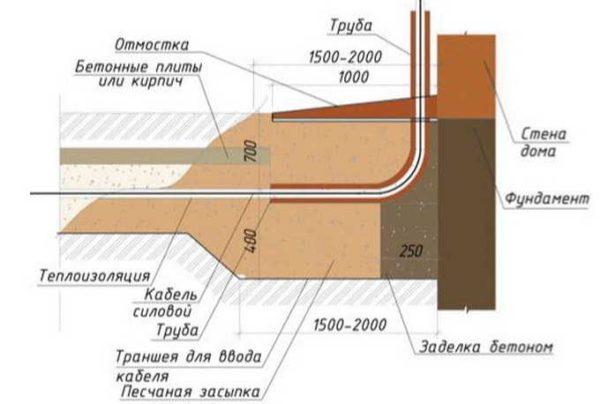
A trench is dug along the planned route. Its depth – 70-80 cm, width when laying one cable – 20-30 cm, when laying two or more, the distance between the threads laid at the bottom of the trench should be at least 10 cm. These are the criteria and determine. After the trench is dug it is necessary:
- Remove all hard and sharp objects, roots, rocks, etc. They can damage the insulation and can cause the line to fail.
- Level the bottom and tamp it slightly. It is not necessary to make it level, but there should not be any sharp drops.
- Pour a layer of sand in 10 cm, level it. Sand can be used cheap, quarry sand, but it must be sifted – so that foreign objects – stones, pieces of glass, etc. – do not get in. Tamp the sand too. You can just tamp it down with your feet. There should be no obvious humps and hollows.
- Check the integrity of the insulation, if there is damage somewhere, repair it. The cable is preliminarily put on cases (pieces of pipes), drag them to the places of increased load.
- Further and begins the actual laying of the cable in the ground – it is laid in a trench with sand. It should not be stretched – it should lie in light waves. Cases are placed in the right places of the route.

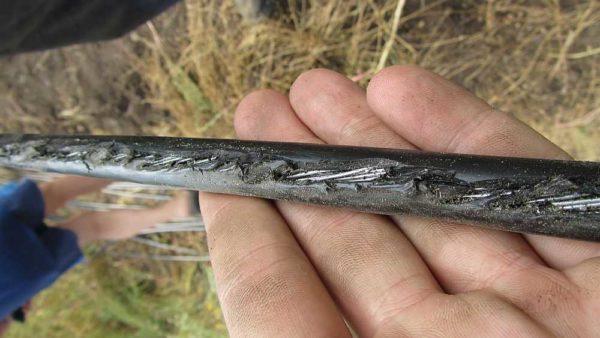
- It is desirable to check the laid cable – there may be damage during laying. If you have a megometer – great, check the integrity of the sheath with it. If you do not have such a device, you can call the cores for breakage with an ordinary multimeter or tester. It is also necessary to check them for “ground”. If somewhere “earth” – damaged insulation. It is necessary to search for damage and eliminate it.
- If all parameters are normal, draw a plan of the route, preferably to scale, with reference to landmarks. Draw distances from reliable objects to the route (from the corner of the house, the edge of the site, etc.). Laying cables in the ground is inconvenient because it is difficult to get access in case of repair. If you have a plan with dimensions, everything will be much easier.
- After that, you fill the laid cable with sand. It is also sifted and the layer is poured – about 10 cm, compacted. It is not necessary to compact it strongly, you can compact it with your feet.
- Next, pour a layer of 15-20 cm of previously removed earth. When backfilling, remove stones and other foreign objects. The layer is also leveled and compacted.
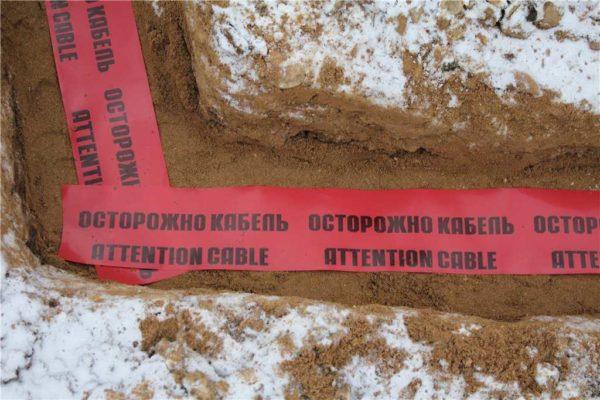
- Lay the signal tape. This is a bright polymer tape with the inscription “careful cable!”. During ground works it can save the electrical wiring laid underground from damage.

- After the ditch continues to be backfilled with soil, pouring a little above ground level, as after some time the rock will compact and settle.
The last step is to check the electrical parameters before connecting to the load. This completes the laying of the cable in the ground. Once again, the entire order of work can be seen in the video.
Nuances and peculiarities
Laying cables in the ground is a labor-intensive process. It costs only to dig a trench, and then carry the cable is also not easy. To bury a little easier, but also not the most pleasant occupation. If in a couple of years, the insulation will crack, you will have to do it all over again, which will not make anyone happy. Clearly, it is better to do everything once and more reliably. The fact is that the cable can be laid in the trench without a protective sheath. This will not contradict the norm. And if you lay armored quality cable, it will serve for a long time.
But if you lay ordinary VVG or NYM, for greater reliability, it is better to lay it in double-wall corrugated hose DKS throughout. In the necessary places additionally put on cases of more rigid pipes or the same DCS but of larger diameter. Often asbestos-cement or plastic thick-walled pipes are also used. At such cable laying in the ground the risk of its premature failure is much lower – the most part of loads falls on pipes, but not on the protective sheath and conductive cores.
Laying cable in the ground in plastic or asbcement pipes, corrugated hose has another plus: there is a high probability that if necessary, it can be replaced simply by tightening it in place of the old. The new one is tied to the old one, the old one is pulled out, and a new one “crawls” in its place. But this is not always possible: over time, both the pipe and the corrugated hose can collapse – the impact of ice, loads from the ground contribute to the destruction of protective sheaths.
From all this it follows that although the norms do not contradict the laying of cables in paper insulation, it is better to use plastic insulation – PVC or cross-linked polyethylene. Paper, albeit with special impregnations, deteriorates much faster than polymers, which brings the replacement period closer. Laying cables in the ground still requires considerable effort and labor, so it is better to lay more durable materials.
How to connect two pieces
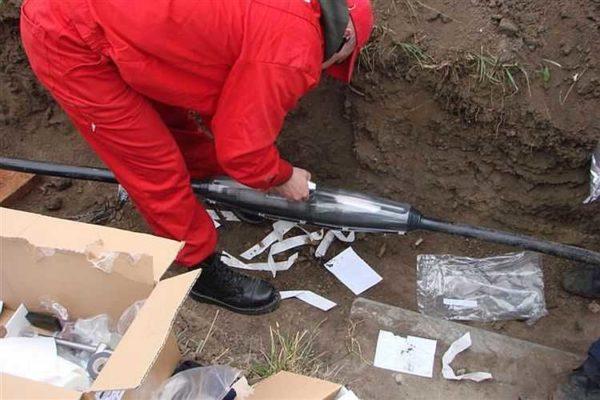
It is more reliable to lay cable in the ground in whole pieces – without connections. If one piece of the required length could not be found, to connect, bring both pieces to the surface, put a sealed mounting box and in it connect the conductors. Make couplings without experience and special equipment, bury them under the ground is not worth it – they will quickly fail, you will have to excavate, redo. A serviceable coupling is always convenient – if necessary, you can reseal the contacts.
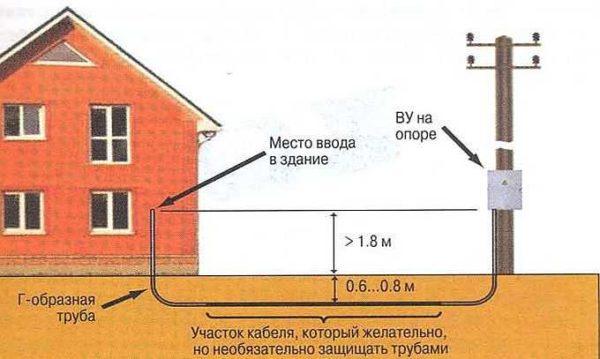
How to enter the house
When entering the house, bathhouse, outbuildings, passing the cable under the foundation is inadmissible. Even if it is a shallowly buried strip foundation. In general, when pouring the tape, for cable entry into the house, it is bricked up embedded. This is a section of pipe, which is a few centimeters beyond the foundation. The cable is inserted into it.
The cross-section of this embedding should be 4 times the cross-section of the cable. And to keep the remaining gap free of animals, after laying the tab is sealed. For sealing you can use the old grandfather’s method – a rag soaked in cement milk, or fill everything with mounting foam.

If you did not make a mortgage during construction, you will have to drill a hole in the foundation, insert and seal the pipe. Then the whole technology is the same.
-

- If no embedding was made in the wall or foundation, a hole is drilled.
-
- The pipe is inserted into the hole, it is foamed, and the cable is inserted into it.
Another option: in a metal pipe to raise the cable to a certain height along the wall of the house. Raise usually to the mark where the input cabinet hangs. At this height, install a tab in the wall (the same metal pipe with the same parameters and rules) and through it lead the cable into the house. This method is suitable if your foundation is a monolithic slab or just do not want to break the monolithicity of the tape.
When using an armored cable, its armor should be grounded. To do this, a sheathed wire is welded/soldered to the armor, and it is wound to the “zero” in the switchboard. If this is not done, if a phase failure occurs, it will most likely end up on the armor. If someone touches the armor, in the best case he will get an electric injury, in the worst case it can be fatal. If the protective metal sheath is earthed (or rather, grounded), the breakdown will trigger a circuit breaker, which will cut off the power supply until the cause is identified and eliminated.
If there are several cables
If several cables are laid underground at the same time, the distance between them should be at least 10 cm. If you decide to lay them in pipes or corrugated hose, a separate one for each one.
How to tighten into a corrugation or pipe
There are two types of corrugations for underground cable installation – with and without a probe. It is easier to take with a probe. This is a thin wire to which the wiring is tied to pull it inside. The wire is pulled out, and the cable is tightened in its place. It’s simple.
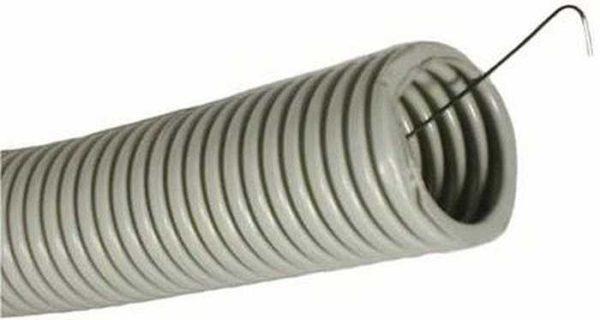
If the pipe or corrugated without a probe, there may be problems. If the cable is stiff enough, it may well just be tucked inside. This is usually not difficult, but can be quite time consuming.
With a soft conductor this trick will not work – it will twist and cling to the walls. But in this case, too, there is a way out. First, a twine or thin rope is tucked into the pipe. The cable is tied to it and pulled inside.
How to tuck the twine? With a vacuum cleaner. One edge of the twine is well fixed, the rest of the unrolled, but without lumps and loops, is placed in the pipe. On the other side connect the vacuum cleaner, close the second inlet. Due to the creation of a rarefied atmosphere, the twine flies out from the other side.
Laying the cable under the road
If the route is located so that it is necessary to conduct it under the road, you will have to take permission from the organization on whose balance is this road. This point is mandatory in populated areas, as under the road may be other communications and unauthorized work can damage them. If we are talking about dachas and dacha settlements, then it is necessary to coordinate with the administration of the settlement.

The rules of cable laying under the road do not change – the depth of the trench is 70-80 cm, sand cushion and backfill, it is desirable to lay the cable in an asbestos-cement pipe or double-wall corrugated DCS. In general, there are no differences, all norms and rules are the same.
Difficulties may arise when it is necessary to lay the cable under the asphalt. If it is a solid route, you are unlikely to be allowed to destroy the coating, and if they do, the restoration of asphalt is an expensive pleasure. In this case, too, there is a way out – there is a special equipment with the help of which make a puncture under the road. The service is also not cheap, but it costs much less than the cost of asphalt restoration.


")